Do you want to get into LED light projects? Using the WLED library you can have some pretty cool LED effects without having to do any coding and very little configuration. Just flash firmware, connect the lights, and go. Read on for details!
Table of Contents
Background on the path to WLED
If you’ve been reading my site, you know that I’ve wanted to play around with LED lights for some time. The holy grail of LED lights for me are individually addressable LED strips and strings. These allow you to control each individual light by itself, so your strip can be just about any combination of colors. This allows for great effects like can be seen here:
Then you can take the time to install permanent lights around your house for amazing effects like the ones below:
Building animations like these seemed intimidating, so I put it off until I had a lot of time to dedicate to it.
I usually start putting up my Christmas lights around Veteran’s day. I don’t have the most elaborate setup. It usually takes me about 4-6 hours to get all my lights into place. I start early so I can enjoy them for longer. Right about the time I started putting up lights, I noticed a video from Dr. Zzs that simplified LED light control and inspired me to at least put up a few LED lights:
Using the WLED library, I wouldn’t easily be able to make super custom displays, but I could make some pretty impressive effects with very little programming or configuration work at all. I was able to get my first LED strip lights up and running so quickly that now I have some permanently installed over my patio for year-round lights, some temporarily installed as Christmas decorations, and I’ve used them to add pizazz to my Christmas tree.
There are tons of cool animations that come out of the box with WLED. There’s so much you can do! Still interested? Let’s get started!
What you need to get started
I’m going to go through a comprehensive list of the materials I used to put together my LED lights. It may seem like a lot, but it really isn’t and all of these things can be bought pretty inexpensively. And, you probably have some of these things already. I’ll go through each set of items and explain what they are and why they are needed. I’ll also discuss how to make a decision when there are options. Finally, I’ll summarize everything in one convenient spot for you.
NodeMCU controller
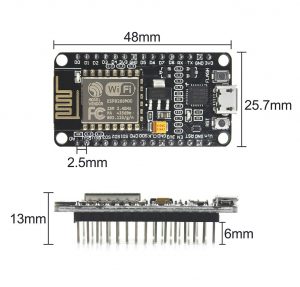
You’ll need a NodeMCU (ESP8266 chipset) to run the WLED firmware. You can get these all over the place pretty inexpensively. The latest ones I purchased were this 3 pack from Amazon. I think it is good to have a few of these around because you can use them for controlling things like irrigation systems and LED lights, to create multi-sensors (temperature, humidity, motion, light level), and so many other things.
The nodeMCU is what actually sends the signals to each and every LED in your LED strip to tell it what color to be.
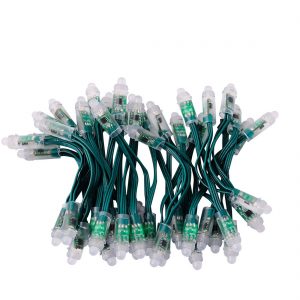
Addressable LED light strips
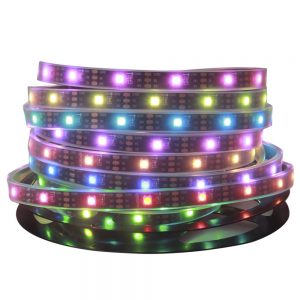
These come in a wide variety. To keep it simple you should consider a couple of sets of options, and then I’ll give you my recommendations.
You can get LED as string lights (which look like the typical Christmas light strings you get) or you can get LED strips. LED strips usually pack in many more lights per foot, but wouldn’t look good around a tree :).
Generally speaking, addressable LED light strips come in 12V or 5V varieties. 5V makes for easier wiring because the NodeMCU also takes 5V. The downside of 5V lights is they are more susceptible to voltage drop. In simple terms, a voltage drop is the decrease of voltage across the strip over distance. Voltage drop will result in LED colors not being as bright the farther away they are from where power is supplied. You can fix that by supplying power at multiple points in the LED strip.
The key thing to know is that 5V LED strips experience more voltage drop than 12V strips. You can run more 12V lights without injecting power than you can 5V LEDs.
You can learn a lot more about the different types of LED lights by watching the video below from The Hookup. My general recommendations for LED lights, based on pricing, performance, and ease of use are:
- 5V WS2812B for LED strip lights
- 12V WS2811 for LED string lights
Power Supply
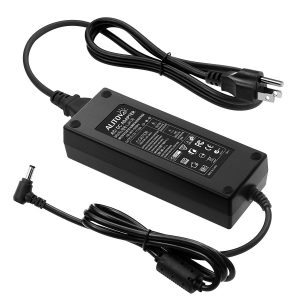
LEDs and the nodeMCU powered by WLED need power to run. If you are using 5V LEDs you need a 5V power supply, and if you are running 12V LEDs you need a 12V power supply. You need to pay attention to how many amps you need. Each LED string/strip should have a rating for how much power they use. Power = voltage times amps, so if a 5V strip uses 15 watts you want a 5V power supply with at least 3 amps of current. A good rule of thumb is that you need 1 amp for every 50 LEDs.
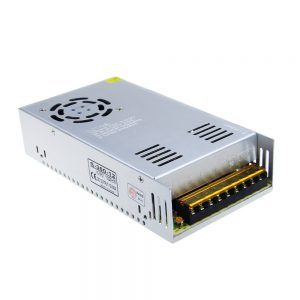
In addition to the voltage and ampere rating of the power supply, you also have a choice in the type of housing of the power supply. The traditional “laptop” style power supplies like above are good for a strip or two. If you are going to wire up quite a few strips with multiple power injection points, you’ll probably want something with a bit more power and ease of multiple connections like the following power supply:
Keep in mind, if you are using 12V LED lights and power supply, you will need a step-down converter to power the nodeMCU. I recommend and use the following step down converter:
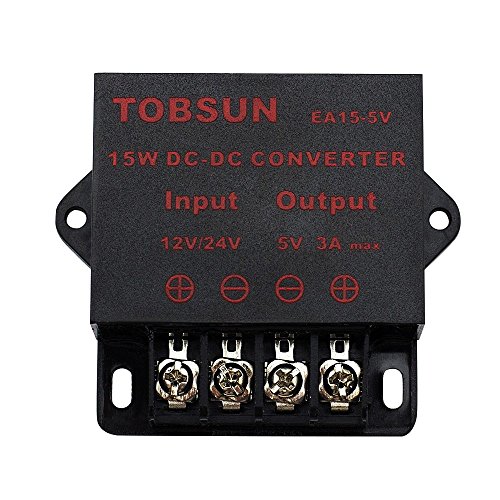
- Convert unstable 8V-40V DC power supply into stable 5V 3A DC power output
- Over-voltage, over current, over temperature, short circuit auto protection, and can return to normal conditions in the work
- Essential for car audio system or other 5V car products (particularly useful in vehicles with 24V power supply)
A summary of what you need
I didn’t mention this above but you’ll need some basic wiring tools and connectors, but no soldering is necessary. You may already have some of these:
- Wire Cutters/Stripper – You’ll need to cut and strip wires to make connections
- Jumper wires – These are needed to connect the nodeMCU to power and to the LED strip
- 18AWG or 20AWG Wire – Wire needed for running power to LED strips. I recommend 18 AWG if you are using 12V lights.
- DC power jack adapters (barrel connectors) – There are many ways to connect up wires, but I prefer barrel connectors.
For LED strips I recommend:
- NodeMCU controller
- 5V WS2812B LED strip lights
- 5V 5 amp power supply for 250 LEDs or less, or a 5V 20 amp power supply for up to 1000 LEDs
- Optional: A case. You could use a soapbox. I used something similar to these and drilled a hole in them for wires.
For LED strings I recommend:
- NodeMCU controller
- 12V WS2811 for LED string lights
- 12V 5 amp power supply for 250 LEDs or less, or a 12V 20 amp power supply for up to 1000 LEDs
- A 12V to 5V step-down converter
Setting up your LED lights in 10 minutes
All that may seem like a lot, but really you just need to focus on what to buy if you want to get started quickly. You can get all of the equipment above (with just 1 string/strip of LEDs) for around $50 through eBay and Aliexpress, and maybe a bit more through Amazon. Now that you have everything, let’s get to it.
Step 1: Install NodeMCU PyFlasher (2 minutes)
We are going to flash the WLED firmware using NodeMCU-PyFlasher. If you are running Windows or a Mac, this is pretty straightforward. You just go to the NodeMCU-PyFlasher site linked earlier and download and run the appropriate executable. Nothing needs to be installed. Linux, which is what I use, takes a few more steps.
Download the source code from the NodeMCU-PyFlasher site. I have the code in ~/bin/nodemcu-pyflasher-master. Make sure you have Python 3 and pip installed. You are going to create a Python virtual environment to run the NodeMCU PyFlasher code with the following commands (run on Ubuntu 18.04):
cd ~/bin/nodemcu-pyflasher-master
python -m venv venv
This creates a python virtual environment. Now you need to activate it and install the necessary python libraries:
. venv/bin/activate
pip install -r requirements.txt
The requirements.txt file should be in the directory that contains the source code you downloaded earlier (again, in my case ~/bin/nodemcu-pyflasher-master). You should see a whole bunch of python library installs.
Step 2: Upload WLED firmware to NodeMCU (1 minute)
First thing is to go and download the latest WLED firmware. At the time of this writing, the latest version is 0.8.6. Next, run the NodeMCU PyFlasher. On Windows and Mac this is as simple as clicking on the executable. For Linux you need to do the following:
Go into the directory you created the Python virtual environment in, activate the virtual environment, and start the NodeMCU PyFlasher:
cd ~/bin/nodemcu-pyflasher-master
. venv/bin/activate
./nodemcu-pyflasher.py
Plug the nodeMCU into a USB port on your computer. In the PyFlasher UI select the serial port the nodeMCU is connected to (if you aren’t sure, use the “dmesg” command right after plugging the nodeMCU in). Next, select the firmware you downloaded and click the “Flash NodeMCU” button. You should see a screen like below upon successful completion.
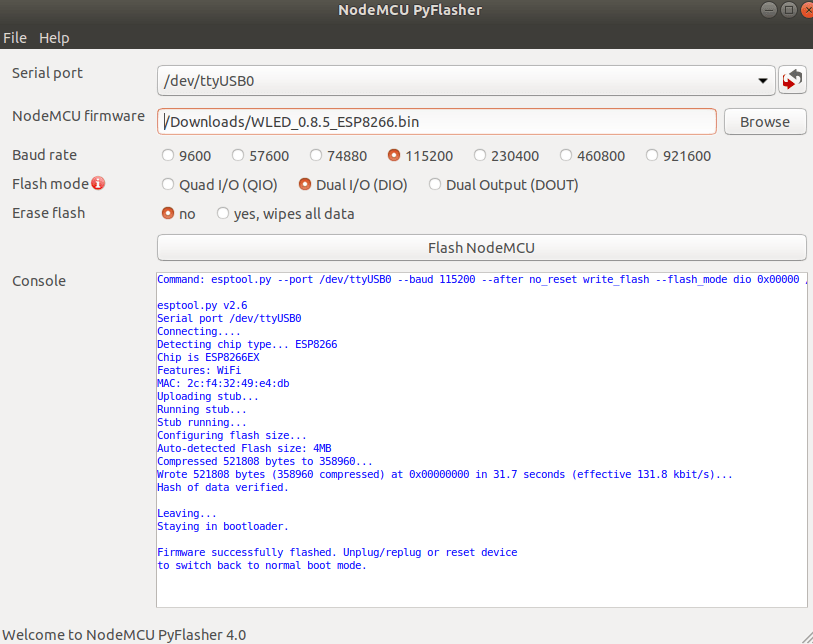
Note: I took this screenshot with a slightly older version of the WLED firmware (0.8.5).
On Linux, I had to explicitly allow write privileges to the nodeMCU serial port for this to work. I probably also could have run the PyFlasher with root privileges.
sudo chmod a+rw /dev/ttyUSB0
Congratulations! You have WLED running on your NodeMCU.
Step 3: Connect to your nodeMCU and configure WLED WiFi (1 minute)
Now you need to disconnect and reconnect your nodeMCU so it will startup. A few seconds after it starts up it will go into access point mode. Using a mobile device, connect to the wireless network called WLED-AP. Depending on your device, you’ll be prompted to sign in (default password is wled1234) and will be taken to the UI of the WLED interface. If you aren’t prompted, open a browser and connect to http://4.3.2.1. From here you can click the cog icon to edit settings. For now, you should just enter settings to connect to your home network. I highly recommend using a static IP or assigning the device a static lease using your router.
Step 4: Wire up the nodeMCU to your LED lights (5 minutes)
This is the longest step in this how-to and it is only 5 minutes! Just follow these steps for 5V lights:
- Disconnect your nodeMCU from any power
- Using jumper wires:
- Connect the Data wire from the LED connector to the D4 pin on the NodeMCU (in my diagram below, that’s the green wire)
- Next, connect the 5V wire from LED connector to the Vin pin on the NodeMCU (the red pin in my diagram)
- Finally, connect the ground wire from the LED connector to the GND pin on the NodeMCU (the white pin in my diagram)
- Next, use your wire strippers to connect the two lead wires (5V and ground) coming from the LED to a female barrel connector. This may be easier to see in the second image below
- Last, connect power to the barrel connector you just wired. Your NodeMCU blue light should come on and you should be ready to go!
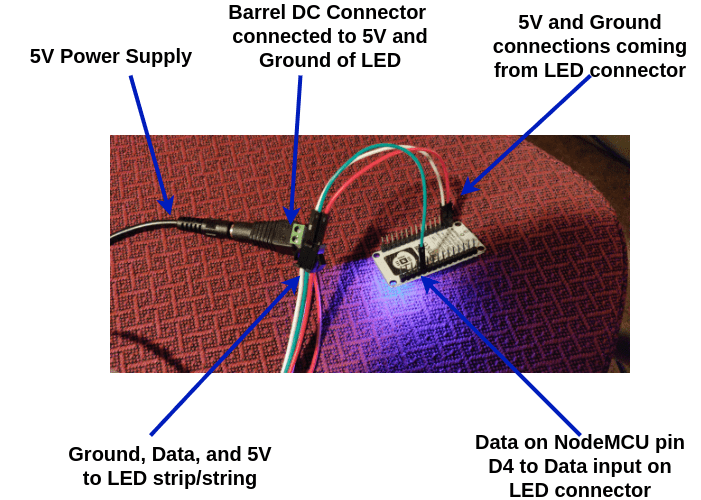
Note the colors of your wires may be different. Be sure to double-check which color is 5V, data, and ground before making the connections. Here’s a look at a different angle in case it helps.

Step 4b: Special considerations for 12V lighting
If you are using a 12V LED the wiring steps are mostly the same. However, you need to use the step-down converter referenced above and make the following wiring changes:
- Use an extra barrel connector to connect the 12V power supply to the 12V input of the step-down connector.
- Connect the 12V and ground wires coming from the LED (red and white in my picture above) directly to the corresponding 12V terminals in the step-down connector
- Instead of connecting the NodeMCU ground and 5V to the LED connector, you connect them to the 5V terminal of the step-down connector. The NodeMCU only connects to the LED connector with the data pin (D4)
Basically, you don’t want to connect 12V to NodeMCU because you will fry it. They need to share the same ground, so use a 12V step-down to supply the NodeMCU with 5V and the LED string with 12V.
Step 5: Connect to the WLED controller and play! (1 Minute)
Assuming everything is wired up, you can now go into WLED interface and play. Using the IP address you assigned when you set up the WiFi, connect to the WLED interface. The desktop interface looks like:

The mobile interface looks like:
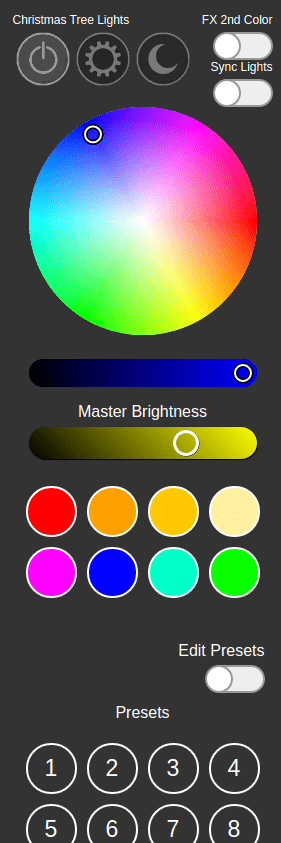
You can also download the WLED app (iOS, Android), which is really useful when you have multiple controllers. From the web site or app, you can set up colors, effects, presets, and many more options. I could detail them all here, but Dr. Zzs already has an extensive video that you should check out:
WLED Home Assistant Integration
If you read my site, you know I’m a big Home Assistant fan. It’s the best smarthome hub out there for me. As of version .102 they’ve added native WLED integration. You can also integrate WLED using MQTT. Integrating with Home Assistant allows you to coordinate LED colors and effects with other events happening in your smarthome. For instance, I change the colors of the Christmas lights depending on when certain sports teams are playing. I also automate when they turn on and off. WLED Home Assistant integration is pretty easy, and Dr. Zzs to the rescue again with another video:
Example Results: My Christmas Tree
One place I put LEDs is on my Christmas tree. I used 4 50 LED 12V string lights to allow for great animations and effects. It’s nice to be able to change the colors without changing the lights. Below are a couple of pictures of different effects. These are stills of moving effects, but I think you get the idea.


Final thoughts
So there you have it. Once you have all the materials together you can literally have LED lights working in 10 minutes. WLED is great for those who want to get into addressable LEDs but are intimidated by what it takes (that was me!). Finding out how easy it can be done has moved me from one LED strip and controller to many LED strips in various places with 4 different WLED controllers and I’m still expanding.
Since writing this post, I’ve greatly expanded my use of LED around the house. If you want to know more about what I did and see some videos of the results, check out my LED planning article.
If you want to do LEDs, but are looking for something a little more polished off the shelf, check out the Shelly RGBW2. You can’t do as many effects with it, but it’s solid, easy to use, and easy to integrate with Home Assistant. You can also check out my recommendations for easy-to-use smart LED strips and strings that work out of the box.
I hope this was helpful to you. Let me know your thoughts on Twitter or in the comments!
This page contains affiliate links. If you purchase an item using an affiliate link I will receive a small commission at no cost to you. Affiliates do not influence my recommendations. Read my disclosures for more information.