
Chromebooks keep rising in popularity as more and more work can be done from the cloud. Web apps, combined with Android and Linux apps, have risen in quantity and quality to fill the software needs of most people. In today’s remote world, there’s a good chance you either own a Chromebook or are in the market for one (here’s why you should be considering a Chromebook, and here’s a list of some of the best Chromebooks for everyone). Here are 23 Chromebook tips that will help you get the most out of your Chromebook.
This page contains affiliate links. If you purchase an item using an affiliate link I will receive a small commission at no cost to you. Affiliates do not influence my recommendations. Read my disclosures for more information.
Chromebook Tip #1: Keyboard shortcuts
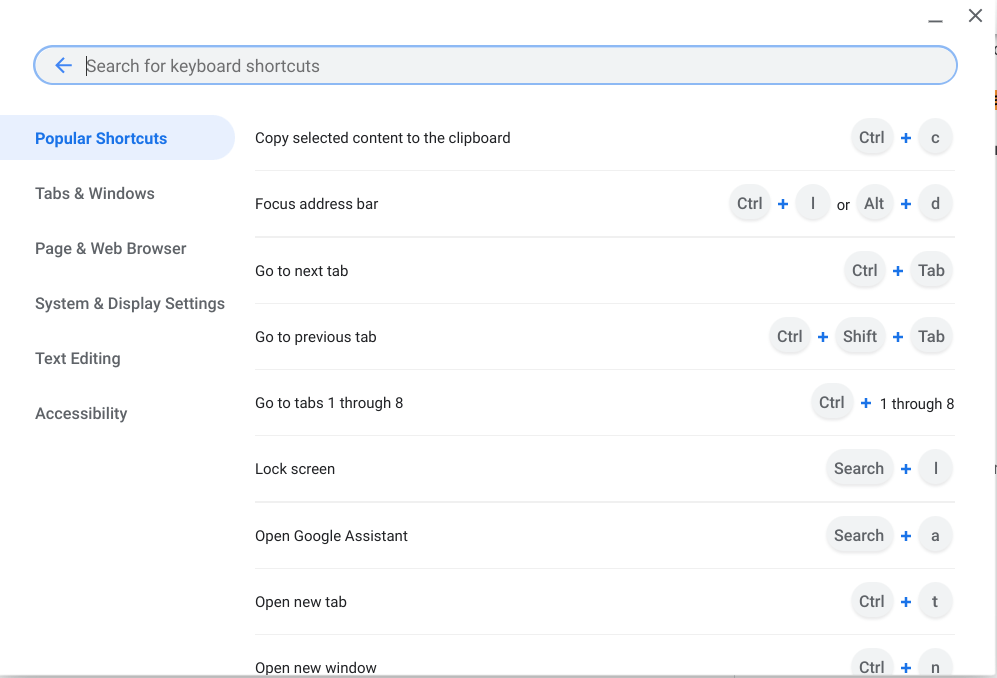
Chromebooks have an incredible number of keyboard shortcuts, but it is hard to remember them all. Luckily, you really only need to remember one shortcut: Ctrl + Alt + / (forward slash). This command will show you all the keyboard shortcuts you can use. You can even search for what you are looking for.
Chromebook Tip #2: Split screen mode
Splitting your screen into two windows side by side can be a useful productivity tool. You can do it on a Chromebook just like you can in Windows. Drag and drop your apps to the corresponding left and right edges of the screen. The Chromebook will do the resizing for you.
Chromebook Tip #3: Chromebook perks
Did you know your Chromebook comes with perks? This is one of the Chromebook tips that many people neglect. Google rewards you for purchasing a Chromebook by giving you access to perks like free subscriptions to Disney+ and Stadio pro and 100 GB of cloud storage with Google One for 12 months. The perks change over time but you can see the updated list of Chromebook perks here.
Chromebook Tip #4: Powerwash to start over
It doesn’t happen often, but sometimes you start having problems with a computer that you just can’t figure out how to fix. When this happens with a Chromebook, you can just “powerwash” it. No, this doesn’t mean soaking it in dishwater. A Chromebook powerwash resets your Chromebook to factory settings, erasing all of the user data on the hard drive as well as all the accounts on the Chromebook. This differs from resetting a Chromebook, which restores Chrome settings to their default, but leaves your accounts, browser history, and saved passwords intact. There are a couple of ways to powerwash your Chromebook, which are well described in this article.
Chromebook Tip #5: Better together (Android phone/Chromebook integration)
Better together is something I don’t hear many people talk about in their lists of Chromebook tips. It integrates your Chromebook and Android phone together so you can share an Internet connection (tethering), the ability to receive, read and respond to Android text messages (SMS Connect), and smart unlock, which I’ll explain in my next tip. You can enable these features in your Chromebook settings under “Connected Devices.”
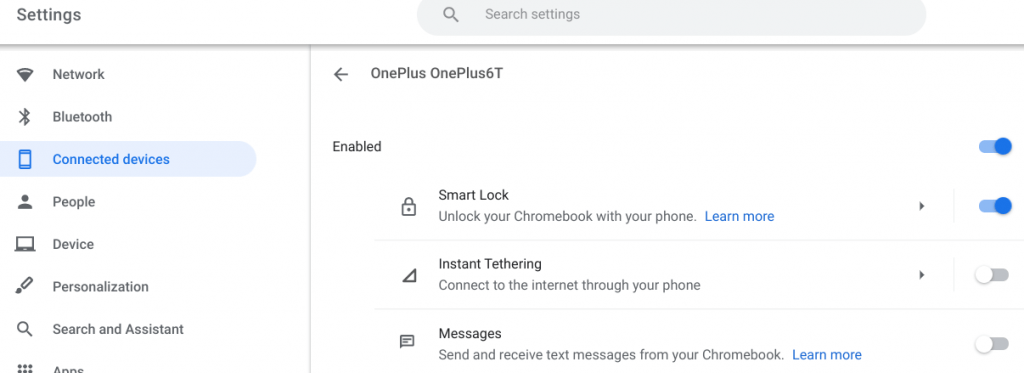
Chromebook Tip #6: Smart unlock
Smart unlock is part of the “Better Together” integration referenced above. Smart unlock allows you to use your Android phone to unlock your Chromebook instead of entering a password or passcode. Once enabled, if your phone is in close proximity to your Chromebook and unlocked, you can log into your Chromebook just by tapping your profile picture. Set up is described in the “Better Together” tip.
Chromebook Tip #7: Chrome Overview (Show all windows)
Like most laptops of any OS, pressing Alt + Tab allows you to select an active window. On Chromebooks, you can also show all windows at once and then select the window you want to be active. Chromebooks have a “show windows” key, which looks like a rectangle with two vertical lines to its right. It is usually above the number 6 key. You can also show all windows by putting three fingers on the touchpad and swiping down.
Chromebook Tip #8: Screenshots
Speaking of the show windows key… You may have noticed I have a few Chromebook screenshots. Most Chromebooks don’t have a dedicated screenshot button. However, screenshots are easy to do and fairly flexible. You can take a full-screen screenshot by pressing Ctrl + Show windows key. You can select what area of the screen you want to capture by holding down the Ctrl + Shift + Show windows key.
Chromebook Tip #9: Casting from your Chromebook
Do you have a cast enabled device like a Google Chromecast, or an Android TV device like the Chromecast with Google TV, JetStream 4K, Nvidia Shield, or the Mi TV Stick? You can easily cast your screen (including video and sound) to a cast enabled device from a Chromebook. Just open up the Chrome browser, go to the 3 dots menu at the top right, and select cast.
Pro tip: You can also cast to Nest Mini smart speakers and the like. You’ll only get sound, but you can play music or podcasts this way.
Chromebook Tip #10: Barrel roll your window
Of all the Chromebook tips this one has the least functional purpose, but it might impress your friends. Just press Ctrl + Alt + Shift + Reload (curved arrow above the 4 key) and see what happens to your active window. I dare you to do it only once. You had to do it multiple times, didn’t you?
Chromebook Tip #11: Run Android Apps
Chromebooks that also have a touchscreen can also run Android apps. All you have to do is open up the Google Play store app and search for and download your favorite app!
Chromebook Tip #12: Run Linux Apps
You aren’t limited to Chrome apps and Android apps with a Chromebook because you can also run Linux apps! You may not be familiar with a lot of Linux applications but if you have a Chromebook you should look into them. Some popular Linux apps include Gimp (an Adobo Photoshop alternative), Calibre (ebook reader), and LibreOffice (Microsoft Office Suite alternative). You can turn on Linux apps in your Chromebook settings menu.
Chromebook Tip #13: Run Microsoft Office
You can use Google Docs. You can run LibreOffice using Linux apps. Or, you can run Microsoft Office. What? Yes, you can. You can install the Android app versions of the Office apps. The free versions (without an Office 365 subscription) aren’t fully featured, but they work well enough for most people.
Chromebook Tip #14: Log out with ease
You can always use the menus to logout of your Chromebook, but there is a faster way to do it. Just hit the key combo Ctrl + Shift + Q (x2). Just make sure you’ve saved all your work first.
Chromebook Tip #15: Use Google Family Link to manage your children’s screen time

Google Family Link is a free service from Google that allows you to manage the screen time of Android devices. It also works on Chromebooks too! If you are looking to set overall screen time limits and schedules, set specific application-level limits, and control the type of content your children can view, take a look at my review of Google Family Link for more information. Did I mention it’s free?
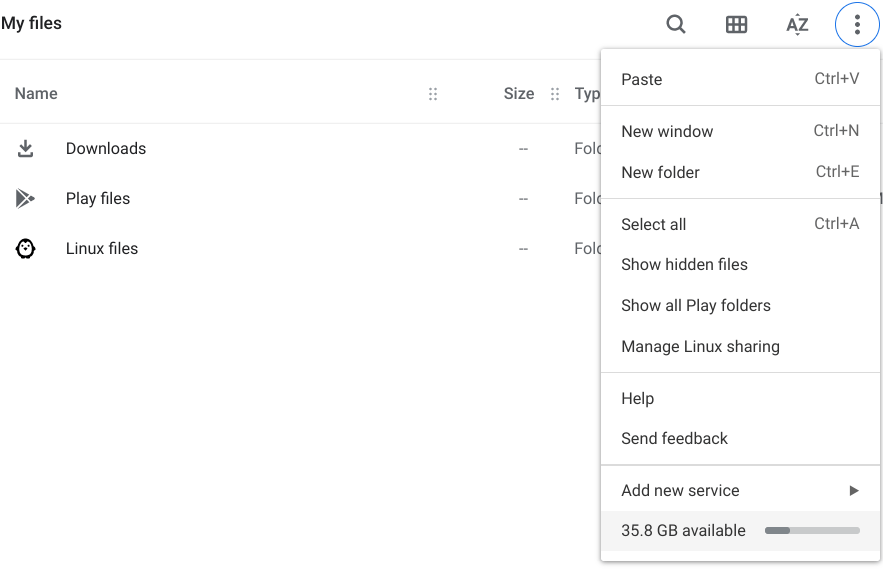
Chromebook Tip #16: Show hidden files
This is one of those Chromebook tips that is for those who want to get into the details of troubleshooting things on their Chromebook. Chromebooks (and other OS’s) often hide system files and other files that start with a period. These files are often used to configure apps and settings and most users never need to mess with them, which is why they are hidden. If for some reason you do need to see or modify the contents of one these files you can just head to the files app, click on the … on the top right, and choose “Show hidden files.”
Chromebook Tip #17: Type special characters
Do you want to use an em dash? Use a superscript or subscript? Or many other special characters? You can do this on a Chromebook by inserting Unicode. Just press Ctrl + Shift + U and the Unicode code you want to insert.
Chromebook Tip #18: Customize the search and other keys
As you read this list of Chromebook tips are you starting the realize how customizable the Chromebook is? On a Chromebook, the traditional Caps Lock key is replaced with a Search button that activates the Google Search popup. If you want it to be a Caps lock key again you can go into the Chromebook settings. Under Device, select Keyboard and then you can change the Search key. You can also reassign the Ctrl, Alt, Esc, and Backspace keys.
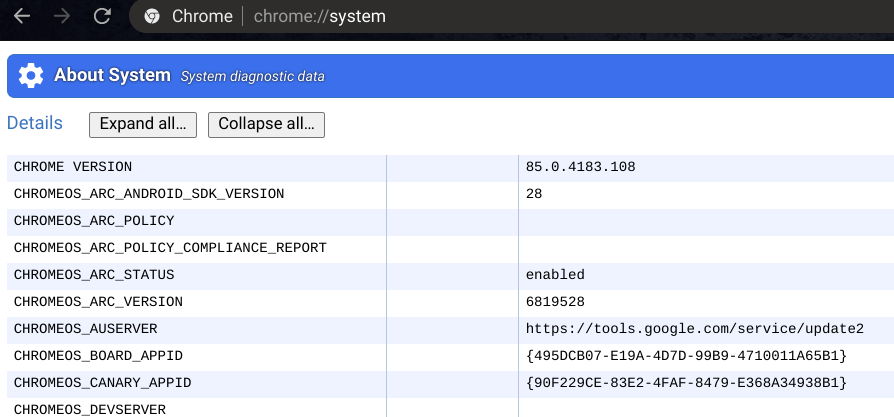
Chromebook Tip #19: Access your system info
People are often interested in seeing their Chromebook system info, but aren’t sure how to do it. The Chromebook has a few ways to show your system info. You can find out about your disk space using the files app (under the three dots menu).
You can find out all kinds of tidbits about your system by opening the Chrome browser and going to chrome://system:
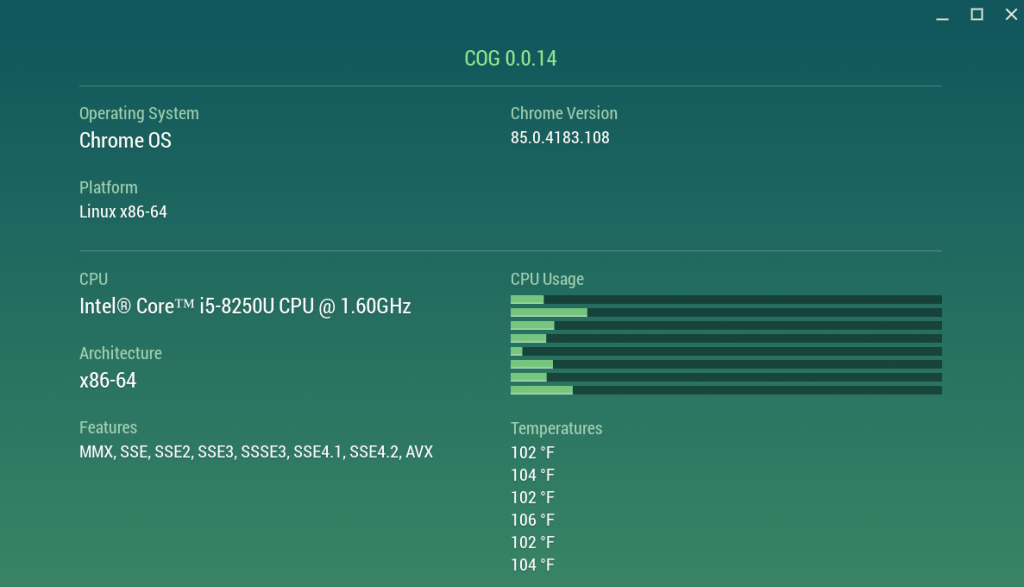
You can also see CPU info and the version of Chrome by installing COG:
Chromebook Tip #20: Offline mode
While it is true that Chromebooks are meant to access cloud services and be online, they can function in offline mode. If you are on a remote desert island and you’ve set up offline mode you can still edit files in Google Drive and they will sync and update when you are back online. To enable offline mode, make sure you are online, open Google Docs and go to the Settings menu. Then toggle the switch that says Offline and hit OK.
Chromebook Tip #21: Chromebook Remote Desktop
Google’s free Chrome Remote Desktop service makes it simple to get on any computer — Windows, Mac, Linux, or Chrome OS — from practically any other desktop or mobile device. You can access all of the remote system’s contents and even click around as if you were sitting right in front of it. While this is more of a Chrome feature than a Chromebook feature, it is still quite useful for Chromebooks.
Signing in to your own Chromebook from afar is pretty easy to set up, as is accessing remote computers from your Chromebook. Here are detailed (but straight forward) instructions on how to set this up.
Chromebook Tip #22: Move the Chromebook taskbar
By default, the Chromebook taskbar is on the bottom of your screen, much like it is in other OS’s. But it doesn’t have to stay there. You can move it to the left or right side. Just right click on your background and select the shelf position you want.
Chromebook Tip #23: Install Chrome extensions
Remember when there was an “app for that?” Well, Chrome doesn’t quite have that many extensions but you’d be surprised at how many are out there and what they can do. If you are looking to extend the capabilities of your Chromebook, check out Chromebook extensions.
Final thoughts
Well, that’s a long list of Chromebook Tips, but hopefully, a lot of these are useful to you. Did I miss any? Let me know in the comments or on Twitter.
Are you interested in other Chromebook articles? Checkout:
- The best Chromebooks you can buy now
- 9 Reasons you should have bought a Chromebook
- HP Chromebook x360 14 review
- Samsung Chromebook Plus 6 month review
Interested in supporting HomeTechHacker?
Have you found the content on this site useful? If so, are you interested in supporting me and this site? There’s no obligation of course, but I would really appreciate any support you can give. Below are a few ways you can show support:
- Share this site with your friends and on social media (use the sharing links at the end of this page for your convenience)
- Subscribe to this site
- Purchase one of my books, The Personal Cybersecurity Manual, The Home Network Manual or The Smart Home Manual, for yourself or as a gift
- Put a link to HomeTechHacker on a site you have access to. Be sure to let me know about it!
- Enroll in HomeTechHacker Academy for free and premium online home technology courses.
- Reach out to me via my contact page or Twitter and let me know something I should write about
- Shop at Amazon through my affiliate links and ads on these pages. See my disclosures for more details about affiliate links. You can also just shop from one of the links below:
- HomeTechHacker Shop: This is a listing of products that I use, have reviewed, and that I recommend
- HomeTechHacker Technology Advisor: This suite of tools will give you customized home technology product recommendations based on your needs
- My Amazon affiliate link: Just click on this link to go to Amazon and shop
Thank you! I really appreciate it!
