I’ve always wanted to add some type of biometrics to my smart home. A while back I found out about and bought an inexpensive fingerprint scanner. I finally got around to using it to solve a long-standing annoyance: My kids playing basketball in our driveway and hitting the cars and garage door opener with their errant shots because they leave the garage door open. Sure, it’s a smart garage door and they could close the door from a phone, or just close it and come outside using another door. But they’re not gonna do that. So, I used a fingerprint scanner to securely (and easily) allow them to open and close the garage door from outside. It was a fun and inexpensive project. Let’s dig into the details!
Editor’s Note: This tutorial was updated on 3/6/2023 to reflect the deprecation of the ESPHome API password in Home Assistant 2023.2.
This page contains affiliate links. If you purchase an item using an affiliate link I will receive a small commission at no cost to you. Affiliates do not influence my recommendations. Read my disclosures for more information.
Table of Contents
Materials I used for this fingerprint scanner project
This is an inexpensive project that doesn’t take a lot of materials. Here’s what I used:


You can get the fingerprint sensor from AliExpress as well, and you can also find the GROW R503 Iron Plate and Plastic Scanner Enclosure which I also used, but isn’t required.
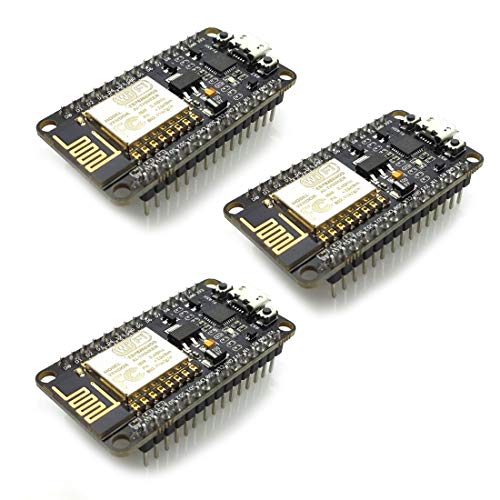
Additionally, I used some electrical tape. I already had barrel connectors, NodeMCUs, breadboard, jumper wires, and a 5V adapter, so I didn’t need to buy those, but I put them here to be comprehensive.
If you are familiar with them, you can use different ESP8266 boards, like the D1 Mini, instead of the NodeMCU. Also, there are many different ways to install the fingerprint scanner and you very well may use something different than a waterproof junction box. And, you could just solder the wires directly onto the NodeMCU instead of using the breadboard. These are just the materials I used.
Here are some of the tools I used:


I recommend these and other tools for DIY smart home projects in my HomeTechHacker Shop.
One last thing… Make sure there is good Wi-Fi where you plan to install it!
Installing ESPHome and flashing it to the chip
ESPHome is a system to control your ESP8266/ESP32 chips using simple yet powerful configuration files and control them remotely through home automation systems. I actually hadn’t used ESPHome before this project even though it is very popular and now officially a part of Nabu Casa (who are the people behind Home Assistant). So, I needed to install ESPHome before using it.
There are many ways to install ESPHome. It works on Windows, macOS, and Linux. Also, it has a Docker container. I’m old school and like the command line, so I went with the Linux Python install using the steps below. If you want to install it another way or on another platform, the links at the end of this article will point you in the right direction.
Install ESPHome via Python
Confirm that your system has at least Python 3.7:
python3 --version
Install ESPHome via pip:
pip3 install --user esphome
That’s it! ESPHome is installed.
Creating the ESPHome Fingerprint scanner configuration
Since I’m new to ESPHome, I decided to use the wizard to create the initial configuration file.
esphome wizard fingerprint-sensor.yaml
This command asked me a few questions, including credentials to my Wi-Fi network and a password to secure ESPHome installation on the chip (this is optional, but recommended). Then it created the file fingerprint-sensor.yaml in the esphome directory in my filesystem.
Editor’s note: As of Home Assistant 2023.2 the password security method of securing ESPHome with Home Assistant has been deprecated. Use the encryption key method.
I then modified the fingerprint-sensor.yaml with a configuration specific to ESPHome interacting with the fingerprint scanner. I’m going to put the configuration below and then mention a couple of things about it.
uart:
tx_pin: D0
rx_pin: D1
baud_rate: 57600
fingerprint_grow:
sensing_pin: D2
on_finger_scan_matched:
- fingerprint_grow.aura_led_control:
state: BREATHING
speed: 200
color: BLUE
count: 1
- text_sensor.template.publish:
id: fingerprint_state
state: "Authorized finger"
- delay: 10s
- text_sensor.template.publish:
id: fingerprint_state
state: "Scan your finger"
on_finger_scan_unmatched:
- fingerprint_grow.aura_led_control:
state: FLASHING
speed: 25
color: RED
count: 2
- text_sensor.template.publish:
id: fingerprint_state
state: "Unauthorized finger"
- delay: 10s
- text_sensor.template.publish:
id: fingerprint_state
state: "Scan your finger"
on_enrollment_scan:
- fingerprint_grow.aura_led_control:
state: FLASHING
speed: 25
color: BLUE
count: 2
- fingerprint_grow.aura_led_control:
state: ALWAYS_ON
speed: 0
color: PURPLE
count: 0
- text_sensor.template.publish:
id: fingerprint_state
state: "Finger scanned"
on_enrollment_done:
- fingerprint_grow.aura_led_control:
state: BREATHING
speed: 100
color: BLUE
count: 2
- text_sensor.template.publish:
id: fingerprint_state
state: "Enrolled fingerprint"
on_enrollment_failed:
- fingerprint_grow.aura_led_control:
state: FLASHING
speed: 25
color: RED
count: 4
- text_sensor.template.publish:
id: fingerprint_state
state: "Failed to enroll fingerprint"
text_sensor:
- platform: template
id: fingerprint_state
name: "Garage Fingerprint State"
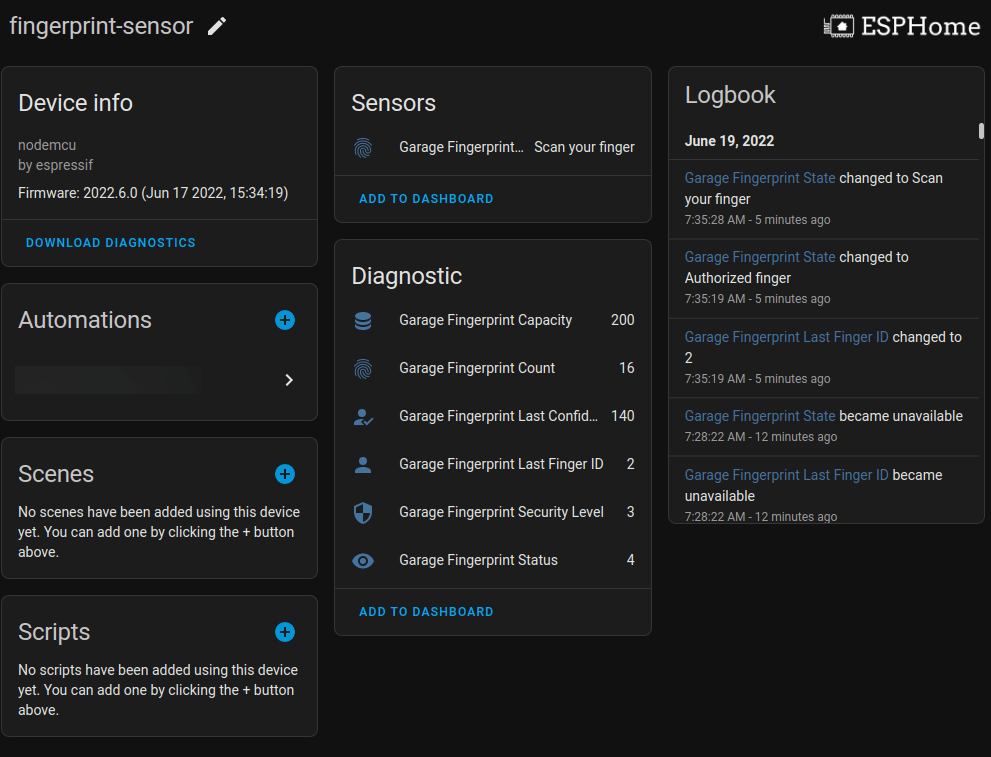
sensor:
- platform: fingerprint_grow
fingerprint_count:
name: "Garage Fingerprint Count"
last_finger_id:
name: "Garage Fingerprint Last Finger ID"
last_confidence:
name: "Garage Fingerprint Last Confidence"
status:
name: "Garage Fingerprint Status"
capacity:
name: "Garage Fingerprint Capacity"
security_level:
name: "Garage Fingerprint Security Level"
esphome:
name: fingerprint-sensor
esp8266:
board: nodemcu
# Enable logging
logger:
# Enable Home Assistant API
api:
# deprecated password: "xxxxxxx"
encryption:
#replace with your own key that you can get at:
#https://esphome.io/components/api.html?highlight=randomly%20generated
key: "YOUR_BASE64_KEY"
services:
- service: enroll
variables:
finger_id: int
num_scans: int
then:
- fingerprint_grow.enroll:
finger_id: !lambda 'return finger_id;'
num_scans: !lambda 'return num_scans;'
- service: cancel_enroll
then:
- fingerprint_grow.cancel_enroll:
- service: delete
variables:
finger_id: int
then:
- fingerprint_grow.delete:
finger_id: !lambda 'return finger_id;'
- service: delete_all
then:
- fingerprint_grow.delete_all:
#to secure firmware updates over OTA
ota:
password: "xxxxxxxxx"
wifi:
ssid: "your-ssid"
password: "xxxxxxx"
# Enable fallback hotspot (captive portal) in case wifi connection fails
ap:
ssid: "Fingerprint-Sensor"
password: "xxxxxxxxxxx"
captive_portal:
Now, I’m far from an ESPHome expert, but here are a few key points:
- This file is written in YAML (YAML Ain’t Markup Language YAML). YAML is a human-friendly serialization language often used in configuration files like the ones for Home Assistant.
- When a finger is matched, the scanner will display a blue ring and switch to a state of “Authorized finger.”
- When a finger is not matched (recognized) the scanner will flash red and switch to a state of “Unauthorized finger.”
- Whether the scanner matches the finger or not, it will reset to a state of “Scan your finger” after 10s. This is so that when you are writing automations in Home Assistant you can trigger off of fingerprint state change. Otherwise, the state would not change when two or more authorized fingers or unauthorized fingers in a row are used.
- When integrating this ESPHome device with Home Assistant, this code publishes the services
esphome.fingerprint_sensor_enrollandesphome.fingerprint_sensor_deletefor adding and deleting authorized fingerprints. - Make sure to put in your own SSID and password for Wi-Fi settings, and OTA updates.
- It also publishes sensors that detail the fingerprint status that can be used in automations. More on that later.
Flashing the configuration to the chip
You’ll need to use a USB cable to connect the NodeMCU chip to your computer to flash the ESPHome configuration the first time. After that, it should connect to your Wi-Fi and be flashable over your network. I simply used the following command to flash my chip:
esphome run fingerprint-sensor.yaml
Replace fingerprint-sensor.yaml with whatever you named your configuration file. You may need to tell it what device your chip is connected to. For me, that was /dev/ttyUSB0. Then I just waited for the magic to happen. About a minute later my chip was ready for wiring!
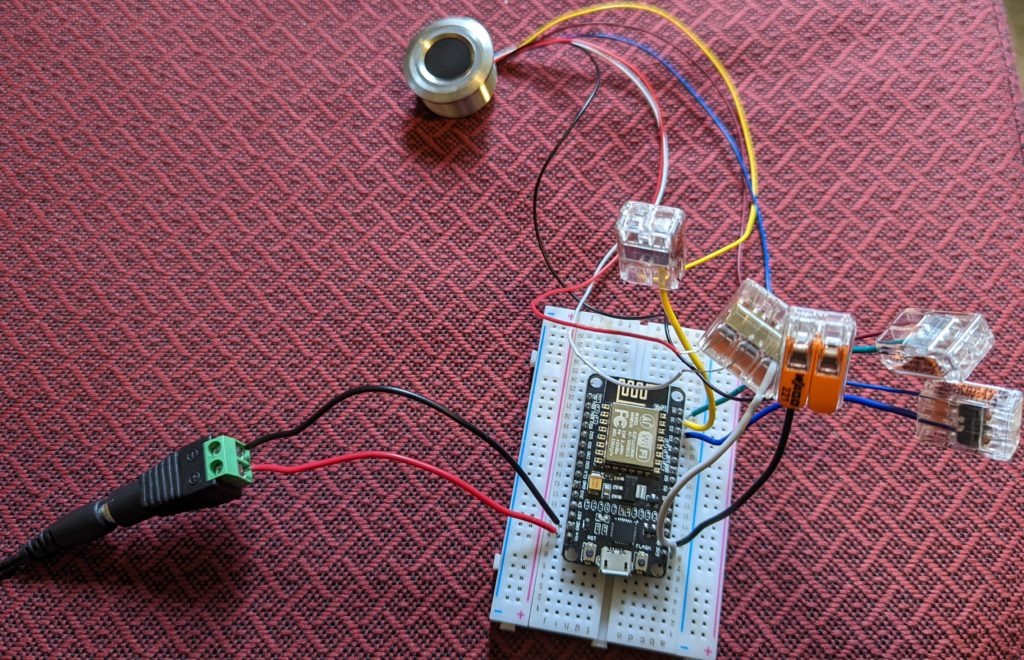
Wiring the fingerprint sensor to the chip
You can use many different techniques to wire and solder the connections. I’m cautious and like to test things before I make permanent connections so I used lever nuts and a solderless breadboard to start with. Below is a pinout diagram for the NodeMCU to help explain how to make the connections:
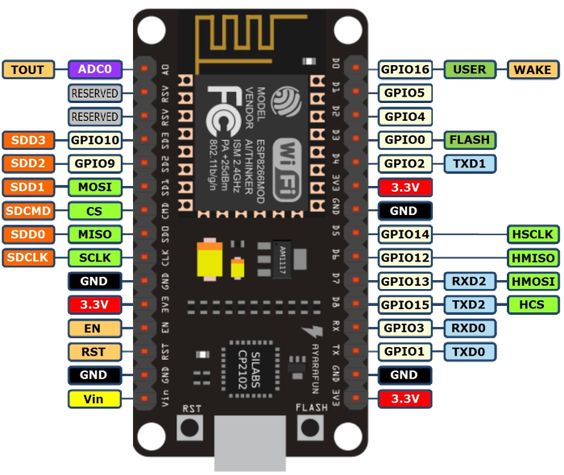
I cut the connector off the end of the fingerprint sensor to expose the individual wires. Using a breadboard, jumper wires, and lever nuts I wired the fingerprint sensor to the NodeMCU as follows:
- Red and white wires to 3.3V
- Black wire to GND
- Purple (green on some versions) wire to D0/GPIO16
- Yellow wire to D1/GPIO5
- Blue wire to D2/GPIO4
Additionally, I wired in power from the 5V adapter with the ground going to GND and 5V going to Vin. Once it was wired up it looked like this:
Testing enrolling and authenticating fingerprints with Home Assistant
Now that everything is wired up, it’s time to add the Fingerprint Scanner to Home Assistant and test it out.
Give it a static IP or static lease
Before adding the sensor to Home Assistant, I recommend you give the sensor a static IP or use your router to give it a static lease (which is what I do). If you want to give your sensor a static IP you can modify the Wi-Fi section of your ESPHome configuration file as follows:
wifi:
  ssid: MyHomeNetwork
  password: VerySafePassword

  # Optional manual IP. Use values that work in your home network environment
  manual_ip:
    static_ip: 192.168.0.123
    gateway: 192.168.0.1
    subnet: 255.255.255.0
Add the sensor to Home Assistant
In the Home Assistant UI, go to Settings->Devices & Services->Integrations and select + Add Integration at the bottom right of the screen. Select the ESPHome integration. You’ll be asked to input the IP Address or hostname for the ESPHome sensor you created in the earlier steps. And, if you protected the chip with an API password, you’ll also need to enter it during this setup. It should automatically import the encryption key if you’ve implemented one. Home Assistant will set up the integration and you’ll have a device that looks like:
Enroll fingerprints
At this point, it’s time to test the sensor by enrolling and authenticating fingerprints. In Home Assistant, go to Developer Tools->Services and select the ESPHome: fingerprint_sensor_enroll service (yours may be named slightly differently if you made changes to the names in your ESPHome configuration). You want to enter YAML that looks like:
service: esphome.fingerprint_sensor_enroll
data:
  finger_id: 0
  num_scans: 2
This tells the fingerprint scanner to read in a fingerprint to id ‘0’ and that it will take 2 scans to read in the fingerprint. After hitting the call service button on the device page, place a finger flatly and firmly on the fingerprint scanner. It should turn blue, and then purple. Press it with the same finger firmly again and it should turn blue and then you are done! Note the Fingerprint State sensor on the aforementioned device page changes to “Enrolled fingerprint” after this is successful.
To enroll more fingerprints, simply change the finger_id in the above service call and repeat the process with another finger.
Now, when you press with a finger that has been enrolled (authorized), the scanner should turn blue and the fingerprint state sensor should change to “Authorized finger.” If you try to use a finger that has not been authorized the scanner should blink red and the state sensor should change to “Unauthorized finger.” After 10 seconds the state sensor will change back to “Scan your finger” in either case.
Controlling the garage door with the fingerprint sensor
Now, this section assumes you already have made your garage smart and integrated it with Home Assistant. If you haven’t here’s one way to do it, and here’s another way. All you have to do is make an automation that toggles (opens or closes) your garage door (cover) based on the fingerprint status changing to “Authorized finger.” Here’s my automation:
- id: toggle_garage_door
  alias: Toggle Garage Door
  trigger:
    platform: state
    entity_id: sensor.garage_fingerprint_state
    to: "Authorized finger"
  action:
  - service: cover.toggle
    entity_id: cover.garage_door
# This part is optional. It's for sending notifications of when the fingerprint reader is used.
  - delay: 00:00:20
  - service: script.notify_garage_controlled_by_fingerprint
You’d need to use appropriate entities for your garage fingerprint state sensor and garage cover.
The bottom of the automation calls a script that notifies me of who opened or closed the garage door using the fingerprint button. I added this to monitor its usage, but I’ll probably turn it off in the future.
The delay before calling the script is just to make time for the garage to update its status (open or closed). To do this, first I made a template sensor that maps the fingerprint ID (which is a sensor published to Home Assistant by ESPHome) to the person that the fingerprint belongs. It looks like this:
  - platform: template
    sensors:
      fingerprint_last_finger_name:
        friendly_name: "Last Fingerprint Name"
        value_template: >-
          {% set personid = states('sensor.garage_fingerprint_last_finger_id') | int(default=-1) %}
          {% if personid == 0 or personid == 1 or personid == 2 or personid == 3 %}
          John
          {% elif personid == 4 or personid == 5 or personid == 6 or personid == 7 %}
          Jane
          {% elif personid == 8 or personid == 9 or personid == 10 or personid == 11 %}
          Jim
          {% elif personid == 12 or personid == 13 or personid == 14 or personid == 15 %}
          Julie
          {% else %}
          Unknown
          {% endif %}
You would modify this with the IDs you used for each fingerprint enrollment. In the above example, I made each person enroll four fingers, so four different IDs map to one person.
Then, the script to notify me looks like this:
notify_garage_controlled_by_fingerprint:
  alias: "Notify Garage Controlled By Fingerprint"
  sequence:
    - service: notify.telegram_main
      data_template:
        message: "Garage Control Alert: {{ states('sensor.fingerprint_last_finger_name') }}'s fingerprint was used to put the garage in '{{ states('cover.garage_door') }}' status."
I use Telegram for notifications, but you can substitute whatever you use. This notification tells me whose fingerprint was used and whether it was used to open or close the garage.
Putting it all together
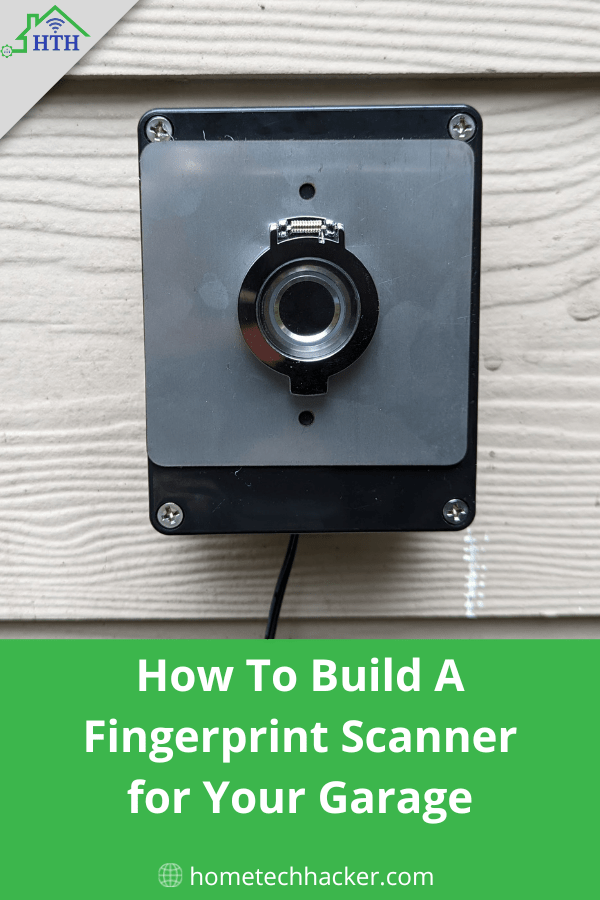
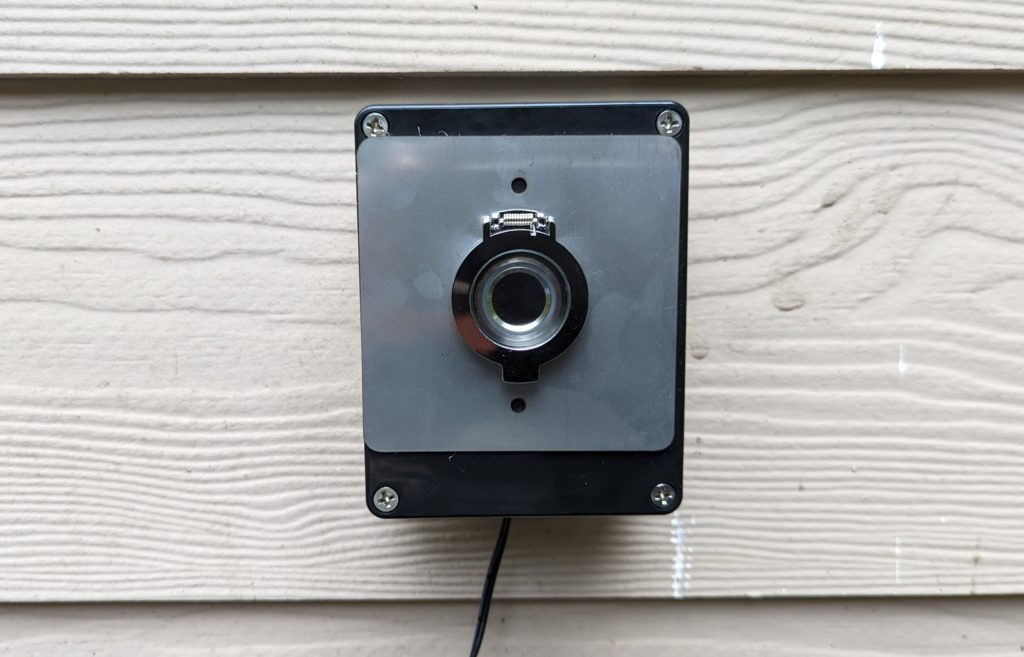
Now that it is all working it is time to put it together. I removed the lever nuts, soldered the connections to the jumper wires, and placed the installation into a project box. I made a hole in the project box for the fingerprint sensor and the power adapter:

Then I put the box together and installed it on the side of my house. It is somewhat protected by an eave and the box is waterproof, except for the holes I drilled :). The adapter is plugged into a waterproof case that I use for other electrical connections outside. Here’s how it looks:
For more information
Here is a listing of the places where you can get more information on ESPHome, the fingerprint sensor, and the sources for my learning for this project:
- Installing ESPHome Manually
- Getting Started with the ESPHome Command Line
- ESPHome Grow Fingerprint Reader documentation
Final thoughts
This was a surprisingly quick but useful project. My family uses it all the time, and so far it is accurate and secure. No more basketballs and footballs hitting the cars and garage door sensors when the kids play. And now, even without pulling out a phone, we can securely open and close the garage from the outside.
A garage door isn’t the only thing you can use a fingerprint scanner for. You could also use it for multi-factor authentication, disarming an alarm, opening some type of lock, and many more use cases.
ESPHome can be used for many more projects like creating an air quality sensor. In fact, ESPHome is becoming one of my favorite Home Assistant integrations.
What ideas do you have for its use? Let me know on Twitter or in the comments.