Smart bulbs are great when you have a location with a single, always-on bulb that you want to control. As I detailed in my article about smart home truths, smart switches are better when you have a whole bunch of lights connected to one switch. But what about if you have a bunch of lights you want to make smart and dimmable? That’s where the Shelly Dimmer 2 comes into play.
This page contains affiliate links. If you purchase an item using an affiliate link I will receive a small commission at no cost to you. Affiliates do not influence my recommendations. Read my disclosures for more information.
Table of Contents
Background on my use case
I’ve been a fan of TP-Link (Kasa) smart home products for a while. They are inexpensive, allow local control, and work well. A couple of things happened recently that made me a little leery of TP-Link smart home products. First, at least for some European products, they announced they were removing local control of some smart home products. This makes them much harder to integrate with smart home hubs. After lots of complaints from customers, especially in the Home Assistant community, TP-Link offered a way to maintain local control. However, that makes them a little harder to trust going forward.
Second, one of my TP-Link smart switches started to malfunction. I have two TP-Link HS200 smart switches. One of them I’ve never had a problem with. The second one seems to drop Wi-Fi every so often. It reconnects automatically, but for some reason, it turns the lights off and back on when it does that. I’ve contacted tech support but they haven’t been able to resolve it. It is only a few feet away from the one that works fine, so I don’t think interference is the problem. I have noted that the one that doesn’t have any problems is a V2 version and the one that does is V3. So maybe there is a hardware difference causing the problem.
I decided to replace it. It controls the light fixture in my bathroom, which actually has dimmable lights, so I thought, why not replace it with a smart dimmer? As much as I’ve liked TP-Link products, I’ve loved Shelly products even more (for my garage, my fireplace, my light switches, flood sensor, smart switches, smart bulbs, etc.). Enter the Shelly Dimmer 2!
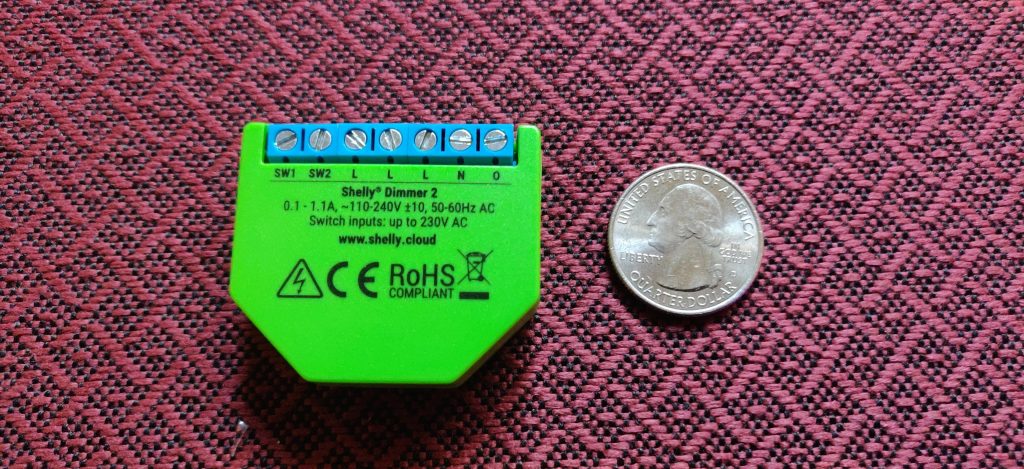
Shelly Dimmer 2 specs and features
The Shelly Dimmer 2 has the following specs:
| Power Supply AC | 110-230V, 50/60Hz |
| Device temperature protection | Yes |
| Overload protection | Yes |
| Dimming | Yes |
| Dimmable LED | 50-200VA / 10W-200W |
| Incandescent and halogen light sources | 10-220W |
| Device power consumption | < 1W |
| Wi-Fi Protocol | 802.11 b/g/n |
| Neutral wire required | No |
The Shelly Dimmer 2 works with LED, halogen, CFL, and incandescent bulbs that support dimming. The other key spec to note above is that the Shelly Dimmer 2 does not require a neutral wire to work. Now, you should know Shelly made an earlier dimmer product (that you can still buy) called the Shelly Dimmer (without the “2”) which is close to the same but does require a neutral wire. Be aware of which one you are buying if you don’t have a neutral wire.
As with other Shelly devices, this Dimmer 2 can be controlled remotely via a few different APIs, including REST and MQTT. The device can also be controlled via its internal web server or via the Shelly app (locally or in the cloud). Also like other Shelly devices, enabling MQTT disables cloud control. Some of the key features include the ability to set a minimum brightness level, fade rate, scheduling, timers, and triggers to call other smart home devices (Actions).
Also, the Shelly Dimmer 2 is really small. Even smaller than the Shelly 1 relay.
Shelly Dimmer 2 installation
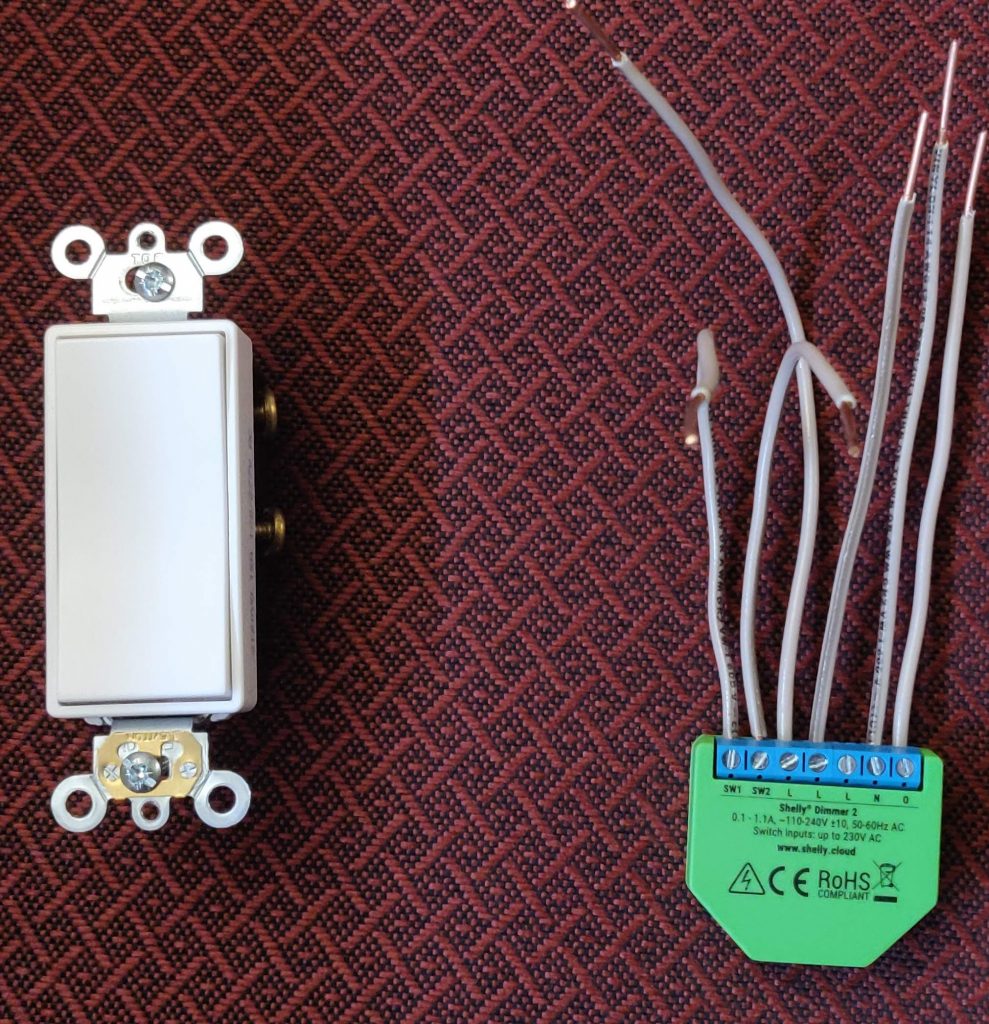
The Shelly Dimmer 2 has many different installation options. You can install it with or without a neutral wire. You can install it where one button controls dimming, on and off. Also, you can also install it with two buttons; one button brightens (press and hold), and the other button dims (press and hold), and both can turn it on and off (press, but don’t hold). I chose the latter option for the best user experience. To do that I bought the Leviton 5657-2W dual rocker switch. It is a single-pole, double-throw, dual-button momentary switch. The Shelly manual shows multiple ways of wiring; two of them with a neutral, and two of them without:
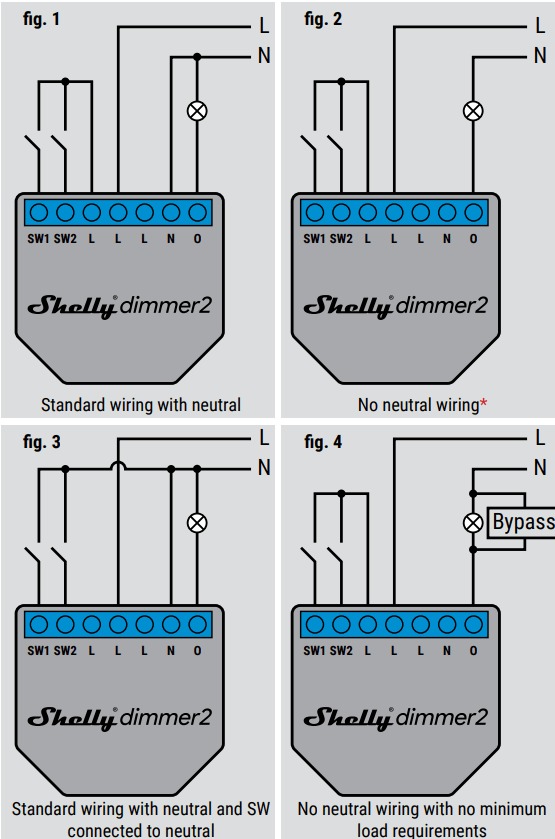
For my installation, I went with fig. 1 and this is my rudimentary wiring diagram for the Shelly Dimmer 2 and my Leviton switch:
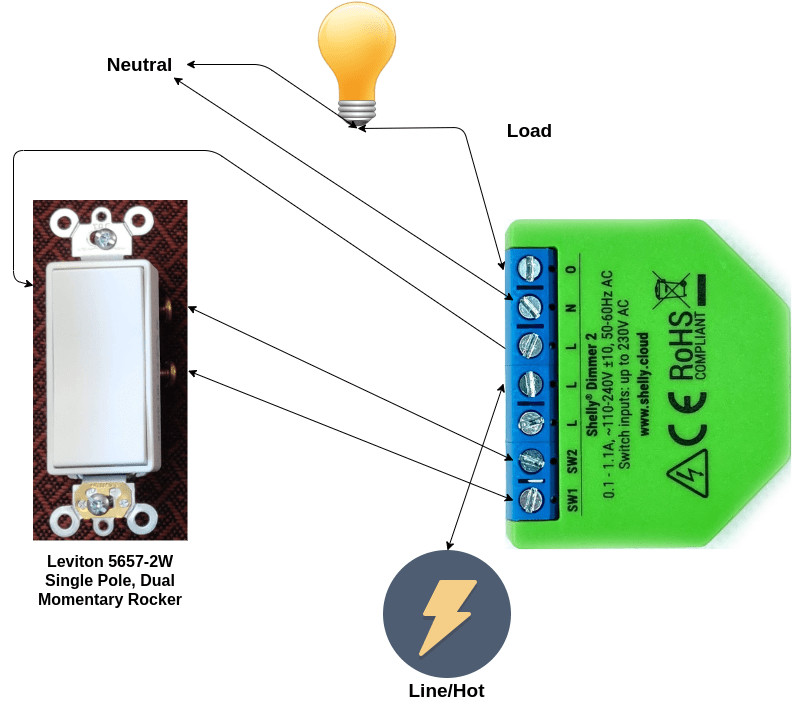
Before proceeding with the wiring make sure you’ve identified the line, neutral, and load wires, and then turn the power to the circuit off at the breaker for safety. Hopefully, you can see from the diagram that I:
- Connected load from the light to the O input on the Shelly.
- Attached the neutral line to the N input on the Shelly.
- Connected Line/Hot to an L input on the Shelly (I don’t think it matters which of the three L inputs you use, but I chose the middle one).
- Connected an L input on the Shelly to the line input on the Leviton switch to allow it to send a signal to the Shelly when a button is pressed (again, I don’t think it matters which L input you use).
- Ran lines from the 2 Leviton switch outputs to the two Shelly Dimmer 2 switch inputs (SW1 and SW2).
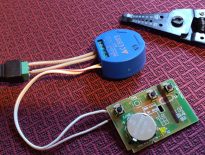
Here is a picture of my prewiring before connecting and installing the Dimmer 2:
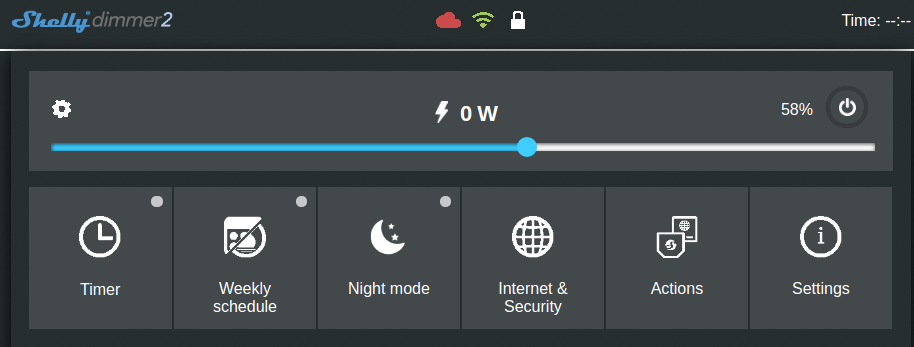
Configuring the Shelly Dimmer 2
Step one: set up Wi-Fi
The basic steps for configuring all the versions of Shelly relays are the same. Restore power to the circuit and then the Shelly will boot up in access point mode and broadcast a Wi-Fi network (e.g. shellydimmer2-35AF58) that you connect to using a mobile device. After connecting, go to the IP address 192.168.33.1. This is the default address for the web interface (note, you can configure the Shelly using the app as well).
If you connect using a device with a cellular connection you may have problems connecting to the Shelly IP address depending on your settings. You should be able to get around this by temporarily disabling your mobile network.
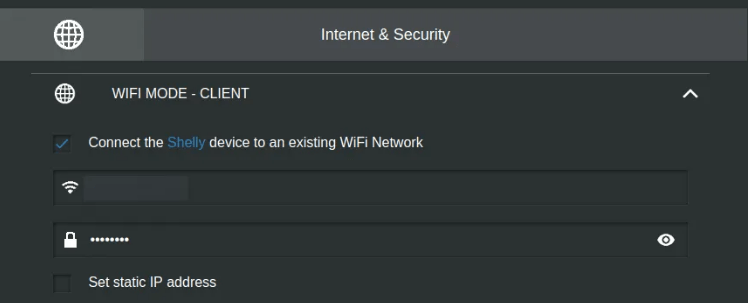
The first thing you’ll want to do is connect your Shelly to your Wi-Fi network. Go to Internet & Security->WIFI MODE – CLIENT and fill in your Wi-Fi credentials. Double-check they are correct and press save.
I recommend you set up a static IP address here or set up a static DHCP lease using your router.
Connect to the IP address of the Shelly (that you set as static in the web interface or that your router assigned) from a computer on your LAN. Go ahead and check for a firmware upgrade and apply if it’s available (Settings->Firmware Update).
Configure the Shelly Dimmer 2 behavior
Next, you’ll want to set up the way the Shelly reacts to buttons. I’m using a two-button switch, so I set it up accordingly in Settings->Button Type:
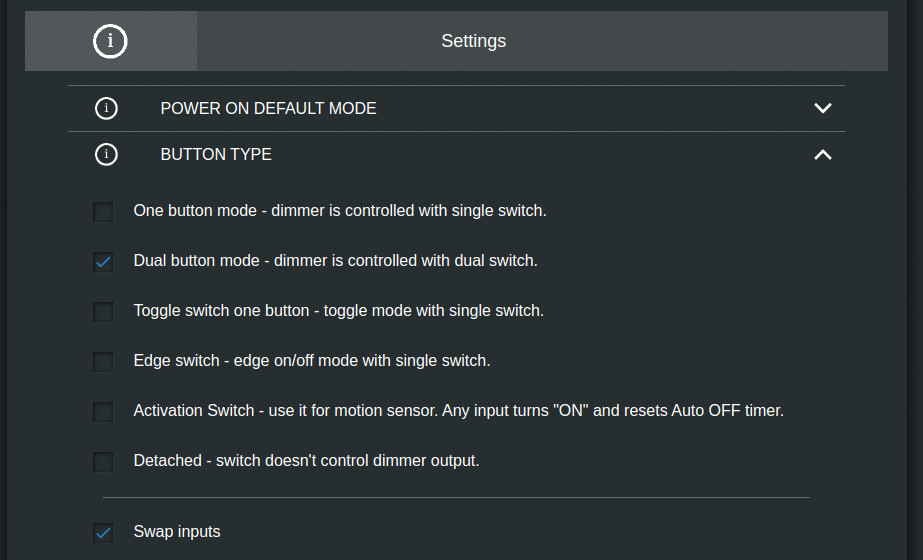
This way, when I hold one button the light dims, and when I hold the other button the light brightens. The light will turn off if I briefly press the top or bottom rocker. Also, initially, my buttons were reversed (the top rocker dimmed and the bottom rocker brightened). No need to take the switch out or mess with the wiring to fix this, I just had to select the Swap inputs option (see above).
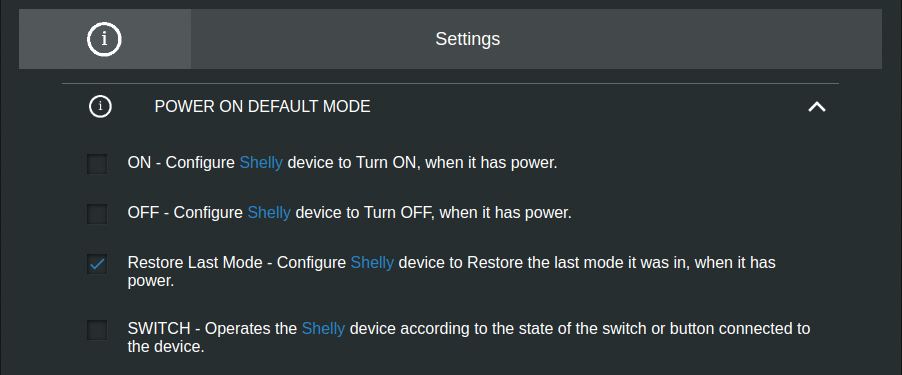
You’ll want to set the default state of the dimmer when power is restored to it (e.g. after a power outage). I set mine to default to the last known state:
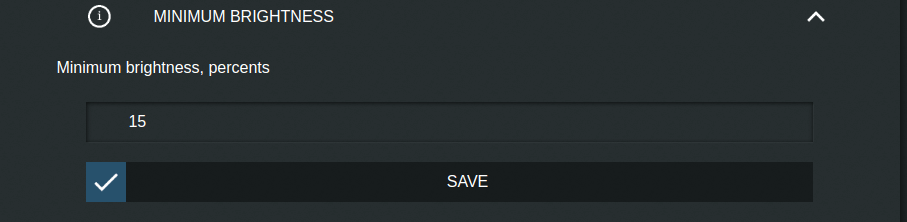
One more thing you may want to look into is setting a minimum brightness level. Some dimmable bulbs will look like they are turned off even at 10% or 20% brightness, causing you to think you’ve turned the lights off, but really you haven’t and you’re wasting electricity. 15% worked for me:
Advanced: Integration with Home Assistant via MQTT
I prefer to not have a cloud connection, and I want to be able to automate my fireplace based on other factors in my home. The Shelly app and interface allow for some automation, but I prefer to use Home Assistant, my favorite automation controller.
Home Assistant has a native Shelly integration, but for some reason, it didn’t work with the Shelly Dimmer 2. I received an error message about the Shelly being on an unsupported firmware version. It probably will be fixed in a couple of releases. No worries though. You can integrate with the Shelly via MQTT right now. First, you need to set up an MQTT broker and integrate it with Home Assistant. I’ve explained what MQTT is, how it works, and how to set it up in Home Assistant so I won’t repeat it here.
Set up MQTT on the Shelly Dimmer 2
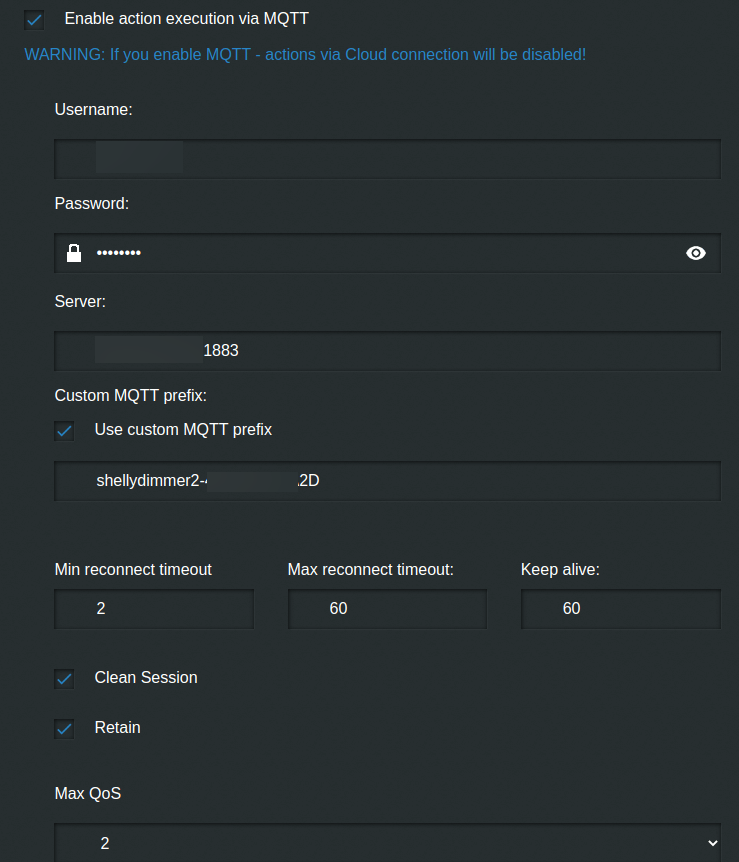
After setting up the broker you need to configure MQTT on the Shelly. Go to the “Internet & Security->Advanced – Developer Settings” and:
- Click the checkmark to “Enable action execution via MQTT” (note this will disable cloud access. It’s one or the other)
- If you secured your MQTT broker enter its username and password
- Under “Server:” enter the IP address of your MQTT broker along with its port (usually 1883). Separate the IP address and port with a colon.
- Save these settings
Take note of the “Custom MQTT Prefix.” This is the MQTT topic that communicates that is unique to this Shelly. You can change it or leave it as is. You’ll need this entire string to create the Home Assistant config
Configuring the MQTT light in Home Assistant
You’ll just need to add a little YAML to your Home Assistant configuration in your light section:
- platform: mqtt
  schema: template
  name: "Master Bathroom Light"
  state_topic: "shellies/shellydimmer2-xxxxxxxxxx/light/0/status"
  state_template: '{% if value_json.ison %} on {% else %} off {% endif %}'
  command_topic: "shellies/shellydimmer2-xxxxxxxxxx/light/0/set"
  command_on_template: '{"turn": "on"{% if brightness is defined %}, "brightness": {{(brightness | float * 0.3882 + 1) | round(0)}}{% endif %}}'
  command_off_template: '{"turn": "off"}'
  brightness_template: '{{ (value_json.brightness | float * 2.55) | round(0) }}'
  qos: 2
Remember to replace the state_topic and command_topic shellydimmer2-xxxxxxxxx with whatever is the MQTT prefix for your device. The entity id of your light will be what you put in the name field (spaces replaced by underscores). This code tells Home Assistant how to control and react to the Shelly Dimmer 2. You’ll have to restart Home Assistant for this to take effect. After that, you’ll be able to control the brightness and on/off of the lights via Home Assistant and the Leviton switch.
Sometimes when I restart Home Assistant it takes a bit for the Shelly to become available because it doesn’t seem to retain the value of the will topic. You can fix this by removing the availability_topic, making the Shelly light appear as always available. Or you can add the following automation, the tells the Shellies to announce themselves if they are available:
- id: mqtt_shelly_announce
  alias: Shelly Sync at HA Start
  trigger:
  - platform: homeassistant
    event: start
  action:
  - delay: 00:00:20
  - service: mqtt.publish
    data:
      topic: shellies/command
      payload: announce
Future Dimmer 2 automations
Now that I have the Shelly integrated with Home Assistant, I can write some automations. I haven’t done this yet, but I’m thinking of having the light default to being somewhat dim in the wee hours of the night and the early morning when it is turned on, to ease our eyes into awakeness.
Smart dimmer alternatives
I think the Shelly dimmer 2 has the best combinations of features and price of any smart dimmer out there. But there are some alternatives you can check out:
- Kasa (TP-Link) HS220 Dimmer switch (I’m a bit down on TP-Link smart products for reasons above)
- Brilliant Smart Home Control (for the luxury look… with a luxury price)
- Lutron Caseta Smart Home Dimmer Switch – (luxury look and very highly rated product, but you’ll need the Caseta Smart Bridge if you don’t have one already)
- GE Enbrighten Z-Wave Plus Smart Light Dimmer (if you already have Z-Wave set up in your home)
- C by GE 4-Wire Smart Dimmer Switch
Final Thoughts
Another Shelly product that I love, what a surprise! At this point, I can easily say that Shelly is my favorite smart home device manufacturer.
Editor’s note: Here’s how you can power your entire smart home using Shelly products.
The Shelly Dimmer 2 truly is a great smart home dimmer that ticks all the boxes. I’m pretty happy with this setup!
I know this is a bit of a long read, but I hope you found it helpful. Let me know what you think or if you have any questions in the comments or on Twitter.