
Internet connections and home networks become more important each day. Activities like cutting the cord, adding Internet of Things devices (IoT – e.g. smart speakers, video cameras, smart switches, etc.) increase our reliance on a working home network. A home router needs to be able to set up an efficient, fast and secure network. I’ve chosen pfSense as my home router for many reasons including security and VPN support. I also like that I can virtualize it. If you are using pfSense (need help planning your pfSense install or choosing hardware?) or just considering it here are 5 tips I’ve found helpful in my home.
Table of Contents
Tip #1: Get notified when someone connects to your OpenVPN server
As I mentioned earlier, VPN support is one of the reasons I chose pfSense. I use OpenVPN to allow secure remote connections to my home network, and in a pinch, when I want to secure my phone on untrustworthy WiFi connections. OpenVPN is well supported open source VPN implementations used by many individuals and corporations and, of course, supported by pfSense.
I’m ultra paranoid about even having a way to connect to my home network remotely and I want a notification whenever anyone successfully connects to my VPN server. Unfortunately, pfSense doesn’t offer a simple configuration for this, but adding this functionality isn’t too hard. You simply have to modify the OpenVPN connection script to send an email. Here are the steps:
Setup email notifications in pfSense
You must have access to an SMTP server (most likely via your ISP or email provider) for pfSense to send emails. Setup the SMTP connection in System->Advanced and then select the Notifications tab.
Locate and backup openvpn.attributes.sh
The file “openvpn.attributes.ssh” gets called whenever an OpenVPN connection or disconnection is made. We need to modify this file to receive notificaitons. On my installation this file is located in /usr/local/sbin/. Before making any edits to this file I recommend backing it up. You can simply copy the file with a .bak or .orig extension if you’d like.
Modify the openvpn .attributes.sh file
Below is what the file looks like on my installation. You simply need to add in the parts in bold.
#!/bin/sh
#
# openvpn.attributes.sh
#
# part of pfSense (https://www.pfsense.org)
# Copyright (c) 2004-2016 Rubicon Communications, LLC
# (Netgate)
# All rights reserved.
#
# Licensed under the Apache License, Version 2.0 (the # "License");
# you may not use this file except in compliance
# with the License.
# You may obtain a copy of the License at
#
# http://www.apache.org/licenses/LICENSE-2.0
#
# Unless required by applicable law or agreed to in
# writing, software
# distributed under the License is distributed on an
# "AS IS" BASIS,
# WITHOUT WARRANTIES OR CONDITIONS OF ANY KIND, either
# express or implied.
# See the License for the specific language governing permissions and
# limitations under the License.

if [ "$script_type" = "client-connect" ]; then
#BEGIN EDIT
/bin/echo "Client $common_name from $trusted_ip connected @ `date`" \
| /usr/local/bin/mail.php -s"OpenVPN Connection Beginning"
#END EDIT

        if [ -f /tmp/$common_name ]; then
                /bin/cat /tmp/$common_name > $1
                /bin/rm /tmp/$common_name
        fi
elif [ "$script_type" = "client-disconnect" ]; then
        command="/sbin/pfctl -a 'openvpn/$common_name' -F rules"
        eval $command
        /sbin/pfctl -k $ifconfig_pool_remote_ip
        /sbin/pfctl -K $ifconfig_pool_remote_ip
#BEGIN EDIT
/bin/echo "Client $common_name from $trusted_ip disconnected @`date`" \
| /usr/local/bin/mail.php -s"OpenVPN Connection Ending"
#END EDIT
fi

exit 0
The first bold part sends an email with the IP address upon successful connection to the OpenVPN server, and the second does the same upon disconnection.
Note: Upgrades seem to overwrite this file, so you will have to apply this patch after each upgrade.
Tip #2: Automate config file backups
If you are like me you are constantly playing around with configurations to try out new things. Sometimes for learning. Sometimes to make an improvement. However, sometimes the changes don’t work out and you break important functionality. This is never good for a router!
Luckily, pfSense makes downloading the configurations files easy via the web interface. But I want automated backups where my other backups are. This can be accomplished by using a cron job on the pfSense server to SCP files to a remote server or by giving
Setup SSH on pfSense
This can be done via the GUI. By default, it only enables ssh for the admin and root accounts and this is fine for my purposes.
Setup ssh key access to pfSense
This will help make your ssh access more secure. There are many tutorials for this on the web. This Reddit post will get the job done. Basically, you create your public key from the account you want to ssh in from and then copy that key into pfSense so it allows the connection.
Create cron job to copy relevant config files
The standard config file (config.xml) has all the configurations for pfSense. After you’ve setup ssh access you can use scp to backup this file remotely with a command similar to:
scp root@<pfSenseIP>:/cf/conf/config.xml /backup/pfSense/Replace the IP and backup destination with the one of your choosing. Remember, you must have set up a remote ssh key for the machine and user you are running this command for in pfSense. You can create a cron job to copy this file as often as you’d like, and you can copy other files. For example, I copy over the /etc/hosts file and the /var/dhcpd/etc/dhcpd.conf files over to my backup server. I keep seven days of rolling backup files on my LAN. Having a backup is essential for upgrading pfSense the right way.
Tip #3: Restrict access to pfSense management UI
Does every machine on your network need to have access to your router UI? No, of course not. And even though you have a strong username and password for your router, I recommend minimizing the number of machines that can access your router settings for even more security. This can be done directly through the pfSense UI. Netgate already has a great tutorial on how to do it. As always, I recommend you backup your settings first.
Tip #4: Block Internet access for devices that don’t need it
The power of pfSense firewall rules allows you control at a very discrete level what devices on your LAN can and can’t access. One use for this is blocking some devices from having access to or from the Internet.
For example, I have a few surveillance cameras set up around my house. I only want to be able to view the streams on my local network. I don’t want a hacker gaining access to these notoriously
The cameras are still accessible on my LAN. Using a secure connection to my Zoneminder installation I can also view these when away from my LAN (or use my VPN). Just create a LAN rule at the top of your LAN firewall rules with the following settings:
- Action: block
- Interface: LAN (or the appropriate LAN interface for your setup)
- Address Family: IPv4+IPv6
- Protocol: Any
- Source: Single host or alias, then add in the IP or alias group for a group of IPs
- Destination: Any
After applying this rule, all devices associated with the blocked group will no longer be able to send anything off of the LAN to the Internet. Here’s a video tutorial that might be helpful:
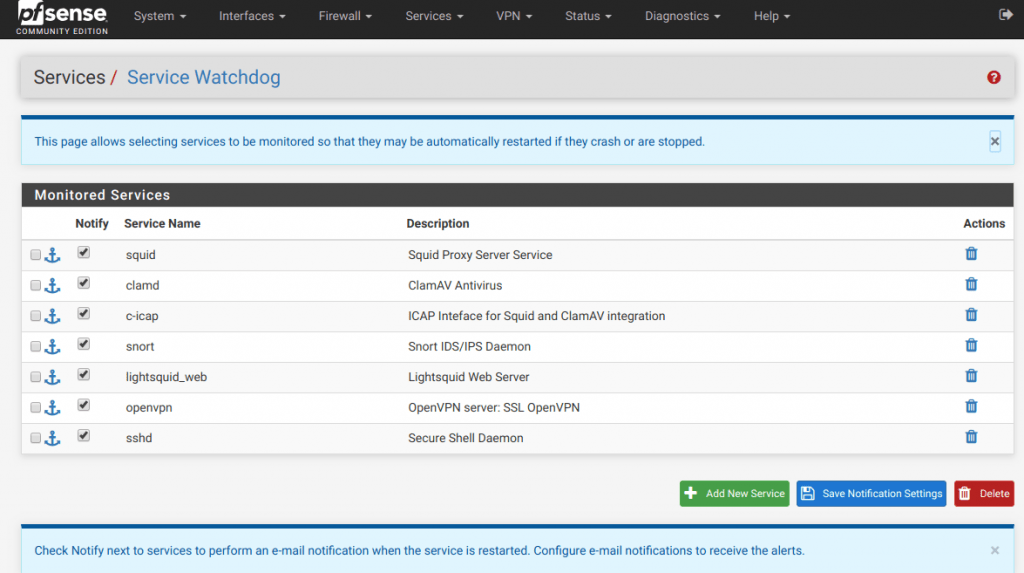
Tip #5: Setup pfSense service watchdog
pfSense is great and incredibly stable, but occasionally a service will stop. It is software, after all. In order to protect against key services stopping when I’m not monitoring my router, I use Service Watchdog.
This service monitors the pfSense services your specify and can notify you when to stop unexpectedly and even restart them. After installing the Service Watchdog package you can go to Services->Service Watchdog and add the services you want peace of mind for:
Final thoughts
I hope you have found these tips helpful. They truly are only the “tip” of the iceberg when it comes to what you can do with pfSense. There’s also static DHCP leases, snort, antivirus, pfBlocker, and so much more you should look into. What tips do you have for others? Share them in the comments or hit me up on Twitter!