Earlier this year I wrote an article about installing and planning my year-round LEDs, in the summer no less! Make sure to check out that article if you want to know and see demonstrations of what I’ve done up until this point. At the time I published that article I was still waiting for some LEDs to arrive so I could finish installing LEDs on my deck. I ended up changing my plans for my deck lights (more on that later). Read on for what I ended up doing and to find out how all the lights have turned out.
Editor’s Note: Be sure to also check out some LED additions I’ve made since this article.
This page contains affiliate links. If you purchase an item using an affiliate link I will receive a small commission at no cost to you. Affiliates do not influence my recommendations. Read my disclosures for more information.
My original plan for year-round LED deck lights
Originally, I was going to mount 12V LED strips around the deck. I was going to try and make it a stealthy install, and it was probably going to require a lot of power injection. Below is a diagram of what I was going to install:
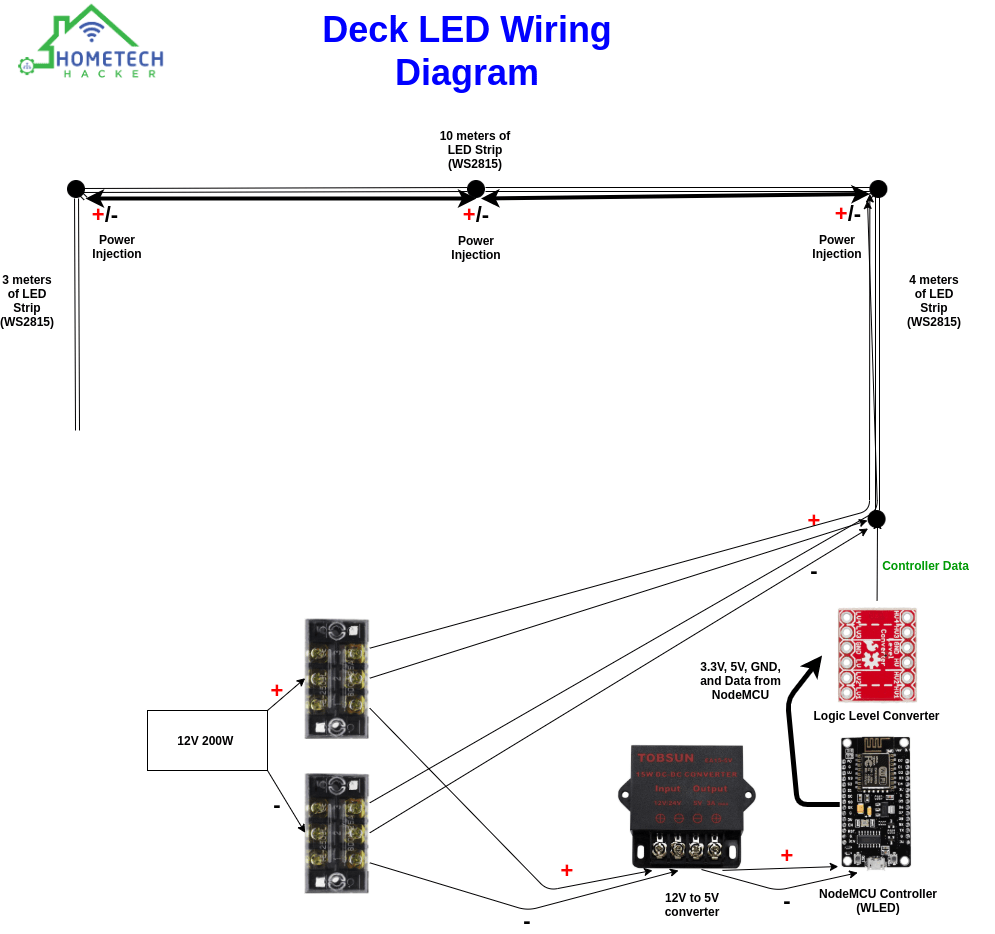
The equipment list I planned to use was:
- 17 meters of 12V WS2815 LED strips, 30 LEDs a meter. I bought them at AliExpress to save money, but not time. More on that later.
- NodeMCU flashed with WLED to control the LEDs.
- A logic level shifter to ensure a clean and powerful enough data signal.
- A 12V to 5V step-down converter so I can power the LEDs (12V) and the NodeMCU (5V).
- 2 core 2 pin pigtail waterproof connectors – I use these for waterproof power connections outside.
- 14 AWG landscape wire – I use this for higher amp connections and where I need to use waterproof wire.
- Terminal blocks – I planned to use these to run power injection lines.
- 250W 12V LED driver to power all of the LEDs.
- Breadboards – For neatly organizing my nodeMCU controller connections.
- Breadboard wires – For making connections on my breadboard.
- Project box to house all the equipment.
I waited a very long time to get my LEDs from China. When I finally did, one of the strips didn’t work right. This also gave me time to really think about how the installation would work. I decided that I wasn’t going to be able to install it in a stealthy enough way to make it worth it. Plus, I wasn’t sure I’d get the effect I wanted from the strips pointing down. I really liked the string lights on my gutter, so I pivoted to a string light installation.
What I ended up installing on my deck
So I went back to the drawing board for what I was going to install. I could still use a lot of the equipment I was planning on using, but I made some key modifications to my installation.
- I decided to use 12V WS2811 LED string lights instead of the LED strips. Amazon can ship these much faster than China, and I decided I would like the lights wrapped around the deck better than having LED strips pointing down.
- For power injection, I decided to use these 2 Pin tee connectors. They go perfectly with the pigtail waterproof connectors I had already bought.
- The biggest thing is I learned about the Dig-Uno. This is a WLED powered device that can handle 12V and 5V power inputs and LEDs, has a built-in fuse and logic level shifter. Using this, I no longer need the NodeMCU, breadboard, logic level shifter, nor a 12V to 5V step-down converter. It also makes the wiring simpler. It saves time and money!
I spent a fair amount of time soldering wires for the power injection connections and making sure all my connections are tight an waterproof. For some the the connections I used a combination of rescue tape and these mini holiday waterproof cord protectors to protect the JST connections between LED strips.
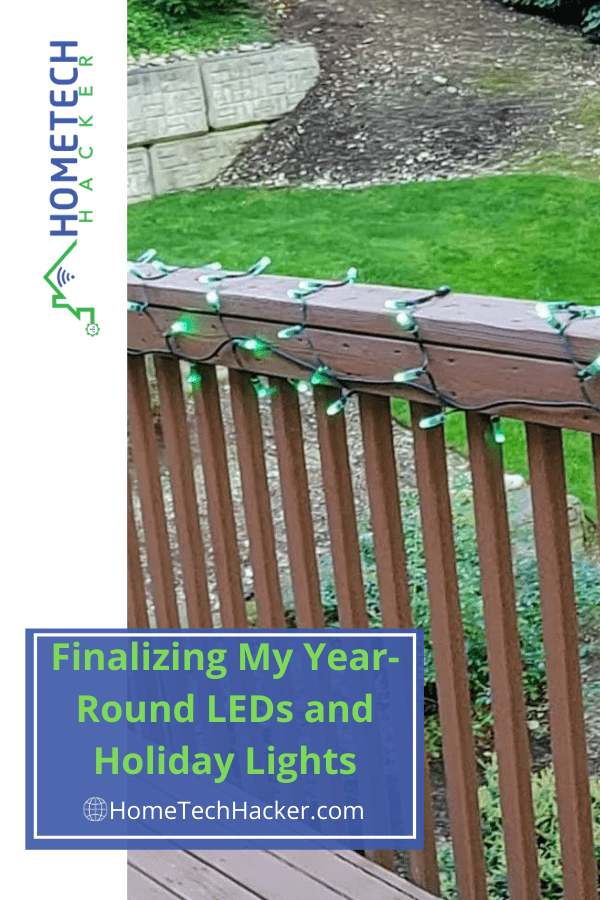
How this and the other lights all turned out
This ends my permanent light installations for the year. The deck lights turned out pretty well.
Here are some videos of most of the LED lights I have permanently installed around the house.
Finalizing Year-round LEDs and Holiday lights
My permanently installed LEDs are controlled by Home Assistant via its WLED integrations and REST commands. I have multiple automations that theme the lights for various occasions including:
- Christmas
- Halloween
- Autumn
- 4th of July
- Easter
- St Patrick’s Day
- Colors of our favorite sports teams that we run on game days
- Whatever else we think of!
Beyond the year-round LEDs, there are a couple more parts to finalizing my holiday lights. First, I have a few lights that I will install specifically for Christmas. These include LED string lights around the Christmas tree and some lights and stakes I’ll put around the yard. The non WLED lights are connected to power via smart switches. I have all of these controlled by Home Assistant.
Final thoughts
Once you get the LED bug, you get it for good. Or, at least I did. I now run my year-round LEDs and change color schemes for different holidays and special events. Why should Christmas time be the only time for lights? In these pandemic times, beautiful lights really help lift my spirits!
If you think some of these projects are more complicated than you’d like to deal with, you can always buy smart LED strips and strings that are ready to go and automate.