I’d been using a Veralite for home automation, including running my Z-Wave network, for years before I started using Home Assistant. Over the course of a few months, I transferred almost all of my home automation over to Home Assistant. One of the things I didn’t completely transfer over was my Z-Wave network.
There really wasn’t an urgent need. Home Assistant integrated easily with Vera and could control all of the devices. Also, my alarm system was set up as a secondary Z-Wave controller to the Vera. Not to mention I have over 50 Z-wave devices and repairing all of them would be a lot of work.
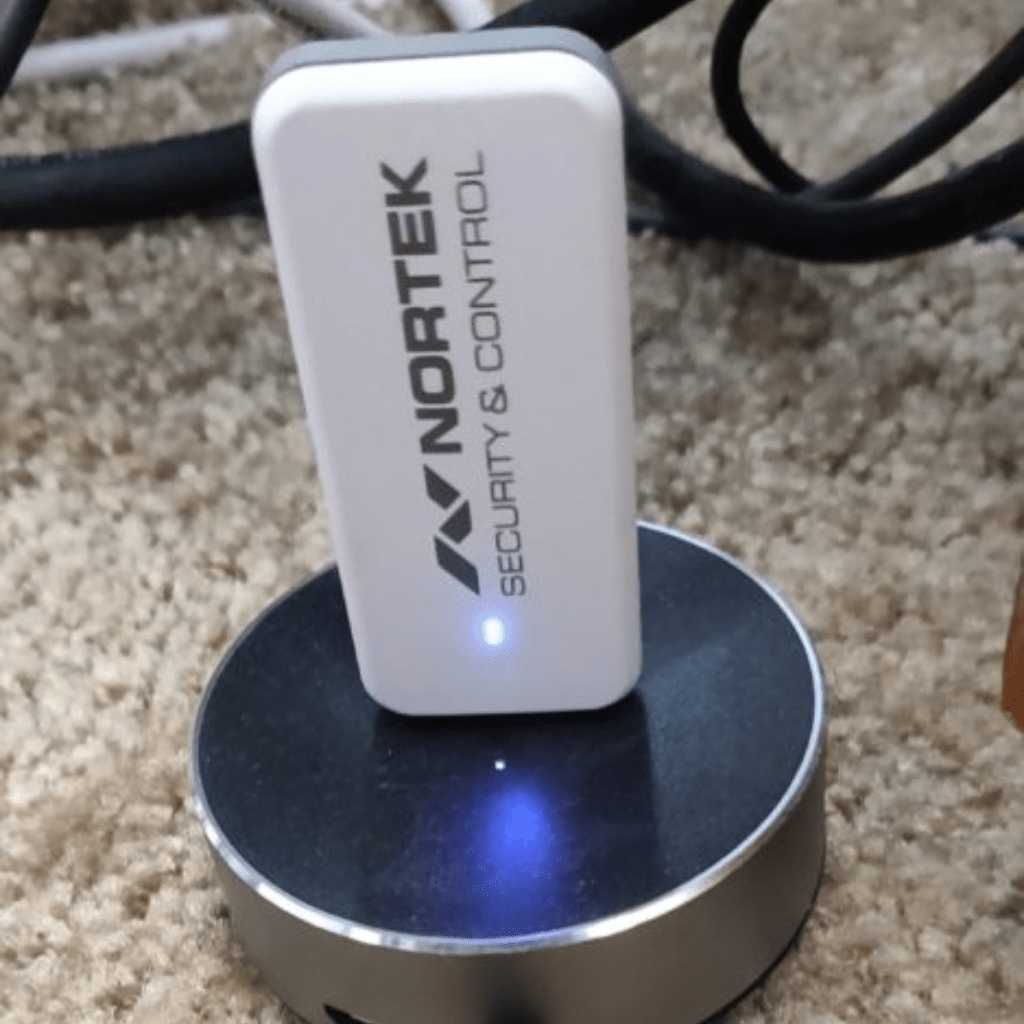
Table of Contents
Problems with my current Z-Wave network
My veralite started off slow, and over time it became old, slow, and buggy. I actually needed to reboot it at least daily (created a script for this) in order for it to be reliable. Also, it often created “phantom” Z-Wave devices that didn’t exist (which I had to delete). It also stopped allowing me to add Z-wave devices. A couple of devices seemingly mysteriously just unpaired and I couldn’t add them back.
Earlier this year, Vera announced the end of support for the Veralite. I decided it was time to retire the Veralite and move my Z-Wave network over to Home Assistant.
Editor’s Note: I’ve now migrated to ZWave JS.
Setting up Z-Wave in Home Assistant
Luckily, I had already prepared for this moment because I knew it was coming. I previously purchased and installed a Linear/Nortek HUSBZB-1 Z-Wave/Zigbee USB stick for use with Home Assistant. I purchased a couple of Zigbee ceiling fans and I thought, why not purchase a device that can control both a Zigbee and a Z-Wave network?
I already wrote an article on how I set up Z-Wave in Home Assistant so I won’t repeat all of that here. A couple of things to know:
- You can now completely configure Z-wave in the Home Assistant UI if you desire. You don’t have to do it in configuration.yaml anymore
- If you plan on having any locks or other secure devices, make sure you create and configure a network key for your Z-wave radio. Some devices need to pair in a secure mode which needs a network key. This can be done in the UI as well.
The rest of this article will focus on the efforts needed to pair my Z-Wave devices.
Overcoming general issues with pairing devices
Let me start off by describing my Z-Wave network. I have an assortment of light switches, plug-in modules, and tilt sensors. Then, throw in a water leak sensor, a home energy monitoring device, door locks, and multi-sensors. All in all, I have over 50 devices spread across my house and in my garage (check out my smarthome gear for details).
This led me to have to overcome the following issues:
The total area covered by the Z-wave network
Some of my Z-wave devices are too far away from the machine that runs Home Assistant (a VM inside a desktop). It’s not really feasible for me to carry around the desktop to get close enough the pair (include) all of my Z-Wave devices.
This was not a problem with my veralite. It had a battery that allowed me to take it to the location of the Z-Wave devices (my Z-wave stick does not have a battery). Additionally, it could use a “full power inclusion” mode that would use the rest of the Z-wave network mesh to pair without having to move the controller
My solution for this was to purchase a long USB cord and use a powered USB hub to move my stick across the house when needed. This worked like a charm! Remember, if you use a long USB cord, you’ll need a powered hub at the end because of the voltage drop.
Excluding/including hard-to-access devices
Some of my wall switches are embedded inside a regular wall switch. Because of the way I have some wired, the only way to put the devices in exclusion/inclusion mode was to open up the wall switch and press a physical button on the Z-wave device. This was a bit of a pain, but I persevered.
There were also a few devices I needed a ladder to access, like my tilt sensors. All in all, not too big of a deal. Just something to consider when if you decide you want to move your Z-Wave network.
Notes on some of the devices I paired
Here are some general notes on the different devices I moved over:
- Aeon Labs Micro Smart Switches and Aeon Labs Smart Plugs – These were straightforward. In order to have them consistently report back status when they were triggered manually I had to make sure configuration parameter 80 was set to “Basic” in the Home Assistant Z-wave control panel. These devices can report Kwh, Watts, Volts, etc. and you can configure the reporting and frequency in the Z-Wave control panel.
- Aeon Labs Multi-sensor – I set the polling intensity for the motion binary sensor to 1 to get accurate motion reporting.
- GE Wave Switch and GE Z-Wave Dimmer – I had to set the polling intensity to 1 as these devices don’t always report manual state changes on their own.
- Yale Deadbolt Door Locks – I had to make sure and use secure inclusion mode for these to pair and have the Z-Wave stick very close to them during the inclusion process. This is the primary reason I needed to long USB cable.
Stabilizing the Z-Wave network
After adding all the devices, it was important to get polling and reporting configurations set right. Some of my devices (especially the energy monitors) can get really chatty with the wrong settings, which will slow down the responsiveness of my Z-Wave network.
It’s important to do a “heal” after adding a lot of devices in different locations. This helps Home Assistant build a good and strong mesh network for maximum responsiveness.
Overall results
Everything migrated and worked with Home Assistant and my Z-Wave stick. I’ve been fully migrated over for a couple of months so I’ve had a good evaluation period. Here are the overall pros and cons of the move.
Pros
- Speed – the devices respond faster than they did on the Vera
- Stability – my veralite was unstable, requiring at least daily reboots to remain responsive. No such problem with my new setup.
- Better access to devices – I am able to access more of my device attributes (e.g. energy usage, battery charge) more easily now that they are entities in Home Assistant. This makes writing automations easier.
- Centralization – It is nice to have all my devices in one system.
- No cloud involved – Always a benefit of using Home Assistant. Vera worked without a cloud, but it did interface with the cloud so there are always privacy concerns.
Cons
- Single point of failure – Now if Home Assistant is down, there is no Z-Wave network. Not a big deal because Home Assistant only goes down when I take it down.
- Startup time – Every time I restart Home Assistant it takes a while (a few minutes) for the Z-Wave network to initialize. Z-Wave devices aren’t very responsive until this is complete.
- Status not always updated – Everyone once in a while a node doesn’t update its status (e.g. a light will show as on when it is off). This is easily fixed by refreshing the node in Home Assistant. It doesn’t happen often enough to be a big nuisance. I had this problem in Vera too, but it was a pain to go into the Vera UI (slow!) and poll the node.
- Pairing devices at a distance – I detailed the issues with this earlier. I don’t think this is much of a problem going forward. Most devices I would buy going forward would be portable and can be brought to the Z-Wave stick for pairing. Alternatively, you could buy a Z-Wave stick that has a battery and bring it to the devices for pairing. It would be great if Home Assistant could do what the Vera does in “full power inclusion” mode.
Final Thoughts
This effort turned out to be a good couple of hours of work, but I’m glad I did it. My smarthome is no longer dependent on the unreliable and aging veralite.
Interested in supporting HomeTechHacker?
Have you found the content on this site useful? If so, are you interested in supporting me and this site? There’s no obligation of course, but I would really appreciate any support you can give. Below are a few ways you can show support:
- Share this site with your friends and on social media (use the sharing links at the end of this page for your convenience)
- Subscribe to this site
- Purchase one of my books, The Personal Cybersecurity Manual, The Home Network Manual or The Smart Home Manual, for yourself or as a gift
- Put a link to HomeTechHacker on a site you have access to. Be sure to let me know about it!
- Enroll in HomeTechHacker Academy for free and premium online home technology courses.
- Reach out to me via my contact page or Twitter and let me know something I should write about
- Shop at Amazon through my affiliate links and ads on these pages. See my disclosures for more details about affiliate links. You can also just shop from one of the links below:
- HomeTechHacker Shop: This is a listing of products that I use, have reviewed, and that I recommend
- HomeTechHacker Technology Advisor: This suite of tools will give you customized home technology product recommendations based on your needs
- My Amazon affiliate link: Just click on this link to go to Amazon and shop
Thank you! I really appreciate it!
This page contains affiliate links. If you purchase an item using an affiliate link I will receive a small commission at no cost to you. Affiliates do not influence my recommendations. Read my disclosures for more information.