Home Assistant has announced that the Z-Wave and OpenZWave integrations are going away in release 2022.4. The only supported Z-Wave integration will be Z-Wave JS. I migrated my Z-Wave network to Home Assistant’s legacy Z-Wave integration a couple of years ago, and it was a lot of work. I had to repair all of my devices. Thankfully, moving to Z-Wave JS integration doesn’t require repairing, but it isn’t without work, especially if you run Home Assistant core in a Python virtual environment. How much work is it? Here are the steps I went through.
This page contains affiliate links. If you purchase an item using an affiliate link I will receive a small commission at no cost to you. Affiliates do not influence my recommendations. Read my disclosures for more information.
Table of Contents
Background
I run Home Assistant core in a Python virtual environment running on a virtualized Ubuntu server (using Proxmox as my hypervisor). I use the Nortek dual Z-Wave/Zigbee Z-Wave USB stick, which has served me well. Home Assistant has an automated migration and Z-Wave JS installation tool, but it doesn’t work for my setup. If you run Home Assistant in a container, Home Assistant Core, or don’t want to use Home Assistant’s Z-Wave JS server you’ll have to take the manual installation path as I did.
I have 42 Z-Wave devices and well over 200 entities, many of which I use in various automations. My smart home really depends on Z-Wave. I was concerned with the following before starting my migration:
- Having many of my Z-Wave devices stop working or start working differently than they used too
- Needing to re-write automations because some of the entities don’t migrate
- Having to rename so many entities one by one
- How long the migration might take
- Knowing which Z-Wave JS server to use and how to install and configure it (Z-Wave JS, or ZWaveJS2MQTT)
With these concerns in mind, I proceeded.
Step 1: Prep for Z-Wave JS Upgrade
Because my family relies on Home Assistant so much, I’m wary of totally breaking it. Luckily, I’m pretty methodical about backups. I upgraded Home Assistant to the latest version and made sure to update all of the Ubuntu packages. Then, I took a snapshot of the VM before proceeding. This way, if something catastrophic happens, I can just restore the snapshot.
I also wanted to have documentation of all my Z-Wave devices and entities so I could verify all my Z-Wave entities migrated and know what they should all be named to work with my UI and automations. I ran the following code in the Home Assistant -> Developer Tools -> Template to get a full listing:
{%- for node, zstates in states | selectattr('attributes.node_id', 'in', range(1000)) | groupby('attributes.node_id') %}
{{ node }}:
  {%- for s in zstates %}
  - {{ s.name }}
    {{ s.entity_id }}
  {% endfor %}
{%- endfor %}
Also, I documented my Z-Wave security key (used by security devices like my Z-Wave door locks) and the USB device location. Both are needed to configure your Z-Wave JS server. You can find these in the existing Z-Wave integration settings in Home Assistant. Note that you’ll need to convert the key from a byte array (0x01, 0x02, 0xFF, etc.) to a 32 character hex string (0102FF…) by dropping the 0x in front of each number. This is the format the Z-Wave JS server expects.
With all that prep done, remove the Z-Wave or OZW integration from Home Assistant and reboot your server.
Step 2: Install ZWaveJS2MQTT or Z-Wave JS Server

To
The first decision to make is which Z-Wave JS server to use, Z-Wave JS or ZWaveJS2MQTT. Z-Wave JS and ZWaveJS2MQTT both run the Z-Wave JS server, but ZWaveJS2MQTT has a better interface for managing your Z-wave devices and the ability to use MQTT with Z-Wave (it is important to note that you do not have to use MQTT if you don’t want to). It’s possible that some information from Z-Wave nodes may not publish directly to the Home Assistant integration, but might provide information via MQTT. Since I’m already a user of MQTT and I’d like the additional option of getting Z-Wave information over MQTT, I decided to go with ZWaveJS2MQTT as my Z-Wave JS server.
Since I’m running Ubuntu 20.04 server as my base OS, I decided to install ZWaveJS2MQTT as a snap package. Ubuntu comes with snapd installed, but if you are running a different OS you’ll want to make sure that snapd is installed with these instructions.
At the time I installed it, the stable snap channel for ZWaveJS2MQTT was running too old of a version for newer releases of Home Assistant, so I installed it from the edge channel. When you install, check the necessary version for Home Assistant and which snap channel you’ll need. You probably don’t want to stay on the edge channel if you don’t have to. I’ll probably switch to the stable when it is updated enough. I also gave the package access to USB so it can access my Z-Wave USB stick:
sudo snap install zwavejs2mqtt --edge
sudo snap connect zwavejs2mqtt:raw-usb
sudo snap connect zwavejs2mqtt:hardware-observe
sudo zwavejs2mqtt.exec
The last line above runs ZWaveJS2MQTT without daemonizing it, which is good for initial configuration and testing.
By default, I could only access the web interface from http://localhost:8091, not from any remote machine. Allowing access from external machines is configurable in the ZWaveJS2MQTT UI, but also from the command line. For example, if you needed to modify which machines have access to the web UI and which port ZWaveJS2MQTT’s web interface runs on you could do:
sudo snap set zwavejs2mqtt server.host='0.0.0.0'
sudo snap set zwavejs2mqtt server.port=1234
Replace '0.0.0.0' and '1234' with whatever is appropriate for your network. Now it’s time to configure ZWaveJS2MQTT.
Step 3: Configure ZWaveJS2MQTT server
Configuration was straightforward. I needed the network key and USB location of my Z-Wave dongle that I saved in the first step. In the ZWaveJS2MQTT UI, I went to the Settings->Z-Wave and entered the USB location and the S0 legacy network key. I then had it generate new S2 level keys in case I add devices later that support these. There are other Z-Wave settings in this screen, which you can learn more about in system documentation or in my supporting resources towards the end of this article.
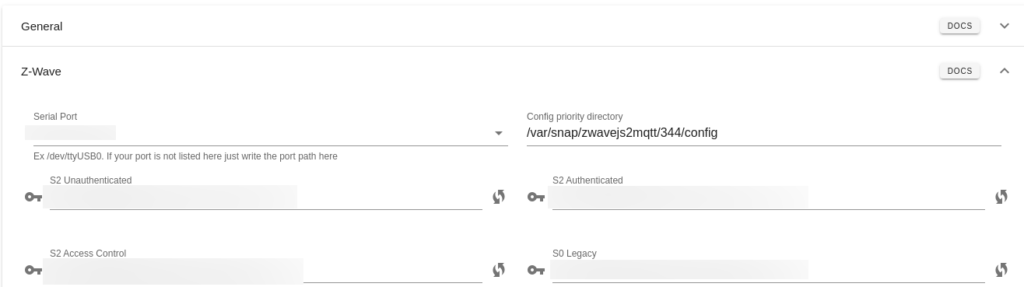
I also turned on the Home Assistant WS Server integration for use with the Home Assistant Z-Wave JS client-side integration. To start, I configured the MQTT gateway with my MQTT server credentials and location, just so I can see what gets passed via MQTT. This step is completely optional. Later, I determined I didn’t need to use any of the MQTT messages so I turned this feature off.
Step 4: Interview the Z-Wave devices (wait for a while)
This step took long enough that for a while I thought it wasn’t working and that I was going to have to revert. I’m sure how long this takes is highly dependent on the number, type, and locations of your Z-Wave devices. For me, this took over an hour to complete. The ZWaveJS2MQTT control panel contains the status of all of the Z-Wave devices, including what stage of the interview process they are in. All you have to do is watch and make sure the devices are populated with the right information properly.
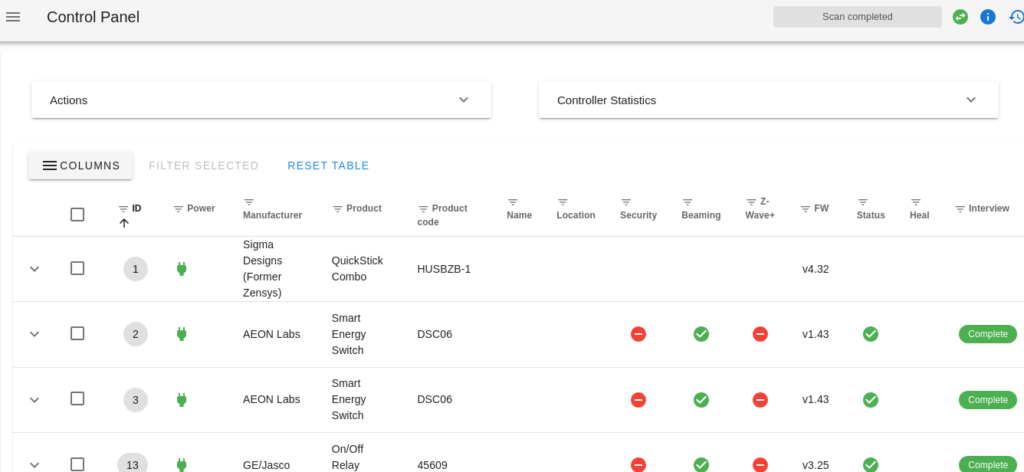
If you have battery-powered devices, you’ll want to wake them up to complete the interview process. I had to wake a couple of my battery-powered devices twice to finish the interview (or perhaps I didn’t do it right the first time). A couple of devices didn’t seem to have full information after interviewing. Starting the interview process again for these specific devices fixed it quickly.
After I was confident everything was interviewed properly, and I tested and played with some of the Z-Wave devices via the control panel, I decided it was time to daemonize the ZWaveJS2MQTT server (which means it will automatically start on boot and run in the background). Just a one-line command:
sudo zwavejs2mqtt.enable
Step 5: Install and configure the Z-Wave JS integration in Home Assistant
This is the easiest part. I added the Z-Wave JS integration to Home Assistant. Configuring it was a matter of just making sure it uses the ZWaveJS2MQTT server I just set up. Since Home Assistant and the ZwaveJS2MQTT server are on the same machine, for me the right address is ws://localhost:3000.
All of my Z-Wave devices populated quickly, but all devices and entities had new names. The node IDs, however, stayed the same and I used the listing of nodes and entities I created in Step 1 to rename the entities. With 200+ entities, this took some time.
Some entities came over as disabled. I found out that you can enable them. I’m not sure why they come over as disabled.
Sometimes it was hard to tell which entity mapped to my old entities, or if it came over at all. Occasionally I had to watch the entity values change while I played with the Z-Wave device to know what the entity was supposed to be.
Step 6: Finishing touches (aka, things I had to fix)
Most things worked fine after renaming entities, but a few things needed some extra tweaking.
Door Lock Logic — I had some extensive logic for my two Z-Wave Yale door locks based on two sensor entities, alarmLevel, and alarmType, that came over as disabled when I migrated to Z-Wave JS. At the time, I didn’t realize you could enable the entities. That probably would have prevented me from doing all the work I eventually did.
Previously I had sensor templates set up to tell me who unlocked the door and had some actions trigger off of that. Since I didn’t think I had that this time, I explored using MQTT data to recreate this, but then I discovered Z-Wave JS event notifications. I watched the event data via the Home Assistant developer tools by watching zwave_js_notification. From this, I was able to reverse engineer which code was used to unlock the door and map that user to a person, which I stored in input_text fields.
Here’s a version of the automation I used for both deadbolts to map the users:
- id: who_unlocked_garage_deadbolt
  alias: Who Unlocked Garage Deadbolt
  initial_state: true
  trigger:
  - platform: event
    event_type: zwave_js_notification
    event_data:
      node_id: 33 #Enter the node for your doorlock here
      event: 6
  action:
  - service: input_number.set_value
    data_template:
      entity_id: input_number.garage_deadbolt_user_code
      value: '{{trigger.event.data.parameters.userId | int}}'
  - service: input_text.set_value
    data_template:
      entity_id: input_text.who_unlocked_garage_deadbolt
      value: >
        "{%- if states('input_number.garage_deadbolt_user_code') | int == 1 -%}
        Unlocked by Person 1
         {%- elif states('input_number.garage_deadbolt_user_code') | int == 2 -%}
        Unlocked by Person 2
         {%- elif states('input_number.garage_deadbolt_user_code') | int == 3 -%}
        Unlocked by Person 3
         {%- elif states('input_number.garage_deadbolt_user_code') | int == 4 -%}
        Unlocked by Person 4
         {%- elif states('input_number.garage_deadbolt_user_code') | int == 0 -%}
        Unlocked by Master Code
         {%- else -%}
        Unlocked by Unknown
         {%- endif -%}"
Then I changed my pre-existing automations that trigger off who opened the door to use the appropriate input_text entity.
All other items were fixed by realizing that I could enable some of the disabled entities that I used to use before.
Final thoughts
This whole change took an afternoon, and then I spent another couple of hours reverse-engineering the door lock event information and redoing the logic. So, not too bad.
Overall, this is a very positive change:
- My Z-wave network seems to respond consistently faster
- Some devices used to fail to update consistently. I actually wrote an automation to refresh a couple of entities every hour. I no longer need this automation
- The interface for Z-Wave devices is much better than it used to be, and having additional logging and a control panel via the ZWaveJS2MQTT server is an added bonus
- You can get even more Z-Wave device information to use for triggers and other customizations via the Z-Wave JS event notifications and MQTT
Still, I hope to not have to do this level of migration again. I also hope that the snap package of ZwaveJS2MQTT keeps up with the Home Assistant required version, or I may have to manually install it, or hold off on my Home Assistant upgrade.
If you’re hesitating to migrate, I understand. You shouldn’t be too concerned because this is all works pretty well. It’s even easier if you’re running HassOS or Home Assistant supervised (then you get to use the migration wizard and official Home Assistant Z-Wave JS server add ons). But, it’s not too bad even if you have to install things manually. Just remember to back up your installation and document your Z-Wave node information and network security key no matter what way you migrate.
Supporting resources
- Home Assistant release 2022.3 blog post
- Home Assistant Z-Wave JS integration documentation
- ZWaveJS2MQTT GitHub documentation
- Snapd Installation for various Linux distributions