MQTT is a great protocol to have in your automation arsenal. I previously wrote a similar article about using the Toke Mosquitto container with Home Assistant and Docker. I have since switched to the Eclipse Mosquitto image and I have received a few questions about how to set it up. This article explains how to quickly get started with MQTT using Eclipse Mosquitto, Docker, and Home Assistant.
First, let’s get through some basics.
Table of Contents
What is MQTT and what can I do with it?
MQTT, which stands for Message Queuing Telemetry Transport, is often described as the protocol of the Internet of Things (IOT). It’s a lightweight publish/subscribe system where clients can both publish and subscribe to messages. It works well for IOT devices because it is low-bandwidth.
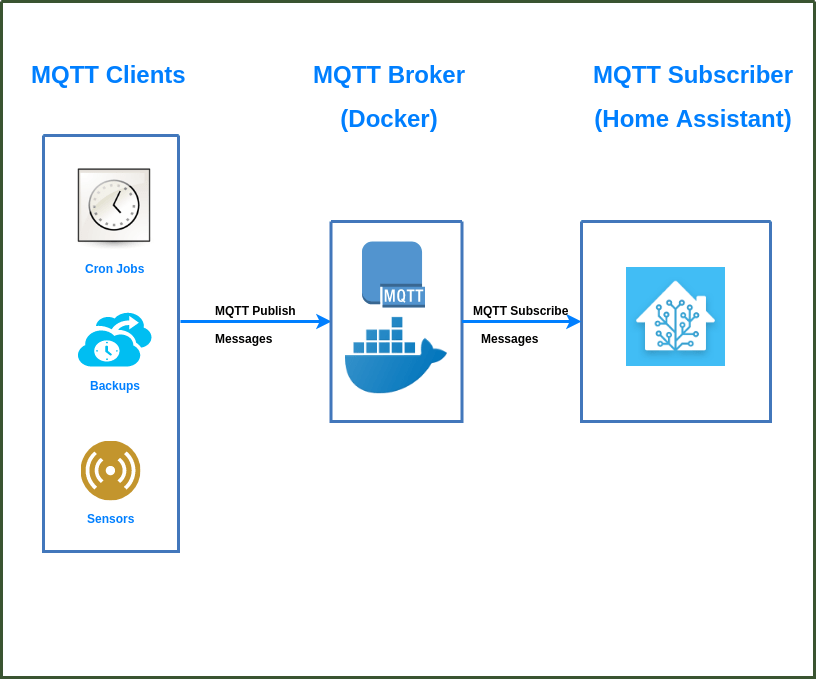
MQTT uses a broker to facilitate communication between subscribers and publishers. In the diagram above, Home Assistant subscribes to messages published by sensors and jobs. However, Home Assistant can also be a publisher and the clients can also be subscribers.
Common uses of MQTT include:
- Sharing and reacting to sensor information like temperature, humidity, motion, and light levels
- Integrating alarm panels that don’t normally talk to your smarthome hub
- Communication between relays and home automation controllers to open gates, garage doors, and to control irrigation, heating, and cooling systems
- As a substitute for devices that don’t have an API or a standard way to communicate with other devices in your ecosystem. You can build these devices for pennies on the dollar compared to their commercial counterparts
I am currently using MQTT to provide Home Assistant with the status of my home backups and some cron jobs. I also use MQTT to interface with a homebrew garage door controller, temperature/humidity/motion multisensor, and relays that control light switches.
What is Docker?
Docker is a virtualization technology, similar to virtual machines. Instead of virtualizing an entire operating system, Docker allows you to virtualize an application into a container for maximum portability and flexibility. I previously wrote an article about Docker so I won’t go into too much detail here.
What is Home Assistant?
Home Assistant is a software-based smarthome hub with a focus on security and local control. It is the brain of my smarthome. I’ve written a lot about it if you want to learn more. Below is a diagram of how they all can work together.
Setting up MQTT in Docker using Eclipse Mosquitto
Picking a broker is the first part of getting started with MQTT. Home Assistant comes with an embedded broker. Cloud-based brokers are popular as well. I went with Mosquitto because it’s popular and there’s a Docker image.
Set up persistent data and base configuration
I originally chose to go with the Toke Mosquitto image because I easily found good documentation. However, it hasn’t been kept up to date and the Eclipse Mosquitto container is now what I recommend. You should set up persistent data directories and the base configuration file (mosquitto.conf) before starting your container. I’m basing this tutorial on Docker running on my Ubuntu 20.04 system, but this should work with most Linux systems. On your Docker host:
mkdir -p /storage/mosquitto/config
mkdir -p /storage/mosquitto/data
mkdir -p /storage/mosquitto/log
Replace the directories with whatever is appropriate for you. You should create a mosquitto.conf file in the “config” directory. My base mosquitto file:
persistence true
persistence_location /mosquitto/data/

user mosquitto

# Listen on all interfaces
listener 1883

#Allow connection without authentication
allow_anonymous true

log_dest file /mosquitto/log/mosquitto.log
log_dest stdout
Pay attention to lines listener and allow_anonymous lines. Since the 2.0 image of the Eclipse Mosquitto image, you will need these lines to connect without a username and password from any device on your network. We’ll go over how to add security (username and password) to the MQTT broker later.
Create and run the Eclipse Mosquitto container
Now the easy part, the Docker run command:
sudo docker run -itd \
--name=mqtt \
--restart=always \
--net=host \
-v /storage/mosquitto/config:/mosquitto/config \
-v /storage/mosquitto/data:/mosquitto/data \
-v /storage/mosquitto/log:/mosquitto/log \
eclipse-mosquitto
This command tells the container where to look for config, data, and log files. I’ve pointed these to the local directories I set up earlier. My Mosquitto MQTT broker should be up and running now.
Testing the Eclipse Mosquitto MQTT instance
To test, install the mosquitto client package:
sudo apt install mosquitto-clients
This will get you access to publish and subscribe commands. First, start by opening a terminal and subscribing to a topic:
mosquitto_sub -h <brokerhost> -t "test"
Replace <brokerhost> with the IP or hostname of your broker. This starts a subscription to any messages that are published with the topic “test.”
In another terminal send a message to the topic test:
mosquitto_pub -h <brokerhost> -t "test" -m "Hello World"
After entering this command, “Hello World” should show up in the terminal where you ran the mosquitto_sub command. If you see it, your broker is working!

Adding security
As it is currently set up, any client can connect to your broker to publish and subscribe to any topic. You can add some security by requiring a username and password for clients to connect to the broker.
First, you’ll need to create a password file. The best way is to connect to your container and run mosquitto_passwd. In order to connect to your container’s console you need to find out its ID:
docker ps
This will give you a list of containers and their IDs. Using that ID you can then run:
docker exec -it <containerID> sh
Replacing <containerID> with the container of your Mosquitto container will give you a command line. Alternatively, you can use Portainer to connect directly to the console. FYI – I’ve found it this Docker image works with “sh” shell but not the “bash” shell.
From the console run something similar to:
mosquitto_passwd -c /mosquitto/config/credentials <username>
With appropriate filename and username arguments, this command will ask for a password and then create a hashed password file. Then you will need to modify the mosquitto.conf file you created earlier to remove anonymous access and add password protection. Below we changed the allow_anonymous value (line 10) and added a password_file option (line 15).
persistence true
persistence_location /mosquitto/data/

user mosquitto

# Listen on all interfaces
listener 1883

#Allow connection without authentication
allow_anonymous true

log_dest file /mosquitto/log/mosquitto.log
log_dest stdout

password_file /mosquitto/config/credentials
Remember to use the appropriate password_file path and filename. After restarting the container, your publish and subscribe commands will need to have a username and password to work:
mosquitto_sub -h <brokerhost> -t "test" -u "<username>" -P "<password>"
mosquitto_pub -h <brokerhost> -t "test" -m "Hello World" -u "<username>" -P "<password>"
You can make your broker more secure by using web sockets or TLS. Digital Ocean has a great tutorial.
Configuring Home Assistant for MQTT
This is as simple as adding the following code to your configuration.yaml, and then restart Home Assistant:
mqtt:
  broker: <brokerip>
  username: <mqtt_username>
  password: <mqtt_password>
You don’t need the username and password if you did not configure your broker to use one. Then, you want to configure Home Assistant to subscribe to some topics. I decided to test this by subscribing to a topic that displays the time of my last Home Assistant backup:
 sensor:
  - platform: mqtt
    name: "Last HA config backup"
    state_topic: "backup/HA"
I added a mosquitto_pub statement to my backup script. It simply sends the time of the last backup to the topic “backup/HA.” Here is the sensor card in the UI that displays the message:

Final thoughts
MQTT is cool, solid, and fast. It provides an easy way to pass information. It also makes it easy to integrate inexpensive hardware. Running it in Docker and configuring Home Assistant to use MQTT is a straight forward process.
Here are a few projects that use MQTT that I’ve written up over the years:
- Building a smart garage door opener using a Shelly 1 relay
- Putting together an inexpensive multisensor (light, temperature, motion, humidity) based on the NodeMCU
- Using a Shelly 1 relay to add smart control to a light switch
- Adding control and status monitoring of my irrigation system
- Implementing a long-range mailbox sensor.
- Configuring the Shelly Dimmer 2 and integrating it with Home Assistant
- Integrating power outages and generator status with Home Assistant
- Using a Sonoff RF Bridge to enable 433Mhz RF devices to integrate with Home Assistant
Interested in supporting HomeTechHacker?
Have you found the content on this site useful? If so, are you interested in supporting me and this site? There’s no obligation of course, but I would really appreciate any support you can give. Below are a few ways you can show support:
- Share this site with your friends and on social media (use the sharing links at the end of this page for your convenience)
- Subscribe to this site
- Purchase my book, The Smart Home Manual, for yourself or as a gift.
- Put a link to HomeTechHacker on a site you have access to. Be sure to let me know about it!
- Reach out to me via my contact page or Twitter and let me know something I should write about
- Shop at Amazon through my affiliate links and ads on these pages. See my disclosures for more details about affiliate links. You can also just shop from the link below:
- US Amazon link: https://amzn.to/2H917ud
Thank you! I really appreciate it!