At work and at home I’ve seen the benefits of virtualization. In general, virtualization is the process of running a virtual instance of a computer or application in a layer abstracted from the actual hardware. For example, you could have one “host” machine running Linux, and then have that machine have multiple “guest” machines. These guests could be Windows or other Linux machines, running on top of the same hardware, even at the same time. I’ve used virtualization a lot at home, including virtualizing my pfSense router. I’m most familiar with virtual machines. I use virtual machines to:
- Upgrade machines without fear of something going wrong. I can use a snapshot to restore the machine to the state it was before I upgraded.
- Isolate certain software and security features across machines. As I mentioned, I run a router in a virtual machine. I also run my TP-Link access point controller and several other virtual machines for various security and management functions.
- Reduce my hardware needs.
- Run Windows in the rare cases I need or want to without buying a windows machine.
Containers are another type of virtualization. Instead of virtualizing the whole operating system, like Windows and Linux, your virtualize the application. For example, you can create a container with Plex or WordPress or Apache that stores the application. These containers can run on different machines, and even in virtual machines.
Below is my first experience Docker. Keep in mind, I’m a total beginner. I may not have done all the things the “right way” or right at all, but I gotta start somewhere!
Table of Contents
Benefits of Docker containers
Docker has the benefits of virtual machines, as I listed above, but it also has some additional advantages:
- Quicker to spin up applications. Instead of building out an entire OS, you just build out what the application needs. You can both build and start a container faster than a virtual machine.
- Containers are good at maximizing the number of applications running on a server.
- Containers have isolation from other containers on the host. This means you can make changes to a container without affecting other applications.
- Docker containers require less memory than virtual machines (i.e. less overhead).
I’m not saying one should always use Docker instead of virtual machines. For instance, virtual machines offer isolation in a way that can be a very important security consideration. The choice is not always clear-cut.
Getting Started with Docker
I’ll be cutting the cord soon. I have a lot of home videos, ripped videos, recorded TV shows, and photos stored locally on my network. Currently, I use MythTV and Kodi to show local content. When I cut the cord, I probably won’t be using MythTV. I need a way to stream all of that content to the streaming sticks on my network. Plex was made for this, as it can transcode to any format needed by my devices and has a MythTV plugin. I haven’t cut the cord yet, making Plex a great test case for my start with Docker.
The host system for my docker containers will be Ubuntu 18.04.
Getting Started with Docker: Hello World
Instead of just starting with a Plex container I wanted to step through a basic install and run a simple container just to get my feet wet. I find that Digital Ocean makes great tutorials specific to Ubuntu installs. I probably don’t need Ubuntu 18.04 specific instructions, but since they are available… So I followed this tutorial summarized below.
Setup Your Repositories to Include Docker
These commands will install the prerequisite apps and set up your system to install Docker from the official Docker Ubuntu repositories:
sudo apt update
sudo apt install apt-transport-https ca-certificates curl software-properties-common
curl -fsSL https://download.docker.com/linux/ubuntu/gpg | sudo apt-key add -
sudo add-apt-repository "deb [arch=amd64] https://download.docker.com/linux/ubuntu bionic stable"
sudo apt update
Finally, install Docker, and then add your user to the docker group so you can run Docker commands without sudo (you’ll need to log out and back after adding yourself to the Docker group). Alternatively, instead of adding your user to the docker group, you could use always use sudo with Docker.
sudo apt install docker-ce
sudo usermod -aG docker ${USER}
Download and Run the Hello World Container
A simple one-line command.
sudo docker run hello-world
Here you start to see the power and simplicity of Docker. Initially, Docker will not find the hello-world image, but it will automatically download it and run it for you. All the image does is tell you it is working, but it’s still a nice feeling. We’ve gone from zero to running a Docker container in minutes!
Setting up My Plex Container
With my few minutes of experience with Docker, I decided I was ready to tackle running a Plex container. I ran the following command to see my options for a Plex container:
docker search plex
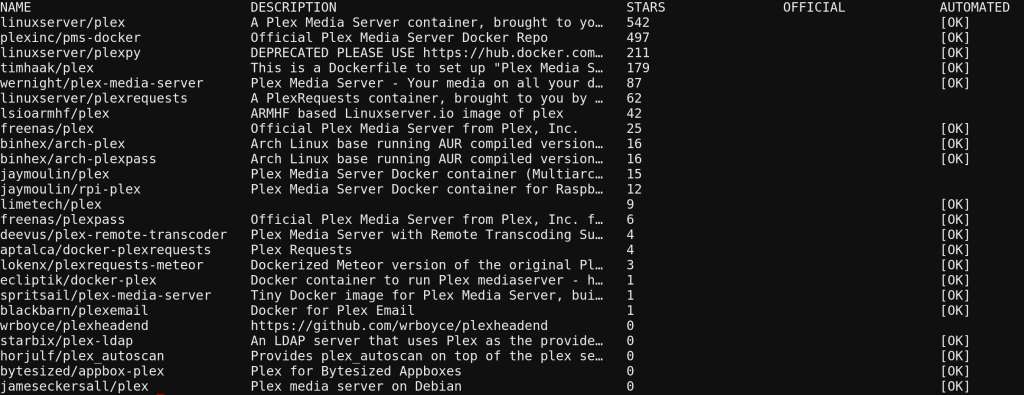
Seems I have a few choices. I decided to go with the one with most stars at the top of the list (linuxserver/plex) because I found a good tutorial to follow for setting up Plex in Docker. The next steps were simply to pull the image and create the container:
sudo docker pull linuxserver/plex
sudo docker create \
--name=plex \
--net=host \
--restart=always \
-e VERSION=latest \
-e PUID=1000 -e PGID=1000 \
-e TZ=America/Los_Angeles \
-v /storage/plex/config:/config \
-v '/multimedia/0-TV Shows:/data/TVshows' \
-v /multimedia/1-Movies:/data/Movies \
-v '/multimedia/2-Home-Movies:/data/Home Movies' \
-v /home/base/plex/transcode:/transcode \
linuxserver/plex
The first command simply downloads the Plex Docker image and makes it available for local containers. The second command takes a bit more explaining. The first few options specify the name of the container, that it will use the host machine’s networking, run as the user with the id 1000, and sets the Plex timezone. The next options for the container set up virtual directories the Plex container will use to access my TV and movie files, which are located on a file server mounted to the machine the Plex container will run on. They also tell Plex where to store configuration and transcode files. You can find more details on the image creation options in its documentation.
After the container is created, I can simply run:
sudo docker start plex
to start the container. Since I opted to use host networking and no special ports, I can access the Plex frontend at:
http://hostip:32400
32400 is the default Plex port.
Plex was up and running in a Docker container, and I was able to configure it as I wanted, which is the subject for another article (or as an alternative, you can try Emby).
Making Changes to Containers
Unfortunately, I forgot to add a picture virtual directory when I set up the initial container. When I noticed this, I had already gone through the timely process of downloading metadata for all of my videos and TV shows and setting up Plex the way I wanted it. I didn’t want to start from scratch. Luckily, Docker makes it easy to do this without starting over.
Since all the data for Plex is stored outside the container via the virtual directories I don’t really have to try and make changes to the Plex container. I can just make a new one that has the additional mapping for my photos, and then pick up where I left off. To do this, I need to stop the currently running Plex container:
sudo docker stop plex
Then, I can just delete it (I know, sounds scary but it is okay!) so I can create a new one with the plex name.
sudo docker rm plex
Since I’m going to recreate the docker container, now would be a good time to pull an updated plex image in case there is one:
sudo docker pull linuxserver/plex
Then I just recreate the image using the same command I used above, but adding a mapping for my photos directory:
sudo docker create \
--name=plex \
--net=host \
--restart=always \
-e VERSION=latest \
-e PUID=1000 -e PGID=1000 \
-e TZ=America/Los_Angeles \
-v /storage/plex/config:/config \
-v '/multimedia/0-TV Shows:/data/TVshows' \
-v /multimedia/1-Movies:/data/Movies \
-v '/multimedia/2-Home-Movies:/data/Home Movies' \
-v /multimedia/Pictures:/data/Pictures \
-v /home/base/plex/transcode:/transcode \
linuxserver/plex
Then I run it:
docker start plex
And I am back where I was, except now I can easily add my photos to Plex.
Managing Docker Containers
Even from this simple example, I can see the power of Docker. I am able to access a repository of container images and modify them locally. I can recreate better and updated versions of the containers in a few commands in a nondestructive way. And, I can run multiple containers on one machine, which is where I’m headed next.
At this point, I’m wishing I had installed a lot of existing applications (like MariaDB, Apache servers, etc.) in containers so that they are easy to maintain. I have plans to create more containers which led me to look for solutions for more easily managing multiple containers. I stumbled upon Portainer.io (here’s my review and how to set it up) and Docker Compose and as I add containers I plan to play with these solutions.
Also, check out this list of 25 basic docker commands for beginners. These are all the commands you need to know to effectively manage your Docker containers.
Final Thoughts
Before I got into virtualization, updates, and configuration changes to critical systems used to worry me because I’ve had experiences that have caused me to start over. Switching to virtual machines helped a lot as I am able to roll back to snapshots if things go wrong. However, containers allow me to do this easily at the application level. In a VM, I’d be recreating or rolling back an OS and suite of applications. With Docker, I can easily make changes to a single application without worrying about messing up any other parts of my system. Now I’ll have to think – Should I use a virtual machine or Docker? It’s great to have these options.
Editor’s Note: I’ve come a long way since my first Docker container. Check out my updates on using Docker.