This page contains affiliate links. If you purchase an item using an affiliate link I will receive a small commission at no cost to you. Affiliates do not influence my recommendations. Read my disclosures for more information.
As we progress through our current pandemic we are all adjusting to our new realities. One of those realities is doing wellness checks to make sure we are well before working or schooling near others. A good touchless thermometer can be key in a wellness assessment. They allow you to safely read visitors and household member temperatures.
In the age of smart devices, what about a smart thermometer to go along with your COVID 19 prepared smarthome? The Withings Thermo may be the touchless smart thermometer you are looking for.
Table of Contents
Withings Thermo overview
The Withings Thermo is a Wi-Fi and Bluetooth smart thermometer that pairs with your mobile device and the cloud. It is touchless; measuring your temperature through the arteries in your forehead. Most professional reviews have deemed it as accurate as the more invasive thermometers.
It supports historical tracking of temperatures for up to 8 users, making it ideal to use for the entire family. It lists at $99.99, making it pretty expensive. Is it worth it over the less expensive smart thermometers like the Comper Smart Forehead Thermometer ($59.99) or the Vicks Smart Temp ($29.99)? This review should give you the information you need to make a decision.
What’s in the Withings Thermo box

The box is nice and simple, containing the thermometer and instructions. The Withings Thermo takes 2 AAA batteries, which are included. The batteries should last a couple of years. The thermometer measures 4.6 inches long and 1.31 inches around and only weighs 2.7 ounces with batteries installed.
One nice touch is that the MAC address is written on the bottom of the box, but labeled as the serial number. This is very convenient for me because I use MAC addresses to assign static DHCP leases. Usually, I have to add the device to my network once to find out its MAC address, and then go and assign a lease and DNS hostname. Knowing the MAC address in advance allows me to do it ahead of time. TP-Link does this with its smart devices too.

The front of the thermometer has an imbedded, easy to read, 20×5 pixel LED display which displays the temperature reading and other key information. The end of the display (opposite of the cap) is touch-sensitive (see the three dots above), allowing you to interact with the thermometer along with the button close to the cap.
Set Up

Set up is pretty straight forward. First, you download the Withings Thermo app. I already own a Withings Body Cardio smart scale which has an app. Unfortunately, this thermometer requires a new app. On the good side, my existing Withings credentials worked. Then you just step through instructions on the app which pair the thermometer with your phone and set up its WiFi or Bluetooth connection. Your data will be stored with your account in the cloud.
Once you have the app setup you can create user profiles in order to monitor several people. You can add name, gender, birth date, weight, height, and assign pictures for each profile.
Usage
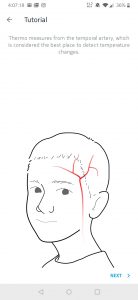
The app also gives a tutorial on how to take a temperature reading. It starts off with this rather creepy looking image (above) displaying your temporal artery. Under the cap of the thermometer are 16 infrared sensors that read your temperature via in your forehead. The steps are as follows:
- Remove the protective cap
- Press and release the button on the Thermo
- Starting from the center, scan across the forehead in a straight line.
- The Withings Thermo will vibrate at the end of the measurement and the result will come up on the display.
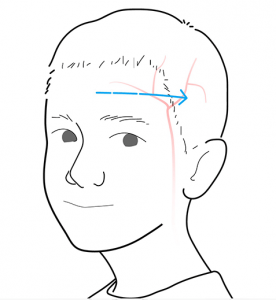
You don’t need to touch the thermometer to your forehead. It will work up to half an inch away.
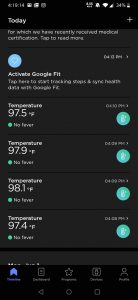
Once you have a temperature reading you can use the display to assign it to a person. If you don’t the app will allow you to assign the temperature as well. Also in the app you can add notes for each reading and see advice about what to do (if anything). The app takes into account the temperature, age, and symptoms (you select from a list) in giving you advice.
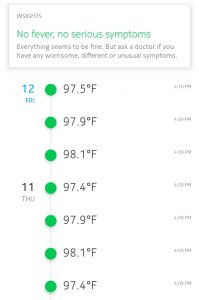
If the thermometer detects that you may be ill (high temperature or fever) after a temperature reading it will display a yellow or red indicator on the LED screen.
Although I had to set up a separate app to use the Withings Thermo, temperature readings did show up in the Health Mate app I use with the Withings scale.
Final thoughts
If you can stomach the price, this thermometer has a few advantages over the Vicks Smart Temp. The Thermo doesn’t require any touch or invasion and has Wi-Fi and Bluetooth. The Vicks Smart Temp is Bluetooth only and is meant for oral, rectal, or underarm use.
The Cooper Smart Medical Forehead Thermometer looks to be very similar in design and function to the Withings Thermo, at $40 less. However, it is also Bluetooth only, meaning it needs to be actively paired to your phone to transmit temperature readings. It started off as a Kickstarter product and doesn’t have the corporate backing of the Thermo, but is seems like an extremely reasonable budget alternative.
Overall, I think the Withings Thermo is well worth it in this day and age.
What do you think? Do you own a smart thermometer? Which one? Let me know what you are using in the comments or on Twitter.