
In this article, I will explain some network security basics and how to configure a Pfsense firewall. In order for this article to be useful you may want to already know about IP networking and how network traffic is routed on a local area network.
Also, some basic pfSense knowledge will help. Here are some resources to learn more about pfSense:
- 7 Reasons pfSense Is Better Than Your Router Software
- 11 Great Choices for pfSense Hardware
- 6 Reasons to Use a pfSense Home Router
- Netgate documentation website
Table of Contents
What is a firewall?
If you imagine your home network as a club or music venue the firewall acts as the bouncer or security guard that stands at the door letting people into and out of your network. It stops random passersby from entering the network and doing as they please inside. When there are new visitors every second it is important for the bouncer in this analogy to establish some ground rules allowing only specific activities to pass through specific areas. An example would be making it harder for crypto miners to be deployed on smart appliances by blocking traffic on well-known crypto mining ports.
General firewall best practices
You may have a number of devices on your network or maybe just a few. There are a few best practices that you should keep in mind for small or home office networks.
- Segment the network based on use. For example, if you have a couple of TVs and music players put them all on a separate network that is different than the network that has a file server and a gaming computer on it. Maybe you also have a work device and want to make sure your home devices are not putting it at risk, you might want to create a separate network for work-related devices as well.
- Deny everything by default and then allow only what you need to access the internet, this will help increase the difficulty of low-level attackers.
pfSense Firewall design preparation
First, take an inventory of what devices you have and break them up into groups. I am a fan of spreadsheets and tables. Below are the hypothetical devices on a network split into groups and networks:
| Device | Group |
|---|---|
| Work PC | Work |
| Smart TV | Media |
| Speakers | Media |
| Door Camera | Operational |
| Coffee Maker | Operational |
| File Server | Personal-Wired |
| Personal PC 1 | Personal-Wired |
| Personal PC 2 | Personal-Wired |
| Personal PC 3 | Personal-Wired |
| Phone | Personal-Wireless |
| Tablet | Personal-Wireless |
| Guest | Guest |
Setting up your pfSense network
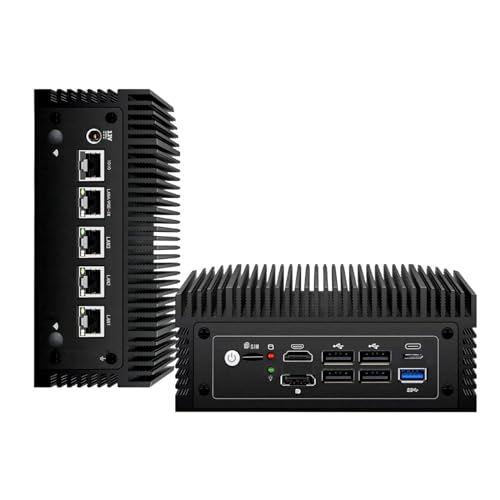
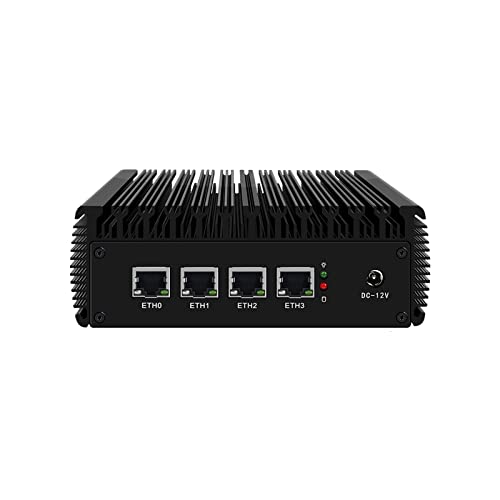
There are many good hardware choices for a pfSense router. You could go with the 5 port Netgate 2100 firewall appliance running Pfsense and a network switch or two to get started.
If you are going to use VLANs (more on that shortly) and have more than a few devices then you are going to need a managed switch that can do VLAN tagging.
A VLAN is a virtual network that allows you to segment a physical network into smaller, isolated networks, typically used to improve network security and efficiency by separating traffic.
The first thing we need to do in order to fully plan out our network is divide each of our device groups into a separate VLAN:
| Network | VLAN/ Nickname | Group | Connectivity | # of Devices |
|---|---|---|---|---|
| 192.168.1.0/24 | 1 / Wired | Personal-Wired | Wired | 4 |
| 192.168.2.0/24 | 2 / Work | Sensitive | Wired | 1 |
| 192.168.3.0/24 | 3 / Wireless | Operational / Media / Personal-Wireless | Wireless | 4 |
| 192.168.4.0/24 | 4 / Guest | Guest | Wireless | ? |
Editor’s Tip: Before you begin, start small with a single network and troubleshoot and finetune it from there. The more complex the configuration the more confusing it can be to troubleshoot.
Configuring pfSense interfaces
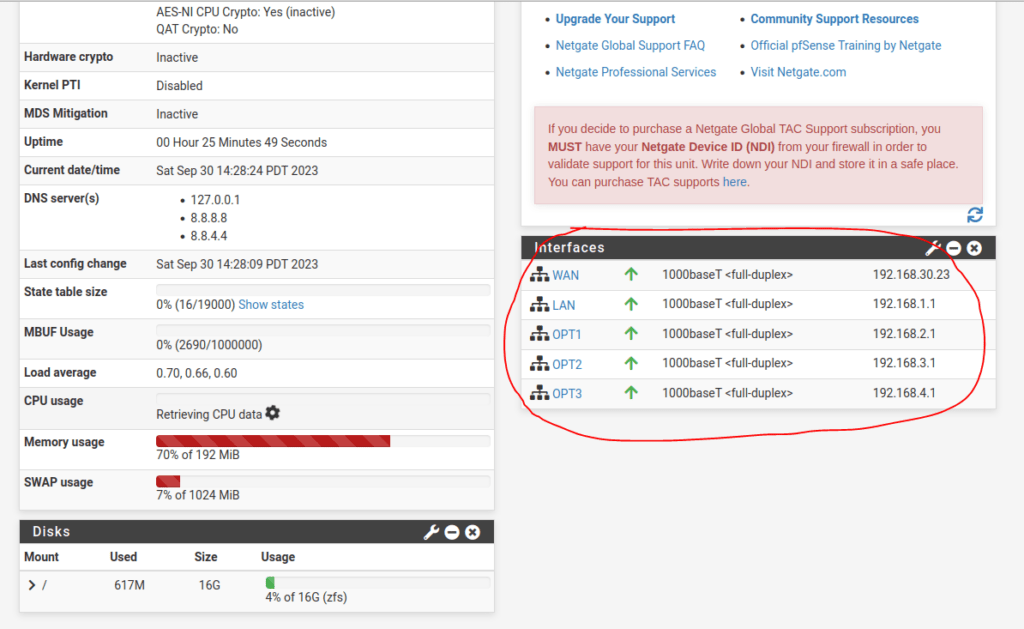
First, configure the router/firewall appliance before moving devices over. After going through the initial setup screen you will land on the main display and it should look something like what is shown below:

First, we will configure VLAN’s for each network port on the pfSense firewall. These are the areas or segments used to separate devices that serve different purposes.
Below is the Interfaces menu. Your interfaces (network ports) may have different names. The only interface that you should not touch is the WAN interface.

First, we will enable the interface:
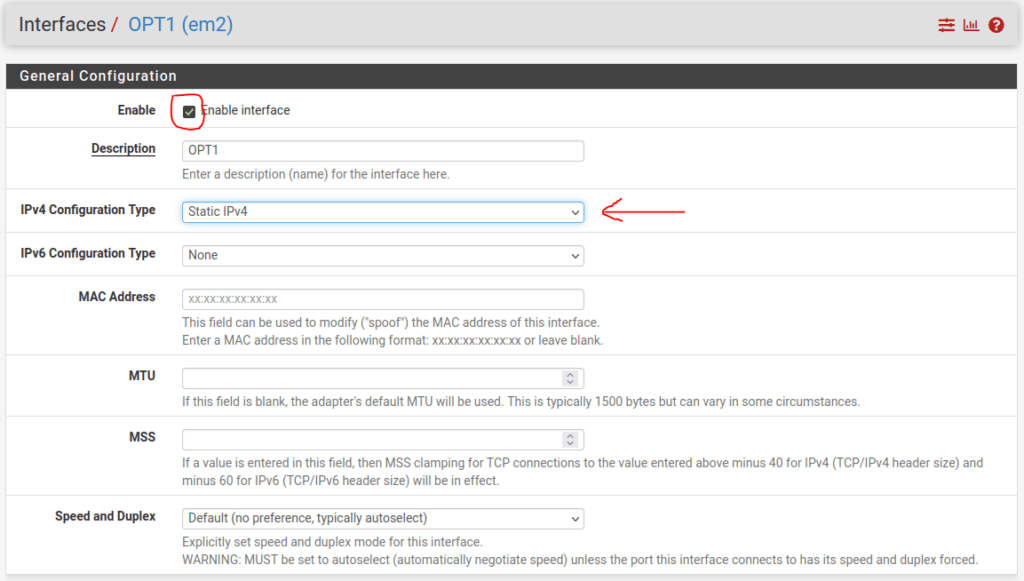
Just below the Speed and Duplex settings, we will assign the IPv4 address for the gateway:

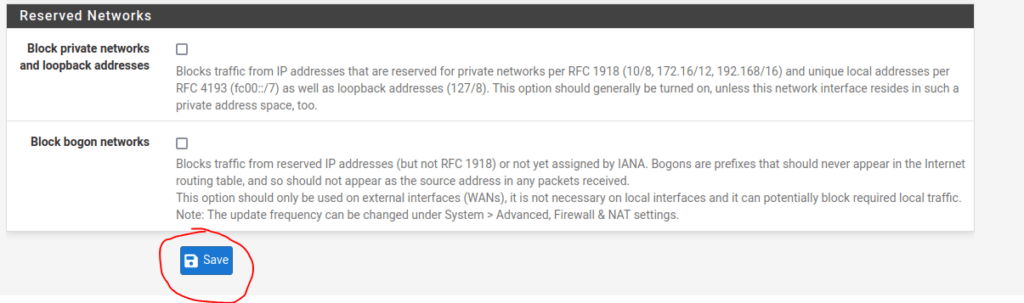
Then save the configuration and apply changes:

Repeat the above steps increasing the network number for each interface. Your dashboard should look something like this when you are done:
Setting up the pfSense firewall DHCP server
Next, we will start setting up the DHCP server on each interface so that our devices obtain an IP address automatically.
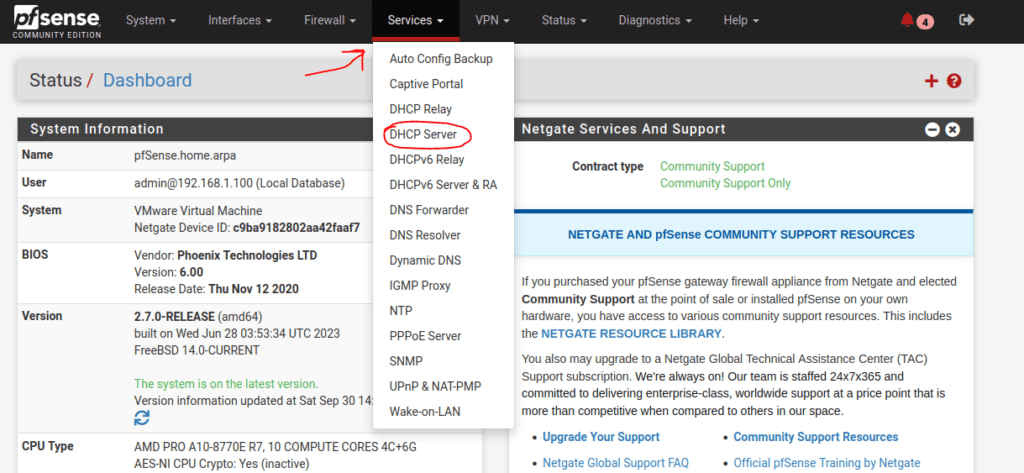
Select the DHCP server from the Services Tab on the menu bar:
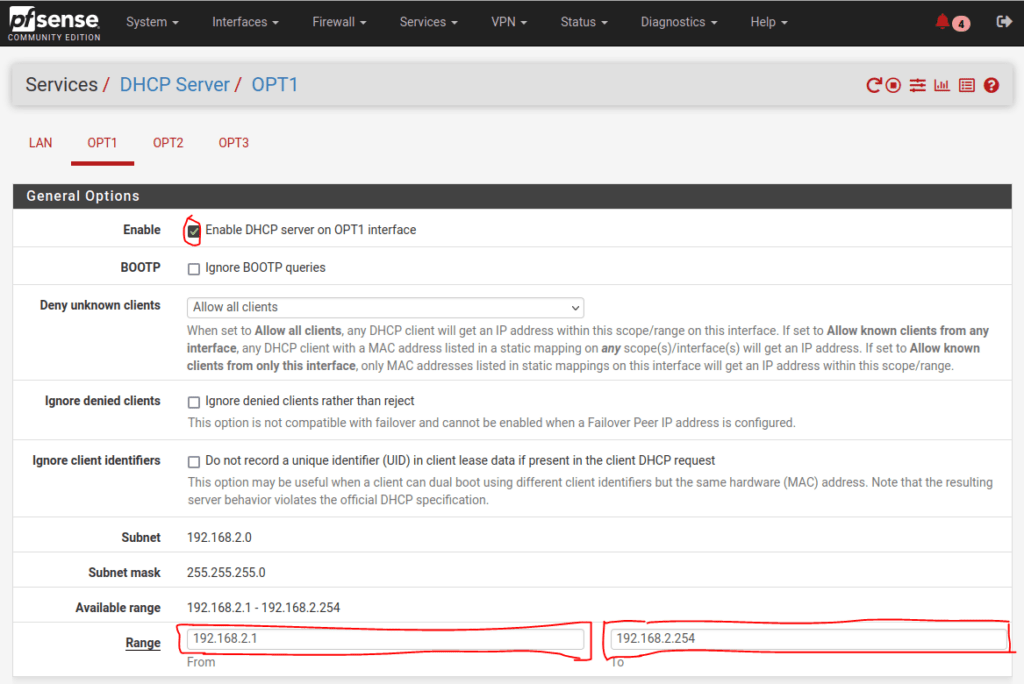
Make sure the range of IP addresses being handed out is configured. As shown below, you can include the entire network or only allow a few IP addresses to be handed out:
Repeat those steps for each interface you have configured. At this point, you can test your network. Connect a device to the pfSense router and make sure it receives an IP address by pulling up a command prompt and typing ipconfig (Windows), ifconfig (Mac) or ip (Linux).
You can test connectivity by pinging the other networks’ default gateways to be sure everything is working.
Before you connect it to the internet you’ll want to set up some basic firewall rules:
- Make sure the management interface webpage cannot be accessed from the internet.
- Make sure our network devices are only allowed to communicate on acceptable ports.
Setting up the pfSense firewall
Before creating firewall rules you need to make an outline of what the acceptable use of each device should be. Think about:
- How many devices should be able to connect to the file server?
- What should the default network policy be?
- Are there specific applications that use specific protocols that will need to be enabled?
It’s important to note that rules are processed sequentially. The firewall will check to see if the packet destined for the network matches the rules one at a time starting from the top. If no rules match then the packet is dropped or allowed depending on the default behavior of the firewall.
Here are a few basic rule outlines for our network
- Administrative access to the firewall should not be possible from any network except Personal-Wired.
- By default hosts on separate networks should not be able to communicate with each other.
- Our phone and tablet should be able to access the file server.
- The personal PCs and the file server should communicate freely.
- The file server should have explicit deny rules that prevent it from being accessed by devices without a static IP address (which our personal devices should have).
Best-selling pfSense Router Hardware


Configuring external pfSense firewall rules
Let’s set up the basic rules to deny administrative console access and allow traffic to freely flow from the internet to our internal hosts.
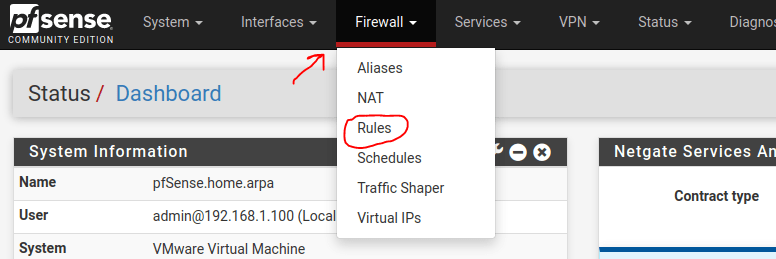
Navigate to the Firewall tab and select Rules.
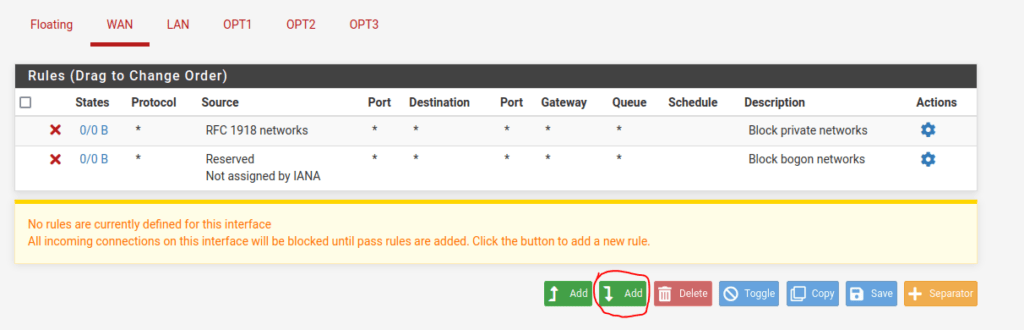
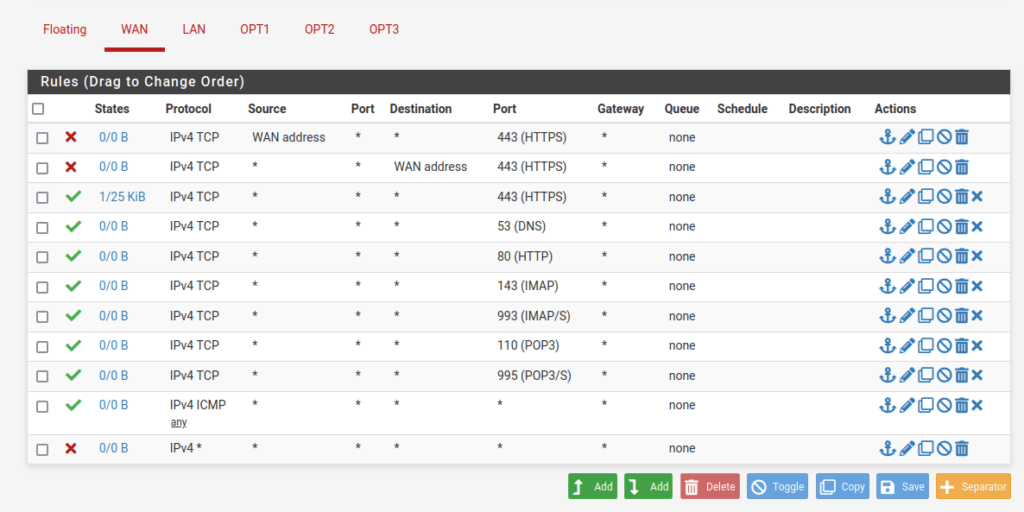
The default interface you will land on will be the WAN interface. Notice the highlighted sentence below. This means that by default all connections to the internet will be dropped. We will add a rule by clicking on the Add button just below the highlighted text.
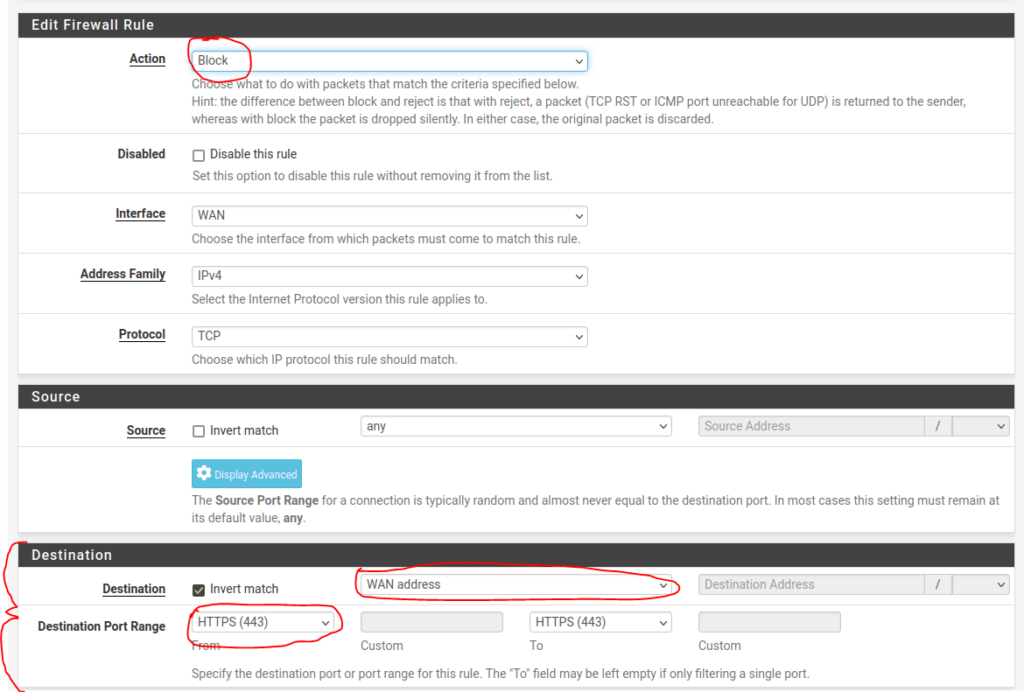
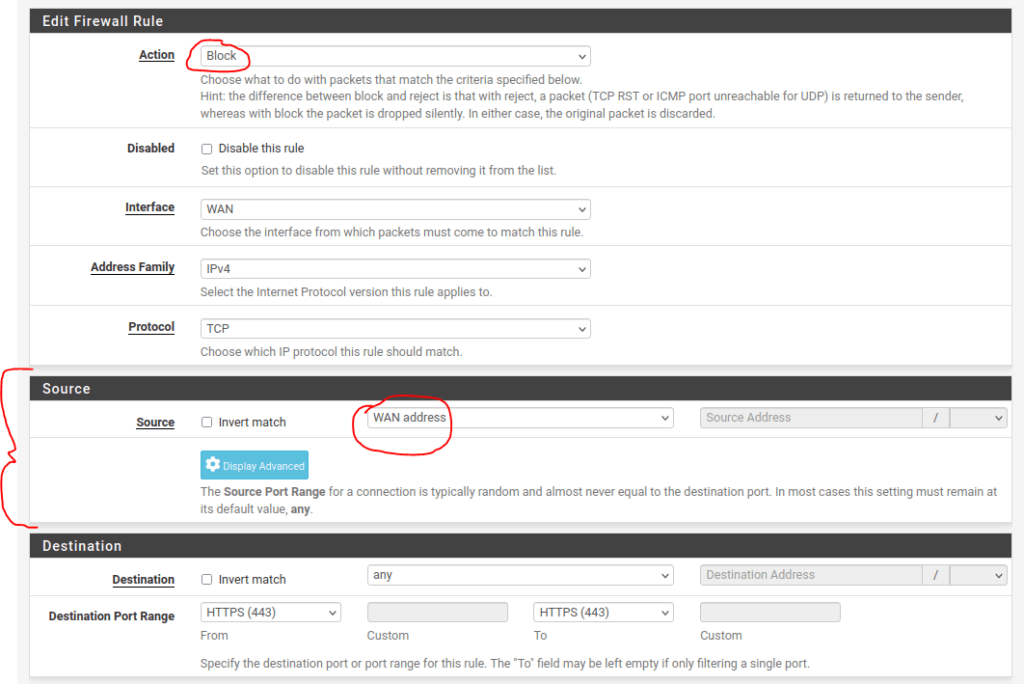
We want to deny access to the administrative panel through the WAN interface. This requires two rules:
- One to block HTTPS traffic destined from the WAN interface.
- Another rule for blocking traffic using the HTTPS port 443 from exiting the WAN interface.
Additionally, we will need to add a rule that allows all other HTTPS traffic just below it so that we can still browse the internet. Here are the rules.
Deny HTTPS traffic to the interface:
Deny HTTPS traffic from the interface:
Next we are going to want to want to allow HTTPS traffic from our hosts to the outside network. The rule action will be Pass, the source will be any, and the destination will be HTTPS port 443.
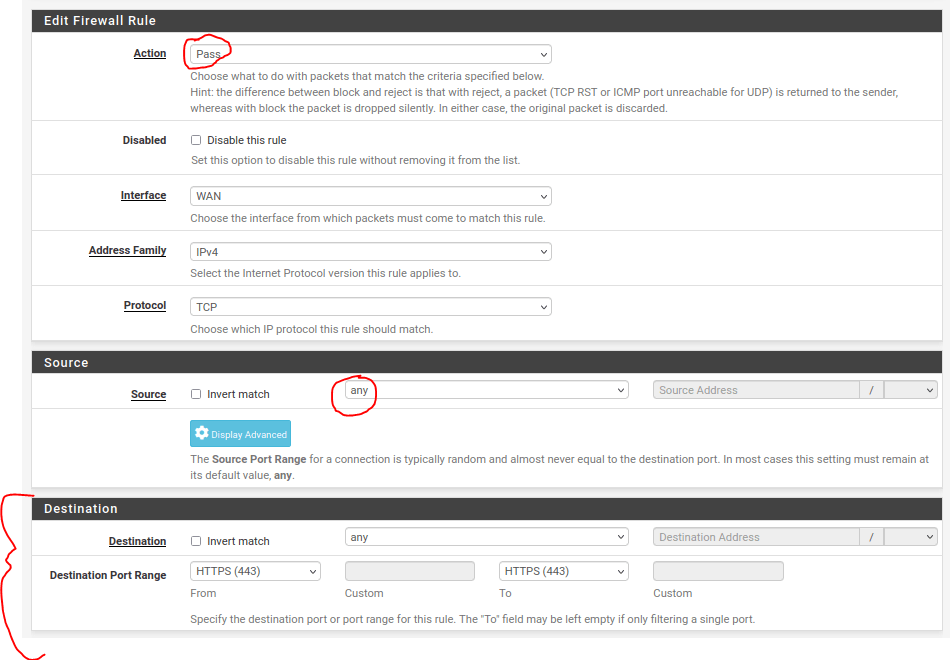
These three rules allow traffic to move from internal hosts to external websites but will disallow attackers from accessing the administrative interface of the router so that unauthorized changes to the network cannot be made.
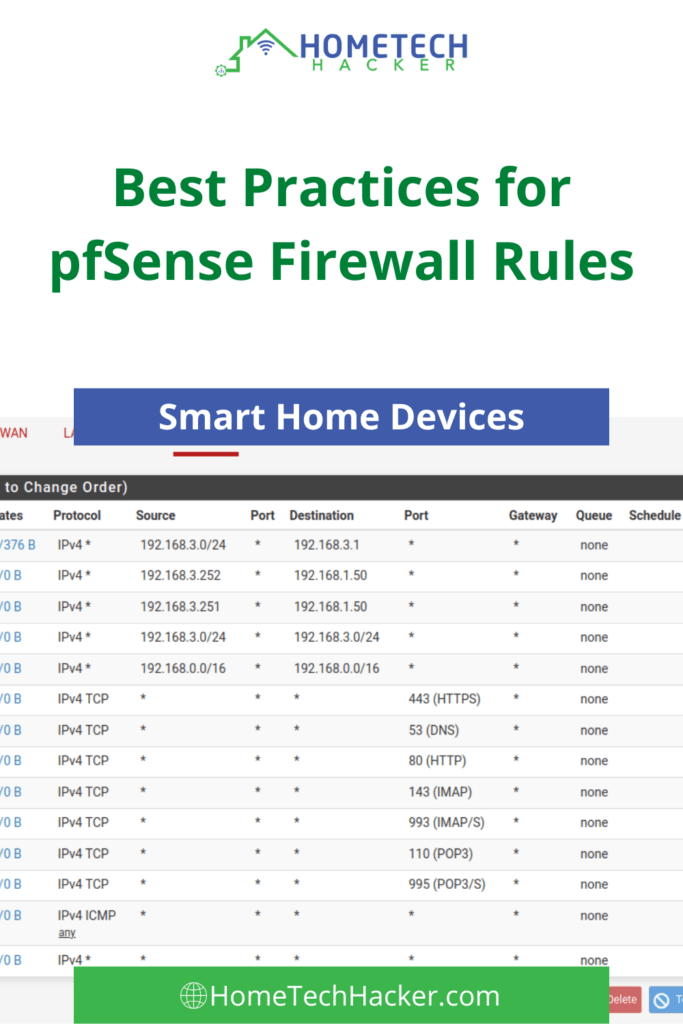
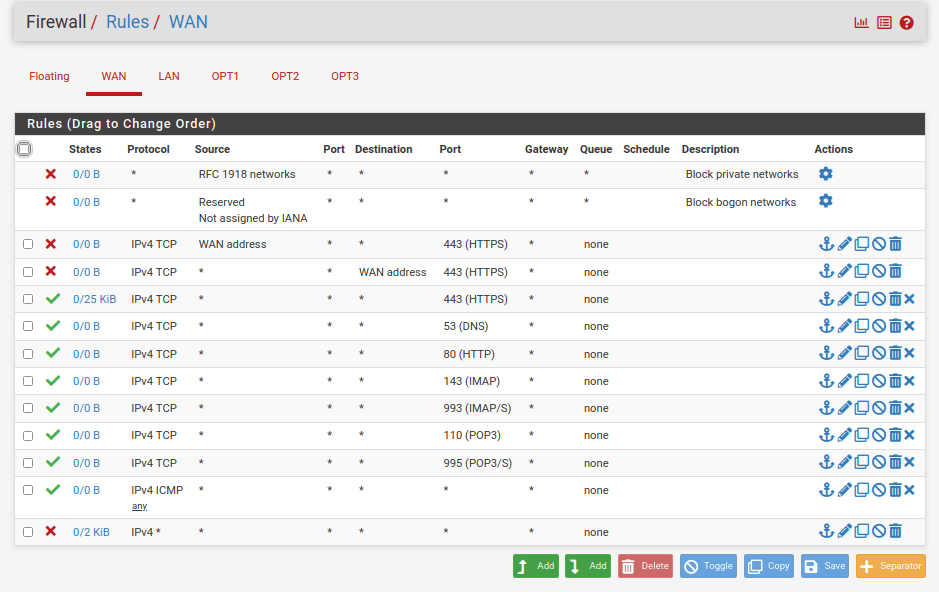
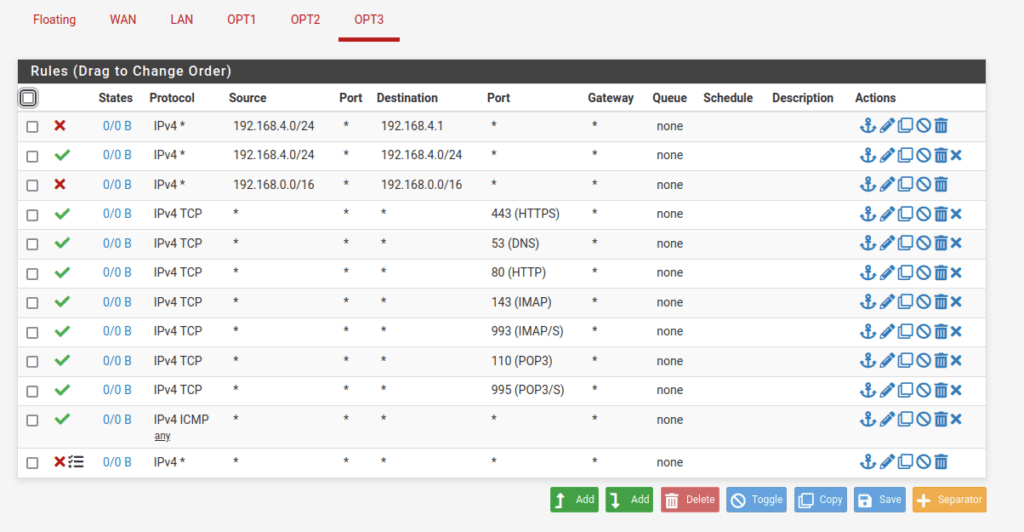
Below I have implemented a very basic ruleset that will allow HTTPS/HTTP traffic as well as some email ports.
Configuring internal pfSense firewall rules
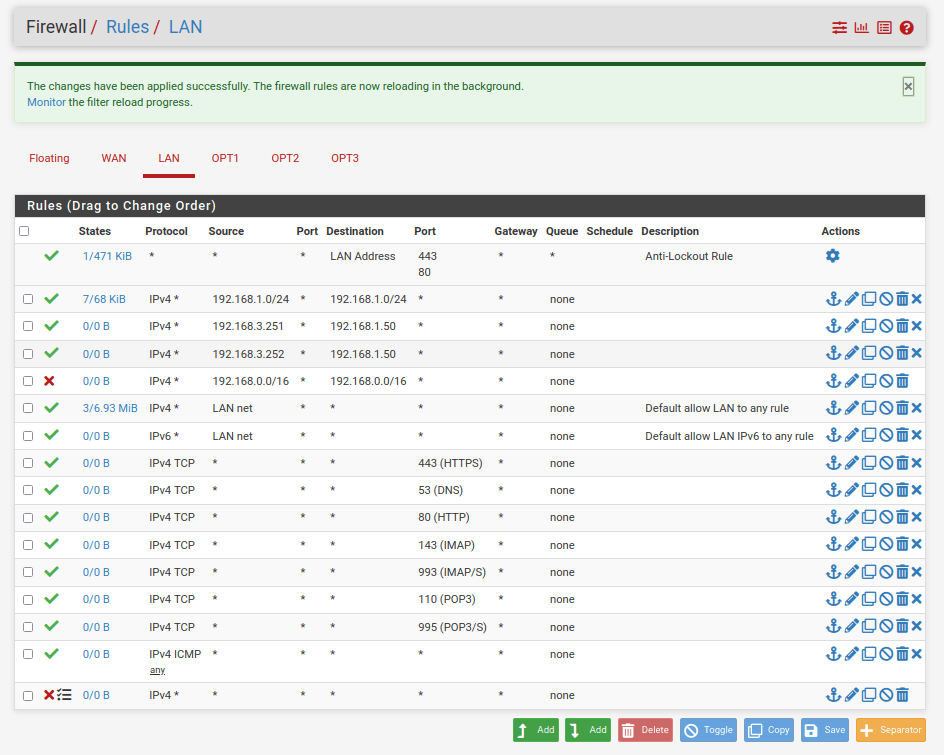
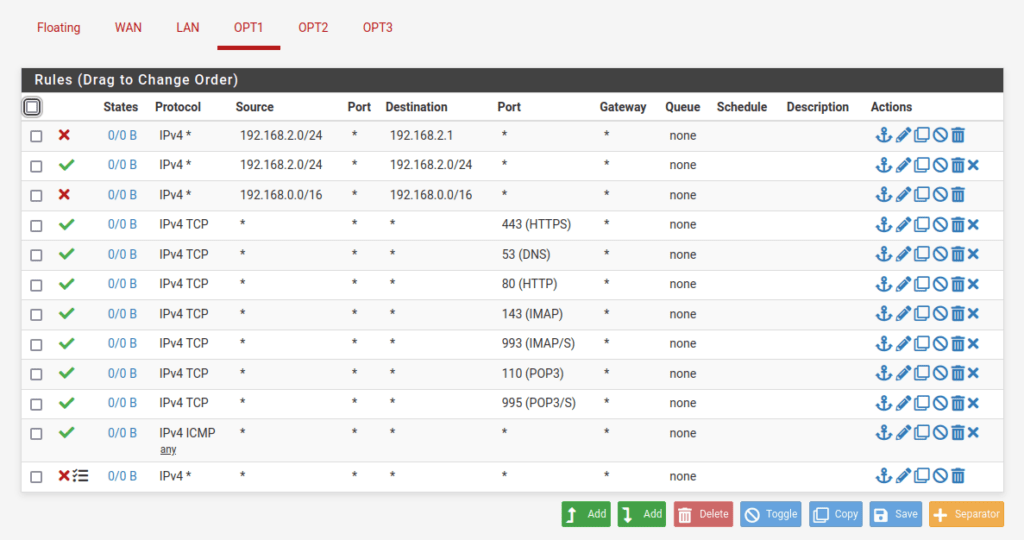
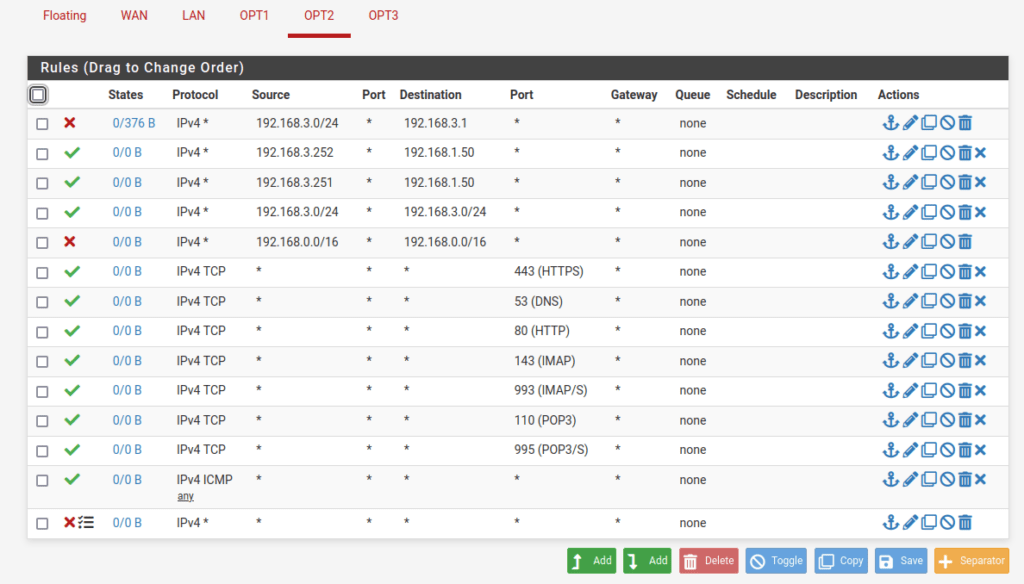
Next, we want to allow all the LAN interfaces to communicate out to the internet using the rules configured on the WAN interface. We will copy them to each interface by first selecting the rules on the WAN interface and then using the copy button found just underneath the rules:
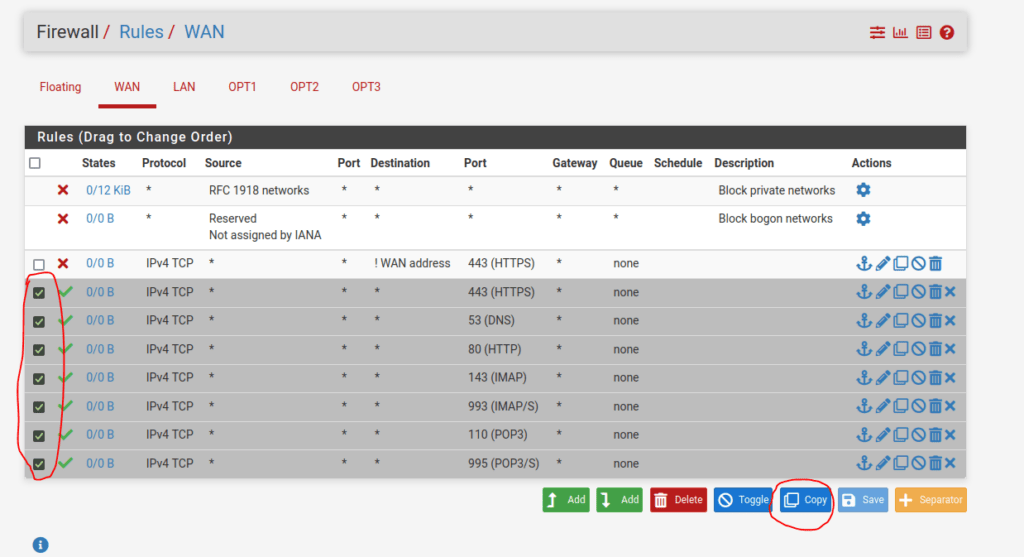
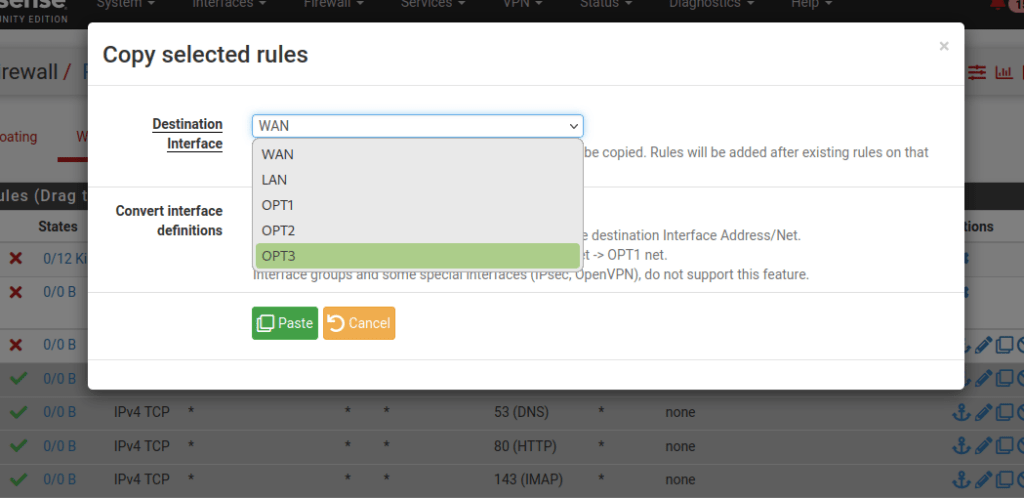
Now we will select the interface we are copying the rules to (in this case OPT3):
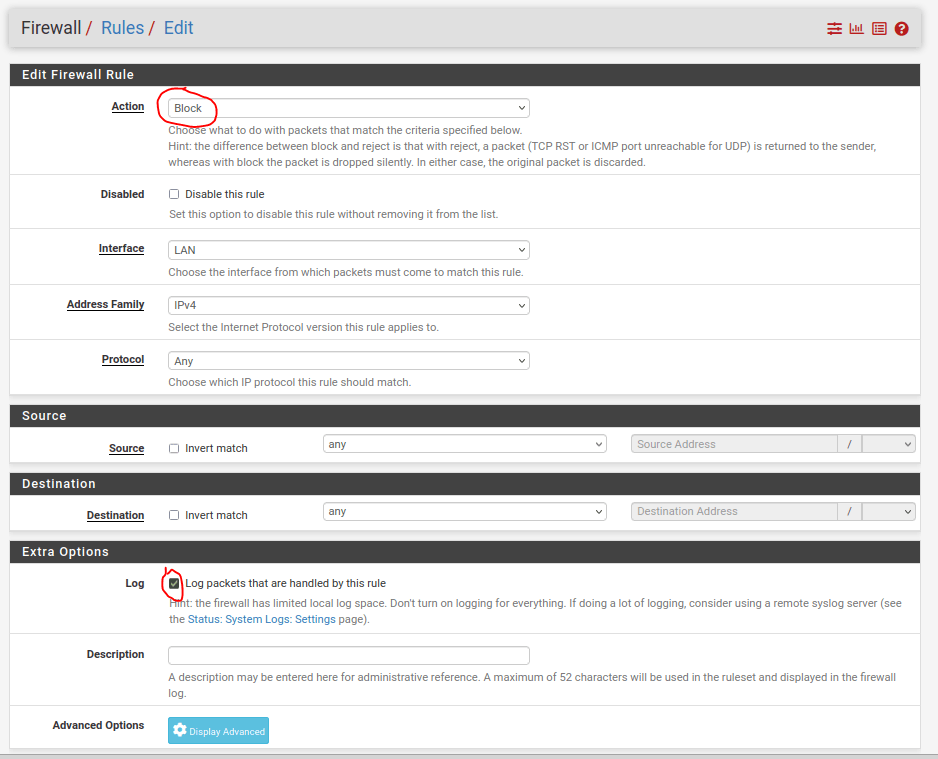
Configuring the most important rule
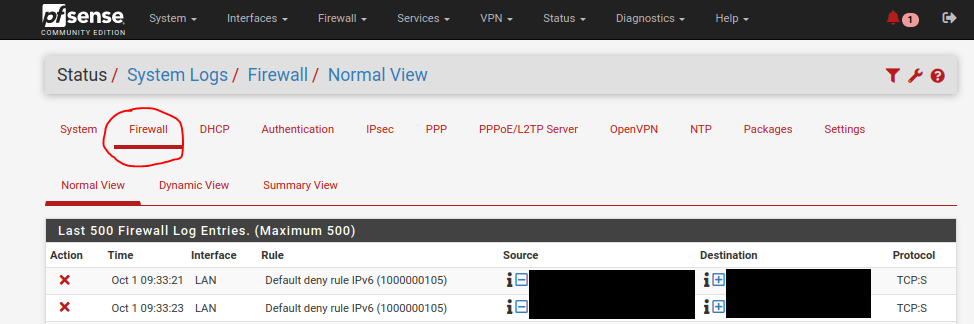
The most important part of any network configuration is the rule that denies any traffic that does not match a previously defined rule. You can look at the firewall logs to see what traffic is being dropped and from where.
This rule is created by using the Block action selecting the protocol, source, and destination to be the “any” value, and then enabling the log packets checkbox:
Select the Status dropdown menu and select the System Logs option to see the logs:
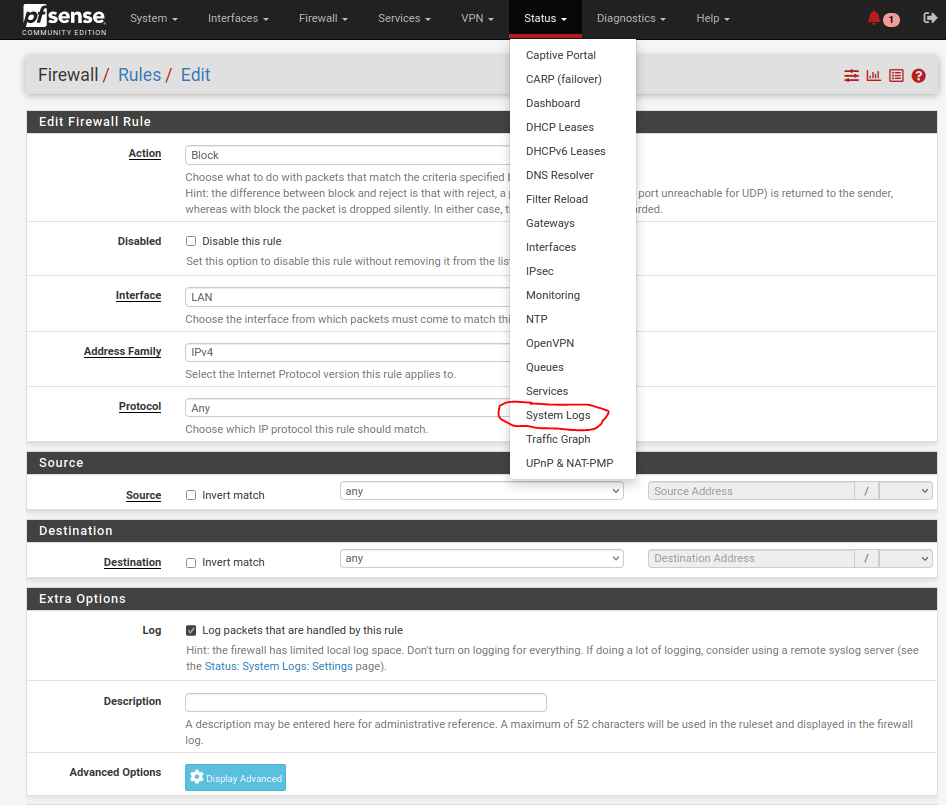
Once there you will select the tab labeled Firewall:
Creating additional rules and troubleshooting
In the following screenshot, there are a couple points you should pay attention to when creating new rules or troubleshooting. First, the source IP address and the port numbers are usually very large and random and can be ignored. The second is the destination address, protocol, and port number which is a service running on a server so it will be static:

The address and port being used here are 69.89.207.199 and UDP port 123, respectively. This is a network time server and will allow devices to synchronize their system clocks with NTP servers on the internet. It is a good idea to allow this traffic as well. We will want to select the + button next to the destination address to quick add the rule:

Hit confirm at the bottom of the screen.
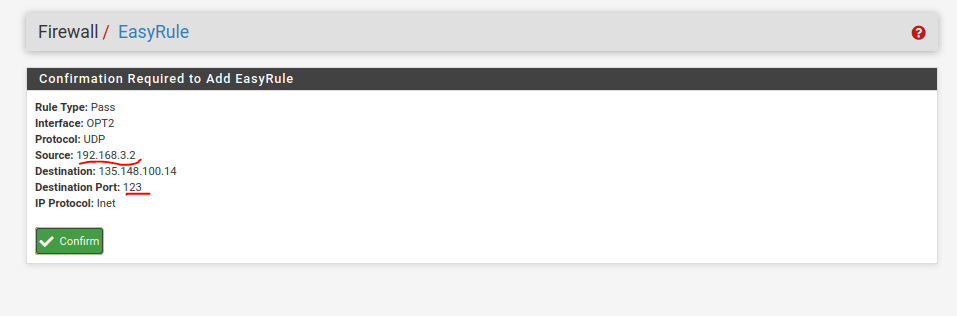
Note this will only allow a single host from the LAN to send information to a single NTP server.
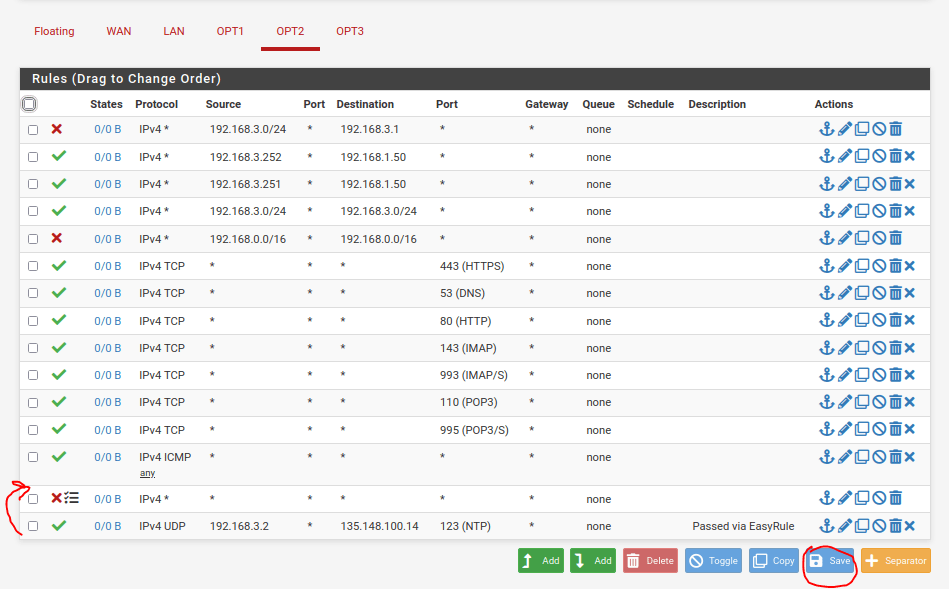
Our main page will jump to show us the rule created on the interface. We will want to change where the rule was placed and allow the single device to communicate to any NTP server. First, we will drag the rule up above our explicit deny rule and hit the Save button then apply changes.
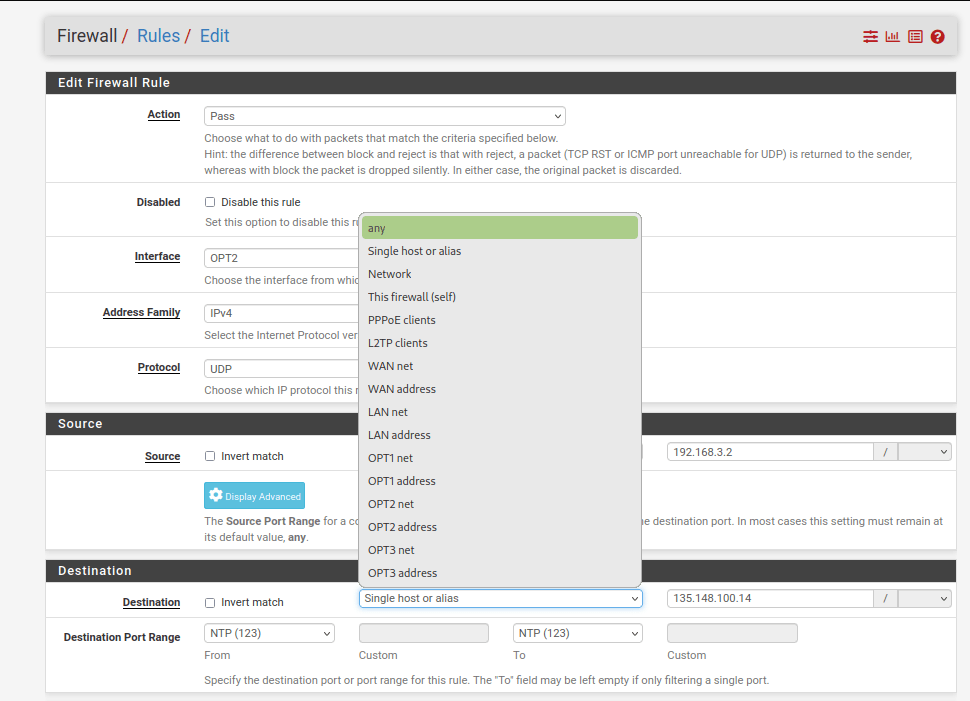
Next, edit the rule and change the destination address to any which will clear out the destination address of the server. This allows our 192.168.3.2 host to request information from any NTP server.
pfSense firewall configuration challenge
Can you implement rules to allow only two devices to access a host on another network?
The next part of this guide will be to implement these rules. For example, you want to be able to access photos or music from your tablet and phone when connected to Wi-Fi. Let’s say:
- Your tablet has a static IP address of 192.168.3.251.
- Your phone has a static IP address of 192.168.3.252.
- Your file server is assigned the IP address 192.168.1.50 and connected to the primary LAN.
WAN interface rules:
VLAN1 interface rules:
VLAN2 interface rules:
VLAN3 interface rules:
VLAN4 interface rules:
Final thoughts
If you followed along with this article you should know some of the basics of why firewalls are used, some best practices for small networks, how to create rules, and how to troubleshoot configurations in pfSense.
If something on your network does not work right away, start troubleshooting what is causing the network to drop the connection. Sometimes firmware updates will require strange ports such as 22 to be opened up to specific devices. Maybe your security camera uses a specific port to stream video to your device. Be sure to examine the logs of your firewall at least once a week after working out all the bugs.
Leroy Jackson is a freelance tech writer. He has a bachelor’s degree in electronics and is working towards an AI post-graduate degree.

Thanks for the article. I’ve been using pfsense for several years at home. Aside from being a great firewall, it also has the ability to support OpenVPN and provide a free (aside from the cost of the firewall hardware) VPN for all your devices. I also use pfBlockerNG, which is great for blocking adds, malicious destinations, etc (but requires more advanced setup).
One point – pfsense is a stateful firewall. There is no need to add the rules to the WAN interface (I’d argue that they are actually dangerous to add). The only allow rules I have on my pfsense are for inbound connections for VPN and my phone server. Everything else is a deny rule. Since pfsense is stateful, adding the allow rules on the internal interfaces will allow the traffic to exit the firewall and return traffic to pass through the firewall to the client device.
Adding a deny rule with logging is a great troubleshooting step to see if the rules are too restrictive and blocking some traffic that you want allowed.
Very helpful comment. When you say “no need to add rules to the WAN interface”, are you including the Block private networks (RFC 1918) and the Block bogon networks (not assigned by IANA) rules? Or do you use those?
Donnie,
No, those are there by default and should be left alone. Those network/addresses should never be seen on the Internet side of a network, hence the default rule to block them.
The added rules to allow traffic into the firewall is what is unecessary and dangerous. Those rules allow any source on the Internet to send traffic to the firewall on the enabled ports.