“Ok Google, turn on my fireplace” sounds both exciting and scary. Creating a smart fireplace switch is something I have been interested in for a long time. I hesitated due to perceived safety concerns and not knowing enough about how the fireplace works. Education and fortitude got me over that hump. In this article, I’ll show you how I created a smart fireplace switch with $15 and a little bit of time.
Table of Contents
Smart fireplace switch background
There are really three parts to my journey to automate my fireplace. First, I needed to have a good understanding of how my gas fireplace, and gas fireplaces in general, work. Second, I needed to feel secure and sure that automating my fireplace would be safe. Lastly, I needed to figure out the smart fireplace solution that best fit all my needs.
How do gas fireplaces work?
There are a couple of variations, but I’m going to focus on millivolt ignition gas fireplaces. Have you ever wondered why your gas fireplace still works even when you have a power outage? It’s because millivolt systems don’t require mains voltage (typically 120V in the US) to work. In a millivolt system, there is a pilot light that is typically always on (or can be turned on) without a standard electrical connection (usually using a piezo ignitor).
The pilot flame heats a thermocouple or a thermopile. Thermocouples and thermopiles produce small amounts of voltage when heated. The thermocouple generates about 30 millivolts. A thermopile can supply more voltage (up to around 900 millivolts) in case you want to also power a thermostat.
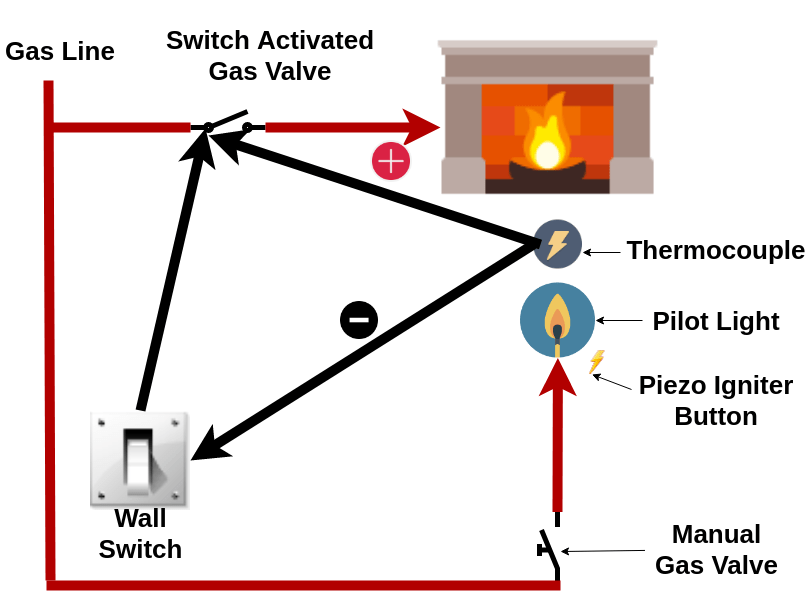
Your fireplace has to supply the fuel (gas) to the pilot light to create the fire. Instead of using a standard electrical circuit, millivolt systems use a thermocouple/thermopile (powered by the pilot light) to generate enough electrical voltage to open the gas valve. A switch (often located on a wall near the fireplace) flips to connect the thermocouple generated voltage to the circuit that opens the gas valve. This effectively turns your fireplace “on.”
There are two very important things to point out:
- No mains voltage should enter this system. All needed voltage comes from the thermocouple and/or thermopile.
- The thermocouple doesn’t generate a voltage if the pilot light isn’t lit. This means the gas valve that powers the fire in the fireplace can’t open unless the pilot light is lit. This is a great safety feature!
Hopefully, this diagram helps clarify what I explained above.
Will my smart fireplace be safe?
This is of paramount concern to me. If you google for recommendations about creating a smart fireplace you’ll find many opinions telling you not to do it. Primary concerns are:
- Introducing mains voltage to a system that doesn’t need it
- Potential impacts of malfunctions, misuse, and malicious remote access
- How power outages may affect the system
Any solution I implement needs to safely keep mains voltage away from any direct interactions with the millivolt system and gas valves. I need to be sure I can reasonably control access to my smart fireplace. This definitely means I don’t want cloud access. It also means I need safeguards that will turn off the fireplace and notify me in case of malfunction or misuse. Lastly, a power outage/restore should not cause my fireplace to turn on.
What are my smart fireplace options?
With an understanding of how my fireplace works and safety criteria in hand, I set out to find the best solution. I considered the following options:
- Smart switch (like the TP-Link HS200) and a 110V relay
- A smart appliance module (like the TP-Link HS105) to open and close a relay
- A product specifically meant for this purpose, such as:
- A Z-wave relay, like the Remotec Z-Wave Dry Contact Fixture Module.
- A WiFi relay, like the Shelly 1
Editor’s note: We recently published an article about the best off-the-shelf options for making your fireplace smart. Check it out if you want additional options.
Why I chose the Shelly 1 relay
I quickly ruled out the first 3 options because:
- A smart switch and relay seem like a good combo, but most smart switches are controllable via cloud apps (although some have local control) and are large. Fitting a smart switch and a relay in the small box and keeping the mains voltage lines clearly apart from the lines that control the fireplace seems difficult.
- Using a smart appliance module and a relay will only work if I have an outlet easily accessible in or near the fireplace housing. I do have an outlet there, but it is NOT easily accessible. Also, there isn’t a lot of room to work underneath my fireplace, and I’d have to wire the relay and wall switch in parallel to have them both have independent control of the fireplace.
- The products that are specifically made for this purpose were on the more expensive side, and all use cloud access for control. I want at least the option to use local control and only expose to voice assistants via Home Assistant.
That leaves me with a Z-wave relay and the Shelly 1. Both can be implemented without cloud control. Ultimately, I chose the Shelly 1 relay because it supports MQTT control, it’s a dry contact relay (important!), and I’ve had a lot of success using it as a light switch and to control my garage doors. Also, the Shelly 1 is less expensive and small!
If you don’t have a wall switch/thermostat you probably have an RF remote. If so you can also consider using something like the Bond RF controller or the Sonoff RF Bridge to add remote control. I’d prefer the Sonoff because it allows local control, but it supports a much narrower frequency set (433Mhz) than the Bond so you would need to make sure it’s compatible.
Editor’s Note: Be sure to check out our article about many other useful DIY projects you can do with a Shelly relay.
Installing the Shelly 1 as a smart fireplace switch
Let’s go over what’s needed and some key information to install the Shelly 1 the way I did before I go through the steps I used.
- I installed the Shelly at the switch that controls the fireplace. You need to be able to power the Shelly, and you need a neutral. In my case, there is another switch in the same gang box that I used for line, neutral, and ground. If you don’t have this at the switch, you can install the Shelly underneath the fireplace, but you need to be able to supply power there. I have an outlet there, but it’s hard for me to reach. Underneath the fireplace may be a better solution for you. Also, be sure to use a Shelly 1 or another dry contact relay for this project. You can also use the newer Shelly 1 Plus.
- I am using MQTT to control the Shelly, but you could use cloud control or the REST API if you’d like. You can use my instructions for setting up MQTT if you haven’t done so already.
- If you aren’t comfortable working with breakers or mains voltage you may want to skip this one. Also, I am not sure what I did is up to building code, but I believe it to be safe, especially with the safeguards I put in place. When dealing with gas and high voltage you need to be safe, and you need to be competent. Don’t take chances.
I hope I didn’t scare you away with that last one. I just want you to be careful. Overall, I don’t think this is very risky at all, especially if you’ve installed light switches or a Shelly-type relay before.
Products used in this project
- Shelly 1 Relay (you can also use a Shelly Gen3 relay)
- Wire Stripper
- Wire Nuts
- 14 Gauge Wire
- Voltage Detector
Step 1: Understanding the installation wiring
The earlier diagram in this article shows how my fireplace worked before installing the Shelly. Here is the same diagram after installing the Shelly:
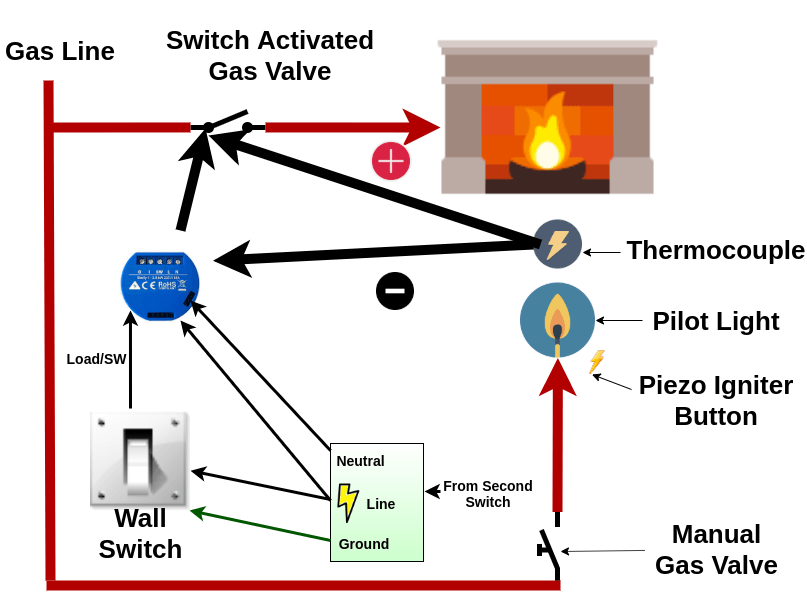
The main differences in this diagram are:
- The Shelly now uses the thermocouple to open the gas valve
- Power to the Shelly and the light switch, along with ground and neutral come from the second wall switch.
- The wall switch now uses its load to control the Shelly. This allows the wall switch to still control the fireplace even after the Shelly is installed.
Step 2: Wire in the Shelly relay
Below is the Shelly wiring diagram:
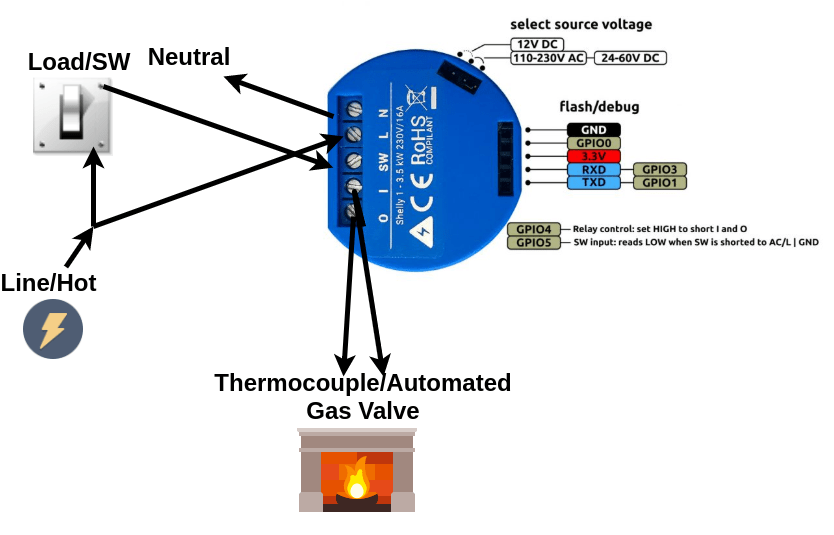
Hopefully, you can see from the diagram that you:
- Turn off the power to the circuit you are working with at the breaker. Make sure you’ve identified which connection is line and which is neutral.
- Disconnect the two wires that were previously connected to the wall switch. Connect them to the I and O (relay) inputs of the Shelly.
- Cut a new load wire and connect it from the light switch to the SW input of the Shelly.
- Connect up the line voltage to the L input of the Shelly and to the wall switch.
- Connect neutral to the N input of the Shelly.
- Locate a ground wire and connect it to the wall switch.
Editor’s Note: Here are instructions for wiring the newer Shelly Plus 1 smart relay.
Here are a couple of pictures of my wiring. They aren’t the cleanest or the best wiring, but hopefully, they help:

Here is the wiring before installing the Shelly. On the left, it looks like they used thermostat wiring to connect the switch to the thermocouple (red and white wires). On the right is the switch which supplies the ground, neutral, and line connections.

This looks like a mess, but this is after I’ve wired in the Shelly to the gas valve (red and white small gauge wires), line, and neutral. The thicker red wire sticking out the Shelly is the load wire that will connect to the wall switch. The blue wire sticking out is a ground wire for the wall switch.
For some reason, I didn’t take any pictures after I connected the switch to the Shelly. I was too busy making sure wires were carefully placed back into gang boxes and not touching for safety. After turning the power on, I configured the Shelly, which is the next step.
Step 3: Configure the Shelly
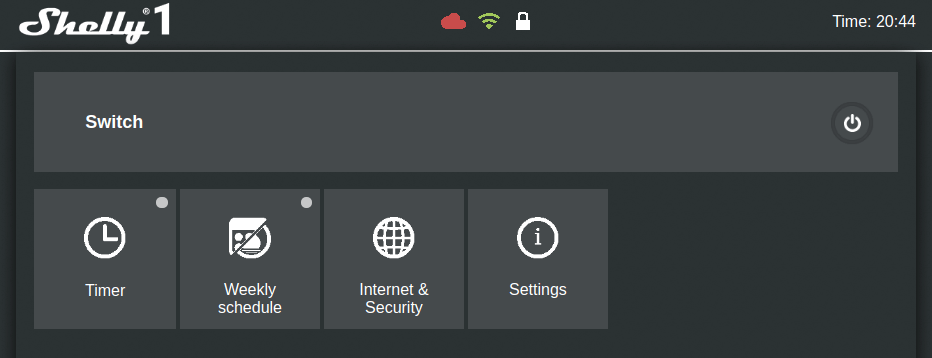
After restoring power, the Shelly will boot up and broadcast a WiFi network (e.g. shelly1-35FA58) that you should connect to with a tablet, phone, or laptop. After connecting, go to the IP address 192.168.33.1. This is the default address for the web interface.
If you connect using a device with a cellular connection you may have problems connecting to the Shelly IP address depending on your settings. You should be able to get around this by temporarily disabling your mobile network.
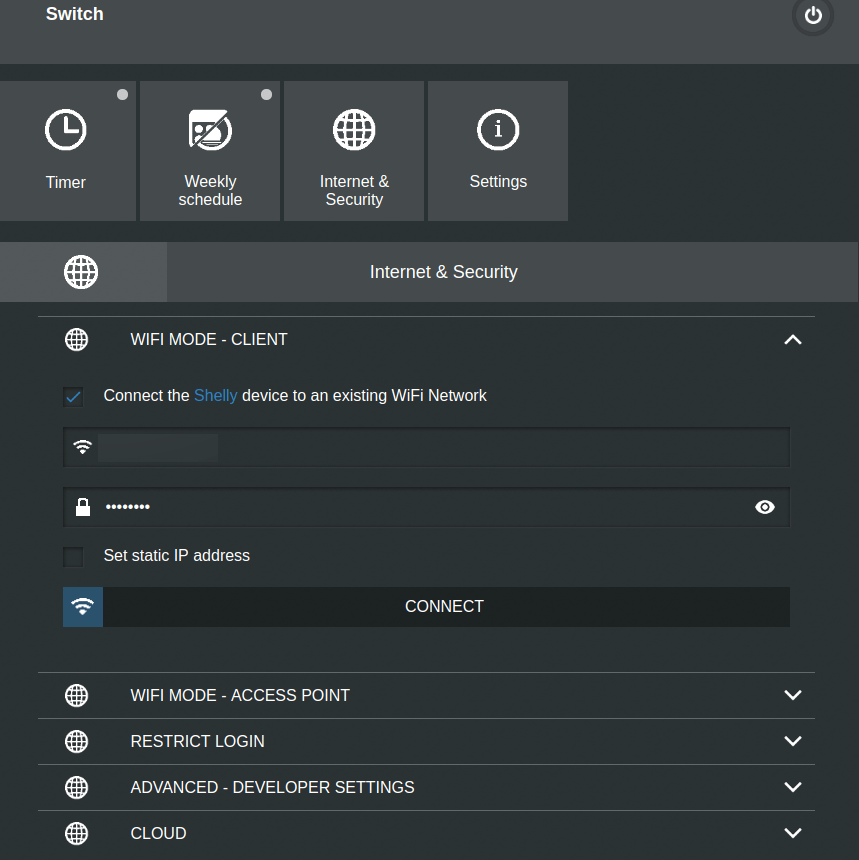
The first thing you’ll want to do is connect your Shelly to your Wifi network. Go to Internet & Security->WIFI MODE – CLIENT and fill in your Wifi credentials. Double-check that they are correct and press save.
I recommend you set up a static IP address here or set up a static DHCP lease using your router.
Connect to the IP address of the Shelly (that you set as static in the web interface or that your router assigned) from a computer on your LAN. Go ahead and check for a firmware upgrade and apply if it’s available (Settings->Firmware Update).
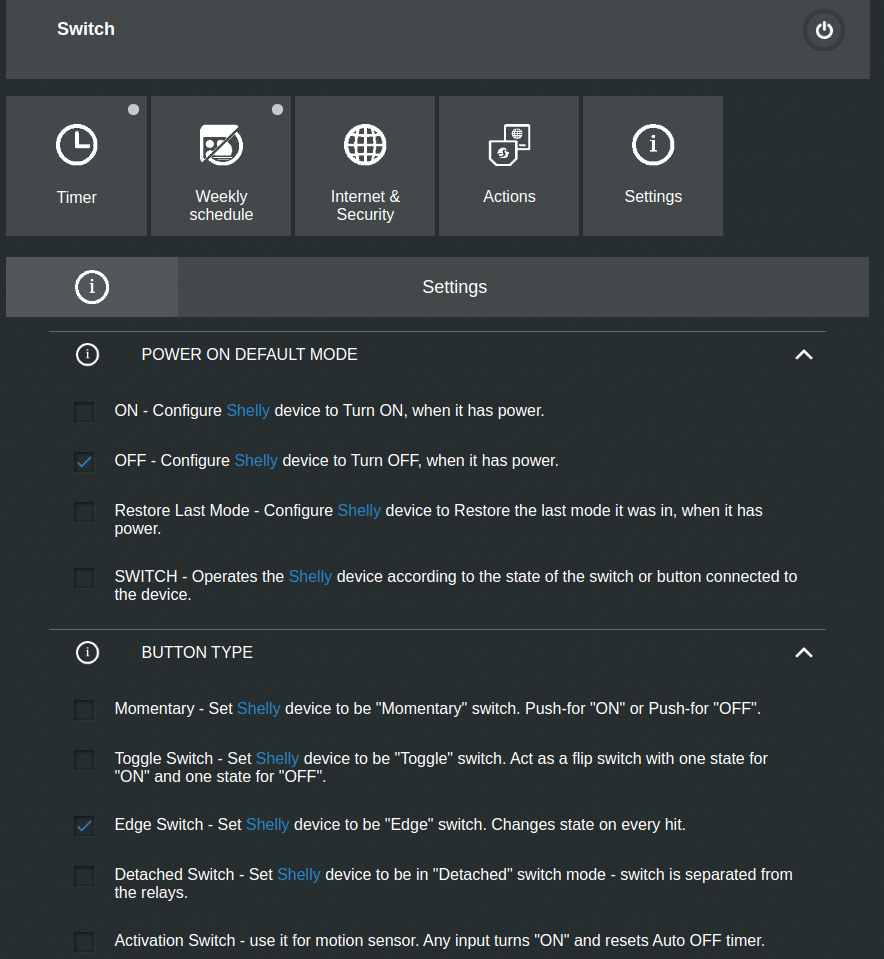
After your Shelly has rebooted, you’ll probably want to set the power on default mode to “Off.” This way the fireplace will default to off whether it was on or off after a power failure. This is an important safety feature!
Additionally, change the button type to “Edge Mode” if you want the light switch to turn the fireplace on/off with every toggle. Otherwise, if you turn the fireplace off with the Shelly while the switch is in the on position, you will have to turn the switch off and then on again to turn the fireplace on with the switch.
Using the Shelly smart fireplace switch
At this point, you can use the web interface to turn the fireplace on and off. Just press the power button at the top right of the web interface.
If you want to access the fireplace switch from the cloud using an app, you have to enable cloud access in the web interface. Then download the Shelly Cloud app and follow the instructions to set up an account and access.
Advanced: Integration with Home Assistant via MQTT
I prefer to not have a cloud connection, and I need to automate my fireplace based on other factors in my home for safety. Home Assistant, my favorite automation controller, can integrate with the Shelly-powered switch via MQTT. First, you need to set up an MQTT broker and integrate it with Home Assistant. I’ve explained what MQTT is, how it works, and how to set it up in Home Assistant so I won’t repeat it here.
Editor’s note: Home Assistant now has direct integration with Shelly, so you can do this even easier if you don’t want to use MQTT.
Setup MQTT on the Shelly 1 Relay
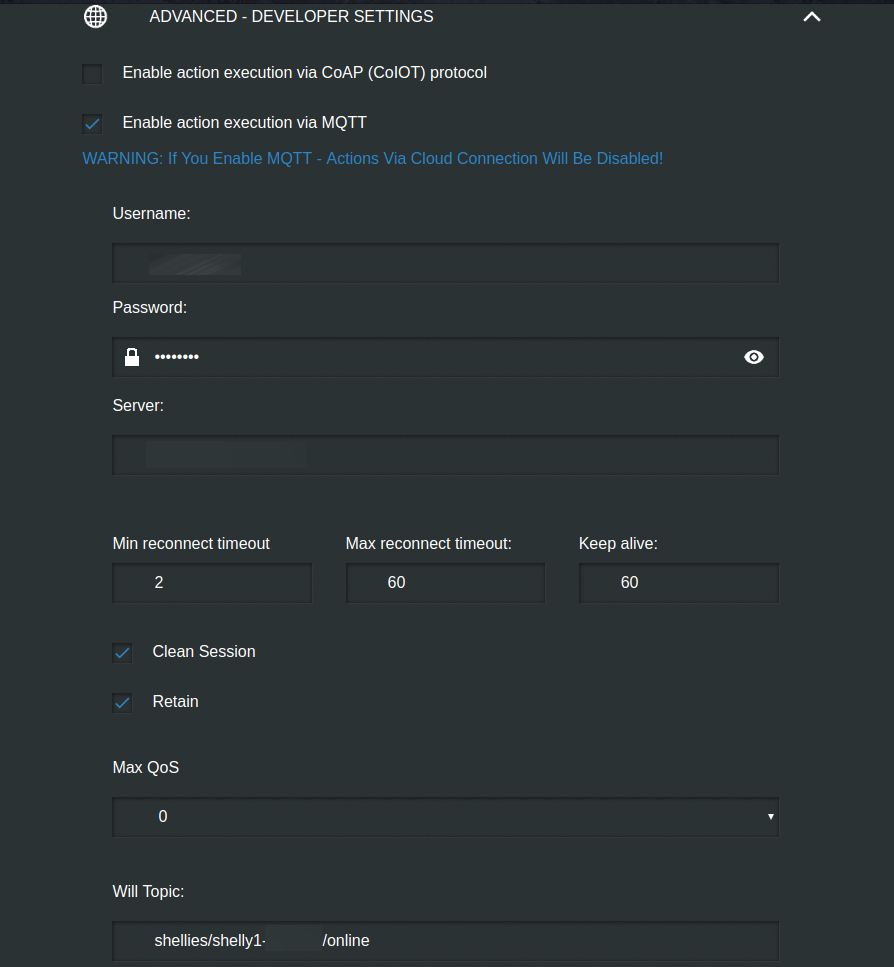
After setting up the broker you need to configure MQTT on the Shelly 1 relay. Go to the “Internet & Security->Advanced – Developer Settings” and:
- Click the checkmark to “Enable action execution via MQTT” (note this will disable cloud access. It’s one or the other)
- If you secured your MQTT broker enter its username and password
- Under “Server:” enter the IP address of your MQTT broker along with its port (usually 1883). Separate the IP address and port with a colon.
- Save these settings
Take note of the “Will Topic.” This is the MQTT topic that communicates whether or not the Shelly is up and running. Note the 6-character string following “shelly-” in the will topic. You’ll need this to create the Home Assistant config.
Configuring the MQTT switch in Home Assistant

You just need to add a little YAML to your Home Assistant configuration in your switch section:
- platform: mqtt
  name: "Fireplace"
  state_topic: "shellies/shelly1-xxxxxx/relay/0"
  command_topic: "shellies/shelly1-xxxxxx/relay/0/command"
  availability_topic: "shellies/shelly1-xxxxxx/online"
  payload_on: "on"
  payload_off: "off"
  payload_available: "true"
  payload_not_available: "false"
Replace the xxxxxx in the topics with the ID of the Shelly you noted in the web interface will topic. The entity id of your switch will be what you put in the name field (spaces replaced by underscores). This code tells Home Assistant how to control and react to the Shelly 1 relay.
Sending “on” and “off” payloads to the command_topic will turn the fireplace on and off, respectively. The state_topic tells Home Assistant whether the fireplace is on or off (and is updated by the Shelly). The availability_topic tells Home Assistant whether or not the Shelly is online, and is also updated by the Shelly.
After you restart Home Assistant your smart fireplace switch will be up and running… Or maybe it won’t for a bit. Sometimes when I restart Home Assistant it takes a bit for the Shelly to become available because it doesn’t seem to retain the value of the will topic. You can fix this by removing the availability_topic, which makes the Shelly switch appear as always available. Or you can add the following automation:
- id: mqtt_shelly_announce
  alias: Shelly Sync at HA Start
  trigger:
  - platform: homeassistant
    event: start
  action:
  - delay: 00:00:20
  - service: mqtt.publish
    data:
      topic: shellies/command
      payload: announce
Sending “announce” to the shellies/command topic tells all Shelly relays on your network to send an updated message to the Will Topic, allowing Home Assistant to see that they are available. With this automation, your Shelly relays should always appear as available 20 seconds after Home Assistant restarts.
Safeguards for your smart fireplace switch
As long as you’ve done a good, secure job of wiring, your installation should be perfectly safe. However, since I’ve integrated my fireplace switch with Home Assistant I can add some further safeguards.
I created an automation that turns the fireplace off automatically if it has been on for two hours straight, or the temperature in the room goes above 76 degrees Fahrenheit (temp sensor courtesy of the Ecobee lite, but you could use any temp sensor). Additionally, it tells everyone in the room why the fireplace turned off through the Google Nest Hub. Lastly, it sends me a notification that it is turning the fireplace off.
- id: fireplace_safeguard
  alias: 'Fireplace Safeguard'
  initial_state: 'true'
  trigger:
    - platform: numeric_state
      entity_id: sensor.main_floor_temperature
      above: '76'
    - platform: state
      entity_id: switch.fireplace
      from: 'off'
      to: 'on'
      for:
        hours: 2
        minutes: 0
        seconds: 0
  condition:
    condition: state
    entity_id: switch.fireplace
    state: 'on'
  action:
    - service: media_player.volume_set
      data:
        entity_id: media_player.google_home_hub
        volume_level: "0.7"
    - service: tts.cloud_say
      data:
        entity_id: media_player.kitchen_nest_hub_max
        message: This is a fireplace alert. The fireplace has been on too long, or it
          is too warm. I turned it off as a safety precaution.
        cache: true
        language: en-GB
        options:
          gender: female
    - service: notify.telegram_main
      data:
        message: "ALERT: The fireplace has been on too long, turning it off."
    - service: switch.turn_off
      entity_id: switch.fireplace
    - delay: 00:00:10
    - service: media_player.turn_off
      entity_id: media_player.kitchen_nest_hub_max
Final thoughts
Once again I’ve found a great use for the inexpensive Shelly relay. Setting up a smart switch for the fireplace initially seemed a little scary, but in the end, I feel pretty secure in my installation. In some ways it is safer than it was before; now I can turn it off remotely, and there are safeguards to automatically turn it off if it has been left on too long. One thing I want to make sure of is that you use the Shelly 1 for this. I’ve gotten questions about other relays, including other Shelly relays. What makes the Shelly 1 unique is that it is a dry contact relay; it won’t pass the mains voltage onto the switch activating the fireplace. If you choose a relay different than the Shelly 1, make sure it is a dry contact relay for safety.
There is one downside to this installation. Now, when the power is out, my fireplace will not come on with the switch because the Shelly needs power. I’d have to undo a bit of what I installed to manually turn the fireplace on without power. This isn’t a big issue for me because I’ve taken some steps to minimize the effects of power and other outages in my home. But it is something to consider. You could also make a parallel run of wires to the thermocouple and gas valves to some type of manual switch somewhere else (like under the fireplace) to eliminate this problem.
Now, via Home Assistant, I can set up google to “Light my fire.” I can also set up “mood” automations that include changing the light colors and dimming and turning on the fireplace. Overall, I’m pretty happy with this project.
I know this is a bit of a long read, but I hope you found it helpful. Let me know what you think or if you have any questions in the comments or on Twitter.
Interested in supporting HomeTechHacker?
Have you found the content on this site useful? If so, are you interested in supporting me and this site? There’s no obligation of course, but I would really appreciate any support you can give. Below are a few ways you can show support:
- Share this site with your friends and on social media (use the sharing links at the end of this page for your convenience)
- Subscribe to this site
- Purchase one of my books, The Personal Cybersecurity Manual, The Home Network Manual or The Smart Home Manual, for yourself or as a gift
- Put a link to HomeTechHacker on a site you have access to. Be sure to let me know about it!
- Enroll in HomeTechHacker Academy for free and premium online home technology courses.
- Reach out to me via my contact page or Twitter and let me know something I should write about
- Shop at Amazon through my affiliate links and ads on these pages. See my disclosures for more details about affiliate links. You can also just shop from one of the links below:
- HomeTechHacker Shop: This is a listing of products that I use, have reviewed, and that I recommend
- HomeTechHacker Technology Advisor: This suite of tools will give you customized home technology product recommendations based on your needs
- My Amazon affiliate link: Just click on this link to go to Amazon and shop
Thank you! I really appreciate it!
This page contains affiliate links. If you purchase an item using an affiliate link I will receive a small commission at no cost to you. Affiliates do not influence my recommendations. Read my disclosures for more information.