
I’ve had a general curiosity about the air quality in and around my home. We use primarily hydronic heating and thus don’t get much airflow without opening the windows. We do have a couple of family members that are more susceptible to allergies than others. Before buying an air purifier, I decided it would be a better idea to measure what the air quality is like in various places in my house. I like to only buy sensors that are smart (connected) and integrate with Home Assistant. I looked at a few sensors but settled in on making my own, and I’m glad I did. Here’s how you can make your own smart air quality sensor.
This page contains affiliate links. If you purchase an item using an affiliate link I will receive a small commission at no cost to you. Affiliates do not influence my recommendations. Read my disclosures for more information.
Table of Contents
Background
I started off initially looking for air purifiers that also monitored the air. As always, I was looking for ones that are connected and work with Home Assistant. A couple of purifiers that I looked at were the Xiaomi Mi Air Purifier 3C and the meross Smart Wi-Fi Purifier, both of which work with Home Assistant. But then I started wondering if I even need an air purifier. I was just thinking it might be good since we have some people who get allergies in my house, and we don’t have a lot of airflow in the house.
This led me to look at starting with an air quality monitor first. I found it much harder to find an air quality monitor that works with Home Assistant without the purifier. Most of my research led to people building their own sensors, and I was starting to see why. Here are a few of the sensors I looked into, and why I didn’t choose them.
- Aqara Indoor Air Quality Monitor — This one looked really promising as it is Zigbee powered and a lot of Aqara products work with Home Assistant. But the reports I heard were that this particular sensor has problems with Home Assistant. It constantly drops its connection and doesn’t always report the air quality metrics.
- Eve Room — Although this had all the functionality I wanted, the sensor by itself costs as much or more than the air purifiers I was looking at!
- IKEA VINDRIKTNING — This one is really inexpensive, but the tutorials I’ve seen require you to connect it up to an ESP8266 chip to get it to work with Home Assistant.
There are probably others that some have gotten to work with Home Assistant, but at this point, I was willing to try building my own.
A little bit about measuring air quality
I’ve already got CO2 sensors, smoke detectors, and explosive gas detectors in my home. I’m primarily interested in air quality. I’m not an expert on air quality but here’s what I’ve learned…
Most of the air quality metrics seem to use the PM2.5 readings. PM2.5 refers to atmospheric particulate matter (PM) that has a diameter of fewer than 2.5 micrometers. These particles can only be seen with a microscope.
Studies have linked prolonged exposure to unhealthy levels of PM2.5 to heart and lung disease. On a clear day, PM2.5 concentration will typically be less than 5 μg/m3 (micrograms/cubic meter). Exposure to PM2.5 levels above 35.4 μg/m3 over a 24-hour period is generally considered unhealthy. Consistent exposure to levels above 12 μg/m3 over a longer period of time is also unhealthy. Good air purifiers reduce PM2.5 levels.
Materials needed for this project
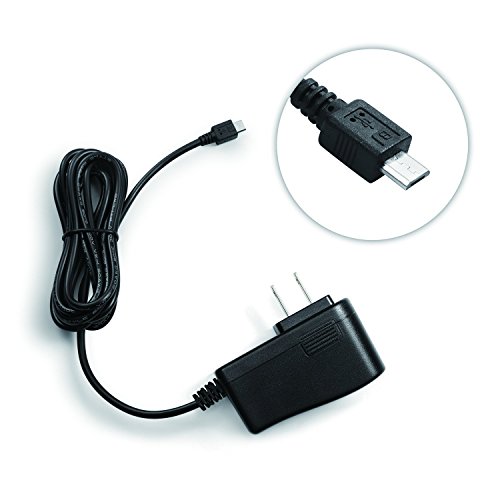
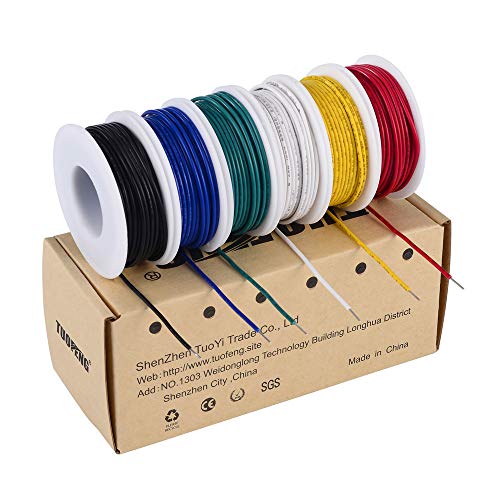
The materials list below might seem long, but there’s a good chance you probably have some of these around. Since I’m a tinkerer, I already had most of these things on hand. You probably have some type of electrical tape, a micro-USB adapter, and a wire stripper available to you.
You can also substitute some of these items, but these will definitely work:


Alternatively, you can buy the air quality and humidity/temperature sensors from AliExpress for less than you can on Amazon, but they might take a while to arrive. Here are the links in case you are interested:
Here are the tools I used to put this together:
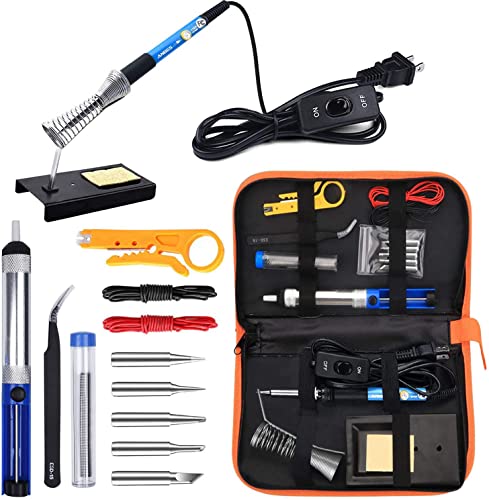


I recommend these and other tools for DIY smart home projects in my HomeTechHacker Shop.
One last thing… Make sure there is good Wi-Fi where you plan to place the sensor.
Building your DIY ESPHome air quality sensor
ESPHome is a system to control your ESP8266/ESP32 chips using simple yet powerful configuration files and control them remotely through home automation systems. You configure how your chip interacts and controls sensors and other devices using YAML (YAML Ain’t Markup Language YAML). YAML is a human-friendly serialization language often used in configuration files like the ones for Home Assistant. I previously used ESPHome to make a fingerprint scanner that can open and close my garage.
Step 1: Install ESPHome
There are many ways to install ESPHome. It works on Windows, macOS, and Linux. Also, it has a Docker container. You can even do it in Home Assistant. I’m old school and like the command line, so I went with the Linux Python install using the steps below. If you want to install it another way or on another platform, the links at the end of this article will point you in the right direction.
To install ESPHome via Python, first, confirm your system has at least Python 3.7:
python3 --version
Then, install ESPHome via pip:
pip3 install --user esphome
That’s it! ESPHome is installed.
Step 2: Wire up the sensors
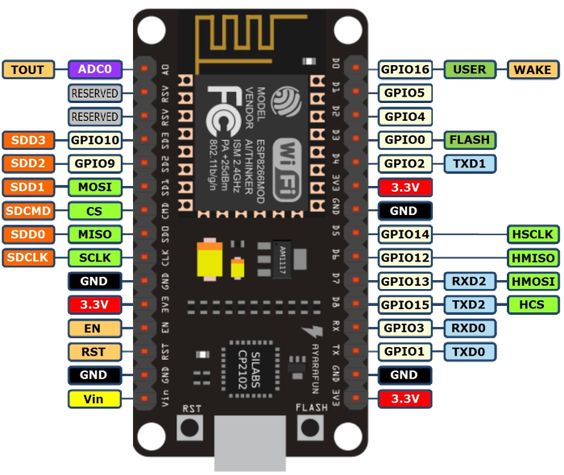
You can use many different techniques to wire and solder the connections. I used lever nuts and a solderless breadboard. Below is a pinout diagram for the NodeMCU to help clarify the neccessary connections.
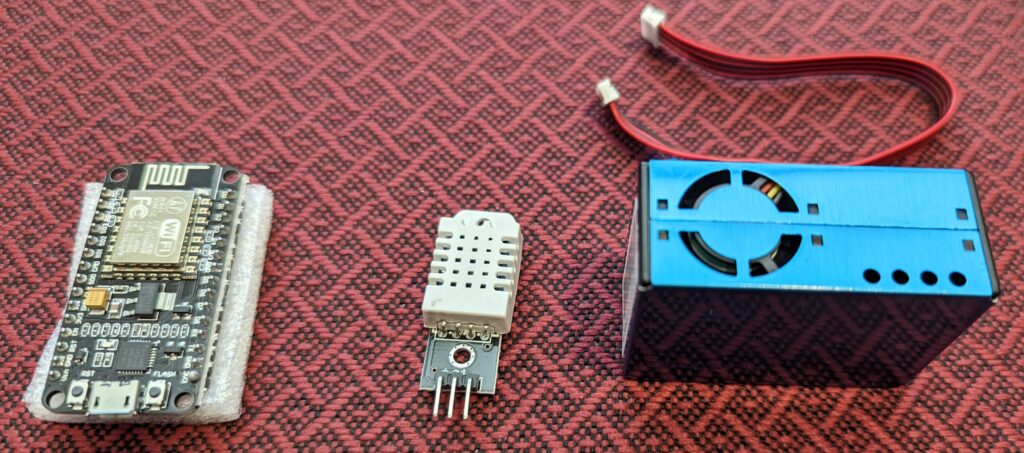
And here are the components I’m going to wire up:
To start, I cut one end of the red and black connector wire to expose the individual wires. Then I connected the wires as indicated in this table:
| Pin # PMS5003 | Connects to | Pin # NodeMCU |
|---|---|---|
| 1 | ——-> | Vin |
| 2 | ——-> | GND (any GND will do) |
| 3 | ——-> | GPIO0 (D3) |
| 4 | ——-> | GPIO12 (D6) |
| 5 | ——-> | GPIO13 (D7) |
Pins 6, 7, and 8 don’t need to connect to anything.
Note the PMS5003 air quality sensor pins are numbered 1 to 8 from top to bottom as indicated in this diagram:

The DHT22 sensor just has 3 connections. They are sometimes labeled differently depending on where you got your DHT22 sensor, but this is how they should connect to the NodeMCU:
| Pin # DHT22 | Connects to | Pin # NodeMCU |
|---|---|---|
| GND (-) | ——-> | GND (any GND will do) |
| Data | ——-> | GPIO2 (D4) |
| VSS (+) | ——-> | Any 3v3 (3.3V) connection |
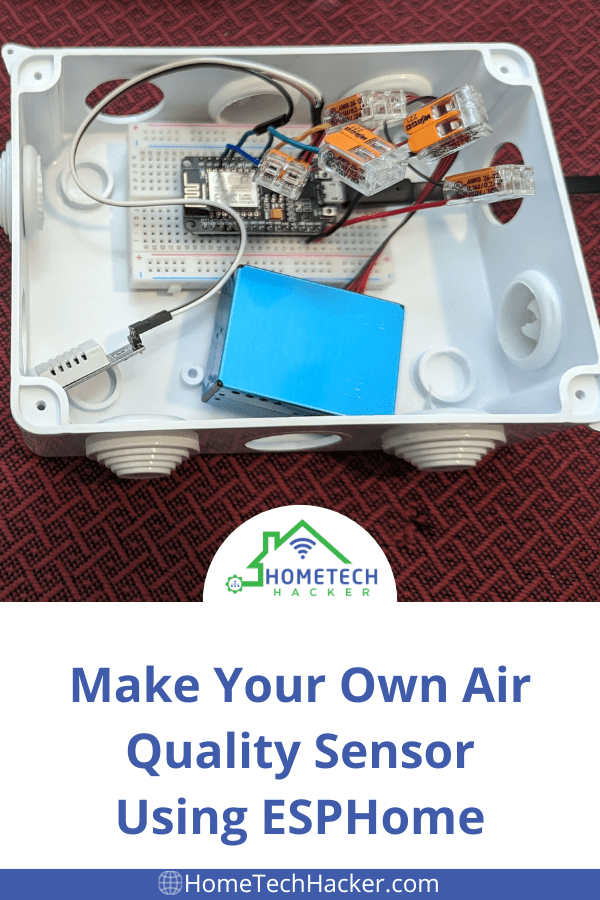
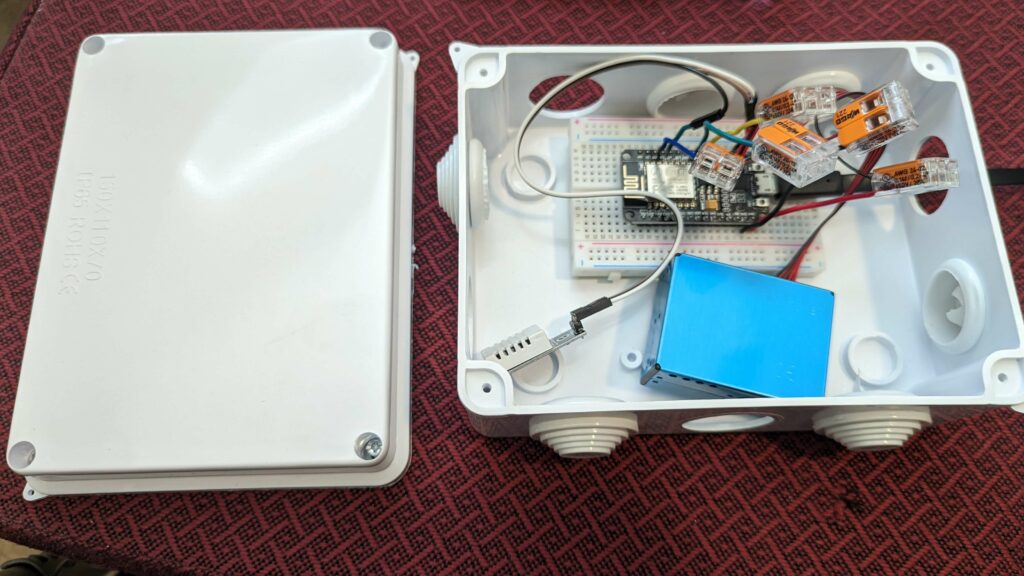
Here’s what mine looks like wired up, and then put into a project box. As I mentioned earlier, I used lever nuts instead of soldering, but I’ll probably go back and solder the connections together.

Step 3: Create the ESPHome configuration for your chip
I used the ESPHome wizard to create the initial configuration file:
esphome wizard aqs.yaml
This command asked me a few questions, including credentials to my Wi-Fi network and a password to secure ESPHome installation on the chip (this is optional, but recommended). Then it created the file aqs.yaml in the esphome directory in my filesystem.
I then modified the aqs.yaml with a configuration specific to ESPHome interacting with the air quality, temperature, and humidity sensors. I’m going to put the configuration below and then mention a couple of things about it.
esphome:
  name: airqualitysensor1

esp8266:
  board: nodemcu

# Enable logging
logger:

# Enable Home Assistant API
api:
  password: "xxxxxxxx"

ota:
  password: "xxxxxxxx"

#to secure firmware updates over OTA
ota:
  password: "xxxxxxxxx"

wifi:
  ssid: "your-ssid"
  password: "xxxxxxx"

  # Enable fallback hotspot (captive portal) in case wifi connection fails
  ap:
    ssid: "aqs1"
    password: "xxxxxxxxxxx"

captive_portal:

uart:
  tx_pin: D6
  rx_pin: D7
  baud_rate: 9600

sensor:
  - platform: pmsx003
    type: PMSX003
    pm_1_0:
      name: "Particulate Matter <1.0µm Concentration"
    pm_2_5:
      name: "Particulate Matter <2.5µm Concentration"
    pm_10_0:
      name: "Particulate Matter <10.0µm Concentration"
  - platform: dht
    pin: D4
    temperature:
      name: "AQS Meter 1 Temperature"
    humidity:
      name: "AQS Meter 1 Humidity"
    update_interval: 60s

switch:
  - platform: gpio
    pin:
      number: D3
    id: measure_aq
    name: "Start AQS Sensor 1"

interval:
  - interval: 120s
    then:
      - switch.turn_on: measure_aq
      - delay: 30s
      - switch.turn_off: measure_aq
Here are a few key points about this configuration file:
- When we add this ESPHome device to Home Assistant, it will create 5 sensors:
- A sensor for musing particulate matter less than 1.0µm
- A sensor for musing particulate matter less than 2.5µm
- A sensor for musing particulate matter less than 10.0µm
- A humidity sensor
- A temperature sensor
- It will also create a switch (viewable and controllable from Home Assistant) that controls when the sensor reads values. Instead of having the sensor constantly read values, I have it read values for 30 seconds out of every two minutes. This will extend the life of the sensor. You can set these to whatever you want. You can also manually trigger this measurement in Home Assistant using this switch. This is why we connected PSM5003 pin 3 to the NodeMCU GPIO0 (D3) pin.
- Make sure to put in your own SSID and password for Wi-Fi settings and OTA updates.
Before adding the sensor to Home Assistant, I recommend you give the sensor a static IP or use your router to give it a static lease (which is what I do). If you want to give your sensor a static IP you can modify the Wi-Fi section of your ESPHome configuration file as follows:
wifi:
  ssid: "your-ssid"
  password: "xxxxxxxx"

  # Optional manual IP. Use values that work in your home network environment
  manual_ip:
    static_ip: 192.168.0.123
    gateway: 192.168.0.1
    subnet: 255.255.255.0
Step 4: Flash the ESPHome configuration to your NodeMCU
All that’s left is to flash the configuration to the NodeMCU. You’ll need to use a USB cable to connect the NodeMCU chip to your computer to flash the ESPHome configuration the first time. After that, it should connect to your Wi-Fi and be flashable over your network. I simply used the following command to flash my chip:
esphome run aqs.yaml
Replace aqs.yaml with whatever you named your configuration file. You may need to tell it what device your chip is connected to. For me, that was /dev/ttyUSB0. Then I just waited about a minute and then I had a fully functioning air quality sensor!
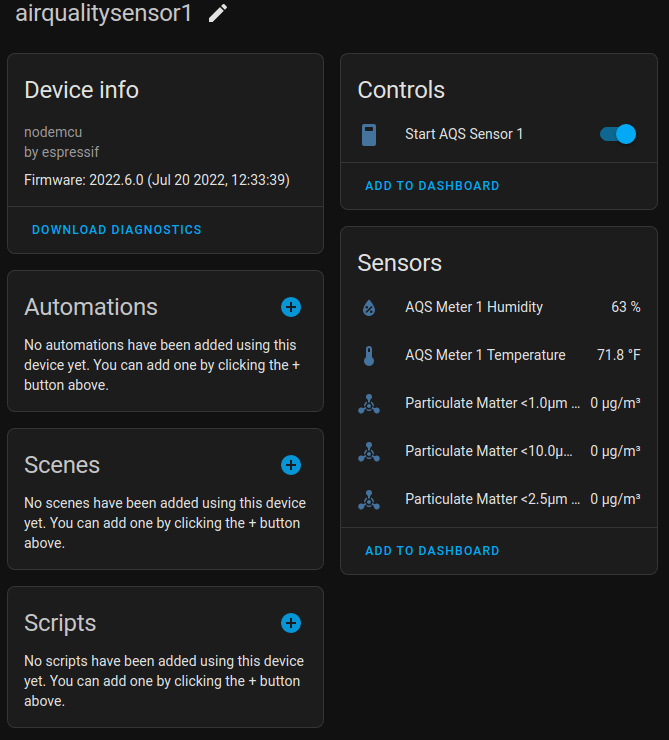
Step 5: Add the air quality sensor to Home Assistant
While the sensor is up and running head over to the Home Assistant UI. Go to Settings->Devices & Services->Integrations and select + Add Integration at the bottom right of the screen. Select the ESPHome integration. You’ll be asked to input the IP Address or hostname for the ESPHome sensor you created in the earlier steps. And, if you protected the chip with a password, you’ll also need to enter it during this setup. Home Assistant will set up the integration and you’ll have a device that looks like:
Results
I set out to test the sensor in various locations in my home. All readings were low and consistent with good air quality. I checked the temperature and humidity against known working sensors and verified my DIY sensor’s readings were accurate.
But how could I know the air quality measurements were good if they always read the same thing? Well, I put the sensor in the garage and then turned on my car (a twin-turbo V6 engine) for a minute. the sensor readings immediately spiked up to the not-so-great range (see chart below).
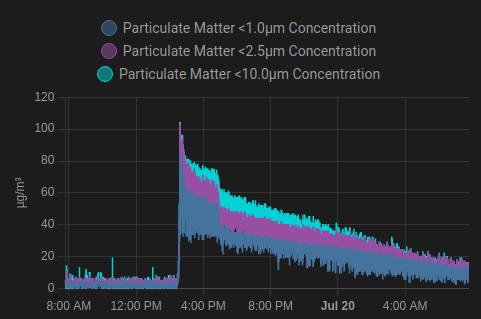
Interestingly, it took about 18 hours for the readings to go back to regular while mostly leaving the garage door closed. I did open the garage for a minute or two during this time. Can you determine about what time I did it by looking at the chart above?
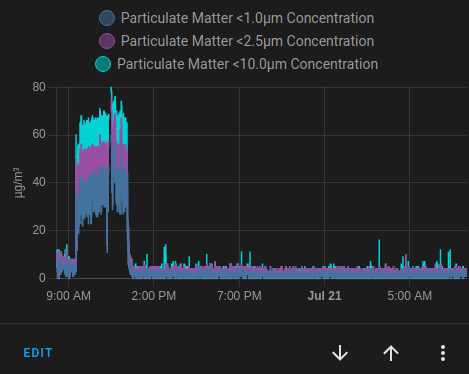
After levels went back to normal I performed a similar test. I started my car and came and went (ran some errands) a couple of times over the course of few hours, closing the garage door except for the time it took to enter and exit the garage. Then, I left the garage open. It took only about 10 minutes of an open garage for levels to get back to normal (see the chart below). Just goes to show that airflow really can help improve air quality.
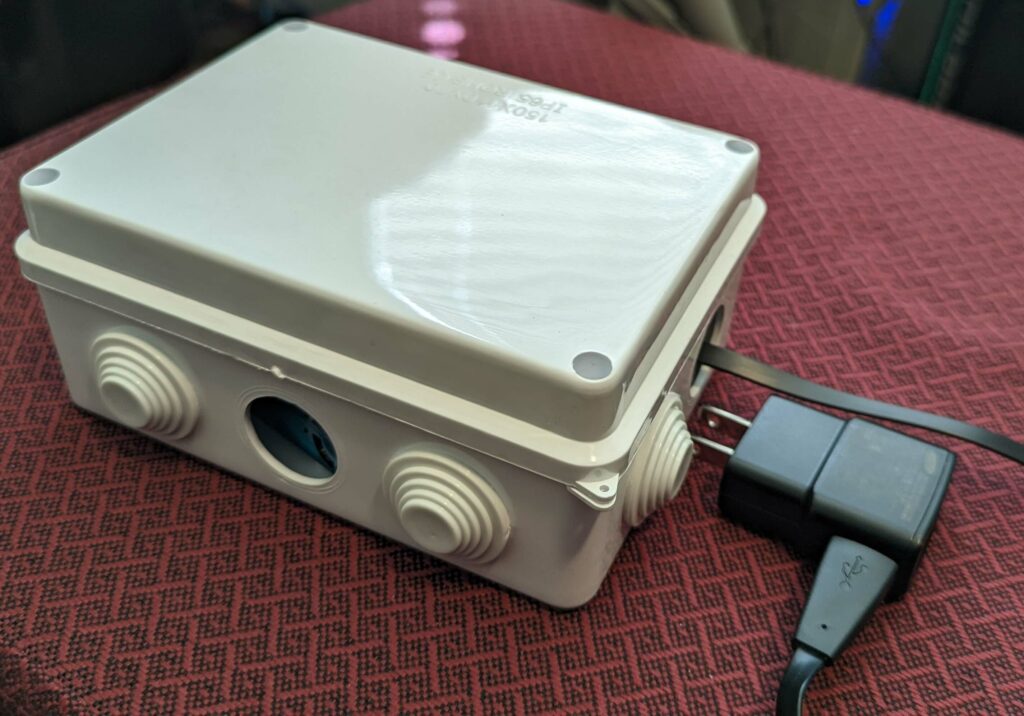
I repeated these tests after putting the sensor in the project box, just to make sure it could still get good readings. The results were the same, so this box works well.
Here’s a final picture of what it looks like inside the project box, with a few openings for air to circulate for proper readings:
Editor’s note: I’ve since improved this design with a smaller project box and also added regional air quality monitoring to Home Assistant. You can read about those improvements in this article.
Editor’s note II: I also decided to buy a smart air purifier.
For more information
Here is a listing of the places where you can get more information on ESPHome, the air quality, temperature and humidity sensors, and the sources for my learning for this project:
- Installing ESPHome Manually
- Getting Started with the ESPHome Command Line
- ESPHome PMSX003 Particulate Matter Sensor documentation
- ESPHome DHT Temperature+Humidity Sensor documentation
Final thoughts
This was another fun ESPHome project (the fingerprint scanner I built was fun too). Turns out, the air quality around my house is good. I’ll be interested to find out how it is affected when the air quality outside is bad, or the gas oven has been left on for a while. I’ve decided I’ll build a second sensor so I can have two to make measurements around the house.
Do you have an air purifier and/or an air quality sensor? Let me know if you do or if you build one using these instructions in the comments or on Twitter.


I’ve had a particulate sensor hiding in my parts box for some time. I’ll try this project soon.
Best wishes. It was a fun project and I actually used it to know when I need to close some windows around the house. Let me know how the project goes!